
Why Are My Pothos Leaves Turning Yellow?
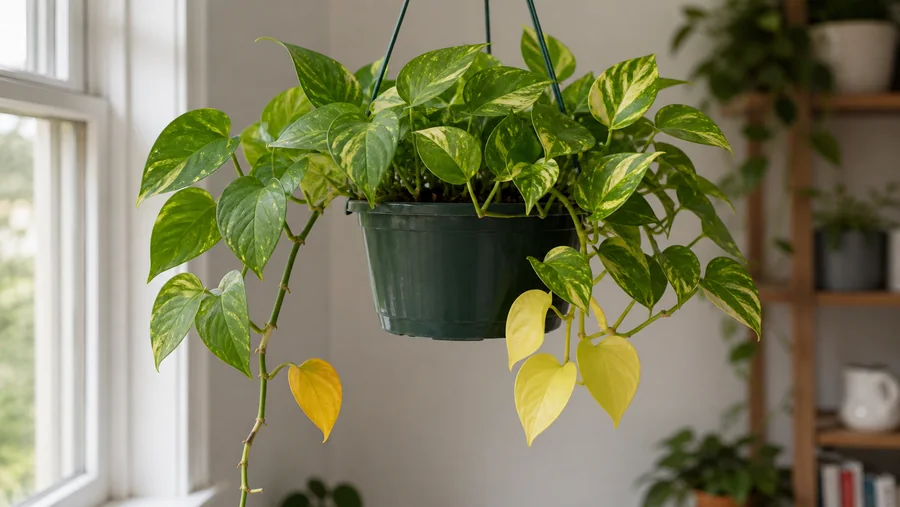
Yellow pothos leaves can reflect normal aging, root-zone stress, changing light or temperature, pests, or disease. The change in a particular leaf matters more than yellow color alone, especially on Golden or Neon pothos.
Leaf position, texture, recent care, and moisture inside the pot help select the next check. They cannot identify every cause or prove that a plant is free of disease.
Quick diagnosis
Start with the changed leaf and the root zone
One aging lower leaf on an otherwise growing vine may need observation. Several declining leaves above wet medium justify checking drainage, while a light pot with a dry root ball may need thorough rewetting. Soft or crisp tissue alone does not settle the cause.
Darkening stems, expanding lesions, or rapid decline call for separation from other plants and further assessment. A clean-looking leaf does not rule out an early root or disease problem.
Open the full diagnosisWhat You Are Seeing
A leaf’s position and history help distinguish a normal feature from a new problem. Looking along the same vine is more useful than comparing unrelated leaves with different ages or markings.
Golden pothos has irregular yellow markings, Marble Queen has white marbling, and Neon pothos can open bright gold and become pale green with age. Those patterns differ from a previously sound leaf turning yellow and losing firmness.
Even within one cultivar, the amount of variegation varies. Firm patterned tissue does not by itself certify plant health, and a less patterned leaf does not prove a deficiency.
Pothos grows well in an airy mix that can dry slightly between thorough waterings. Both a dry root ball and injured roots in wet medium can leave the foliage short of water, which is why yellowing alone cannot choose the watering treatment.
Recent moves, cold transport, fertilizer, and sprays add useful context. Rapid decline, soft stems, or spreading dark tissue deserves more urgent attention than an isolated old leaf fading while the rest of the vine grows.
Common Causes
01 Compare leaf age
Normal cultivar color or one aging oldest leaf
Cultivar color and age can explain some yellow foliage. Neon’s bright new leaves may mature to pale green, while Golden and Marble Queen have differently colored patches. Older leaves can also yellow and drop as a vine grows.
An isolated old leaf fading beside firm, growing foliage is less concerning than continuing leaf loss. Observing that pattern is reasonable, but one unchanged week cannot exclude every developing problem.
How to identify it
- The color fits the identified cultivar and the leaf’s age.
- An older leaf changes while the growing tip and surrounding foliage remain sound.
- The root zone dries and wets normally, without soft stems or spreading damage.
What to do
- Observe the same vine for continuing changes before adding water, fertilizer, or spray.
- Keep sound green tissue when practical. Remove a fully deteriorated leaf with clean tools without tearing the stem.
- Reassess if more leaves decline, growth weakens, or root and stem symptoms appear.
02 Check wet roots
Overwatering, trapped runoff, or root rot
Roots need oxygen as well as moisture. Prolonged saturation can impair roots and favor some pathogens, leaving foliage wilted or yellow even though the pot contains water. Wet-root stress is not automatically a confirmed infection.
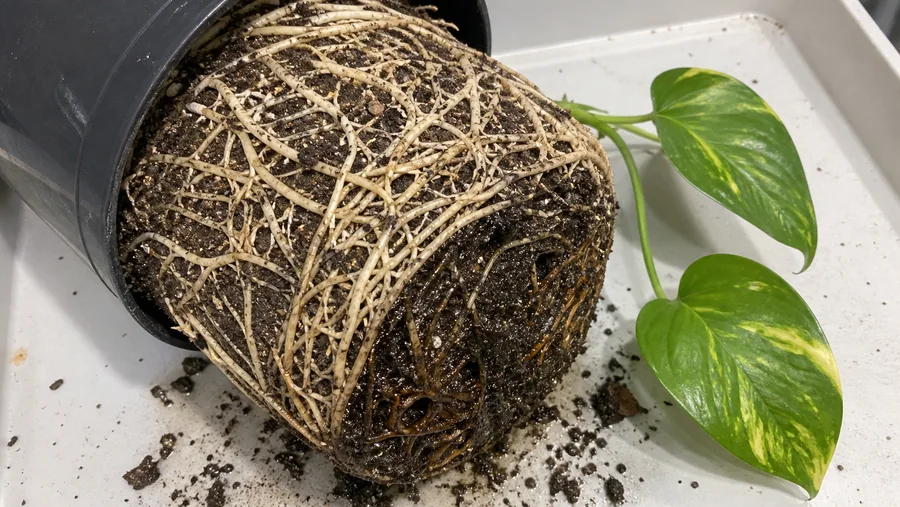
A heavy pot, persistently wet center, or runoff inside a cachepot supports checking drainage first. Continuing decline, odor, or a soft stem base can justify gently examining the root ball. Root texture and deterioration matter more than color alone, since medium can stain sound roots.
How to identify it
- Several leaves decline while the center of the root ball remains wet.
- Runoff collects around the growing pot or drainage is obstructed.
- Roots are soft, deteriorating, or losing their outer tissue. Brown color alone is insufficient.
What to do
- Empty trapped runoff and restore open drainage. Match further watering to the root ball instead of the old schedule.
- If decline persists, inspect the roots gently and preserve firm tissue. Clean tools help avoid carrying contamination between plants.
- Where a plant remains salvageable, remove clearly decayed material and use fresh airy mix in a container suited to the remaining roots, with open drainage holes.
- Seek diagnostic advice for spreading lesions, dark stems, or rapid collapse. Repotting cannot guarantee recovery from an infection.
03 Check dry medium
Underwatering or a root ball that sheds water
A dry root ball can leave pothos leaves wilted, yellow, or eventually crisp. Peat-based mix that dries hard may shrink from the pot wall, allowing water to run around it without wetting the center.
Pot weight and moisture below the surface help test that explanation. Crisp margins can also follow heat, salts, or other injury, so they are a clue to compare with the pot, not a separate diagnosis.
How to identify it
- The pot is light compared with its weight after thorough watering.
- The center is dry, or the medium has shrunk away from the container.
- Water escapes at the sides while the center remains dry.
- Foliage may regain firmness after rewetting, but that response does not exclude a second problem.
What to do
- Wet the root ball slowly and evenly, then allow excess water to drain.
- For shrunken medium, a brief soak from below may help. Stop once moisture reaches the root ball and drain fully rather than leaving the pot in water.
- Confirm moisture inside the pot instead of assuming runoff proves absorption.
- Adjust the next watering to the new drying pattern.
04 Review placement
Insufficient usable light
Low light can slow pothos growth and reduce variegation. Longer gaps and smaller new leaves may develop, while lower water use can leave the medium wet for longer. The light change and root conditions can therefore contribute together.
A greener mature Neon leaf is not evidence of insufficient light. The useful comparison includes growth made before and after a move, light reaching the top of the pot, and how the root ball dries.
How to identify it
- New leaves are smaller and spaced farther apart along the vine.
- Variegation becomes weaker without dry bleached patches.
- Yellowing develops slowly on older leaves far from the growing tip.
- The pot dries unusually slowly because growth and water use are low.
What to do
- Improve access to bright indirect light without abruptly exposing shade-grown foliage to strong sun.
- Allow the root ball’s moisture to set watering while the plant adjusts.
- Judge the change by sustained growth and the absence of new injury, rather than requiring old leaves to regain their earlier color.
05 Review recent exposure
Direct sun or abrupt high heat
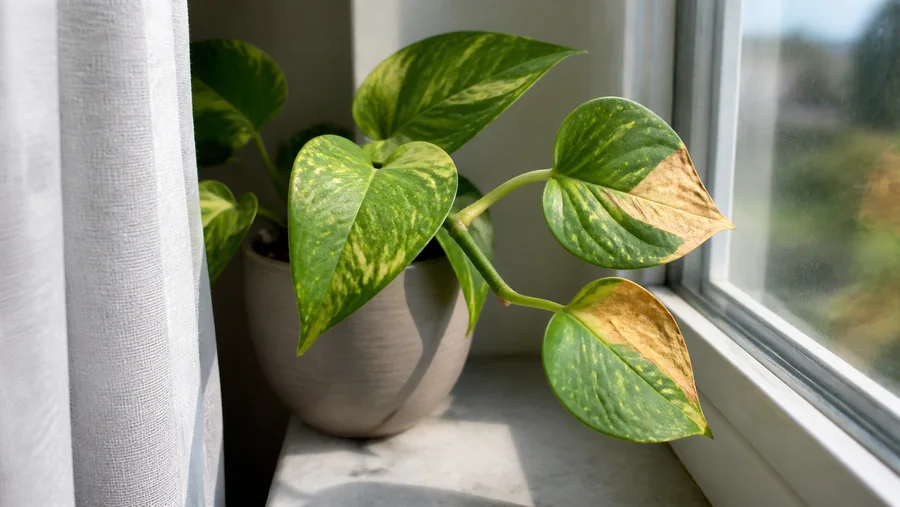
Excessive light or heat can produce pale, dry patches, particularly on variegated tissue. A sudden move toward hot glass or outdoors can increase exposure before the plant has adjusted.
The damaged side and timing support an exposure check, but direction does not exclude root stress or chemical injury. Several causes can coexist. Reviewing moisture, sprays, and recent placement prevents every window-side mark from being labeled sunburn.
How to identify it
- Pale dry patches occur mainly on leaves facing a strong south or west window.
- Shaded leaves on the same vine remain normally colored.
- Damage follows a move outdoors, closer to glass, or into stronger spring sunlight, and the marked tissue is dry rather than water-soaked.
What to do
- Reduce harsh direct exposure with a suitable position or curtain while retaining useful indirect light.
- Make later increases gradually, watching for new damage rather than following a universal acclimation schedule.
- Retain healthy portions of leaves where practical. Damaged brown tissue will not recover its original appearance.
06 Review cold exposure
Cold glass, drafts, or abrupt temperature change
Cold transport, drafts, or contact with cold glass can injure pothos foliage. Yellowing, wilt, and later brown patches may follow exposure, but these symptoms overlap with root and other environmental problems.
Recent history helps identify a plausible event. Moving away from the cold source prevents continuing exposure, while the roots still need moisture assessed on their own. Extra water does not repair chilled leaf tissue.
How to identify it
- Damage follows cold transport or a marked temperature change.
- Affected foliage was near glass, a draft, or an exterior door.
- Moisture, roots, and other potential causes still need consideration.
What to do
- Return the plant to stable indoor warmth, away from cold glass and heater blasts.
- Water according to moisture in the pot, which may now dry more slowly.
- Monitor further damage. Expanding soft tissue deserves reassessment rather than an assumption that the cold event explains everything.
07 Review feeding and sprays
Fertilizer salts or chemical injury
Soluble salts from fertilizer or irrigation water can accumulate in potting medium and injure roots. A crust and yellowing or brown margins make feeding and water history worth reviewing, but neither identifies the amount of salt or excludes root decay.
Pothos is also sensitive to some chemical sprays. Damage after an application calls for checking the product and its directions rather than adding another treatment. A leaf pattern cannot name a nutrient deficiency or a spray ingredient.
How to identify it
- A fertilizer or spray application preceded new damage.
- Deposits appear on the medium or container, alongside declining foliage.
- Root condition, drainage, and watering history may reveal additional stress.
What to do
- Pause unnecessary feeding or sprays while the cause is assessed.
- For an intact, freely draining root ball with suspected salt accumulation, thorough watering and drainage can leach salts. Do not repeatedly saturate already failing roots.
- Base future fertilizer use on active growth and the product label. Degraded medium or root injury may require a different response.
08 Check growth and roots
Nutrient shortage or severe root crowding
A long-established Pothos in exhausted mix can become pale and slow, while a dense mass of firm roots may shed water or leave little medium to hold it. This decline is gradual and usually affects growth quality before it produces a sudden wave of soft yellow leaves.
Check roots, light, moisture, and salt history before naming a deficiency from color. Firm roots circling densely with little mix, water that bypasses the center, and consistently smaller new leaves support crowding.
A few roots visible at one drainage hole do not prove the plant needs a larger pot. Slide the root ball out only when growth, drying behavior, and pot history support the same conclusion.
How to identify it
- New growth is consistently small and pale while the vine remains firm.
- The plant has stayed in the same depleted mix for years without feeding or renewal.
- Firm roots form a dense circle with little mix left inside the pot.
- Moisture, light, pest signs, and feeding history have been reviewed alongside the roots.
What to do
- Repot a crowded root system into a container that accommodates the sound roots with appropriate fresh medium.
- Loosen the outside of a dense healthy root ball without removing firm roots merely for appearance.
- Choose an indoor plant fertilizer only after the plant resumes active growth and follow the product label.
- Use the color and size of future leaves to judge the correction rather than increasing fertilizer quickly.
09 Look for pest evidence
Mealybugs, scale, or spider mites
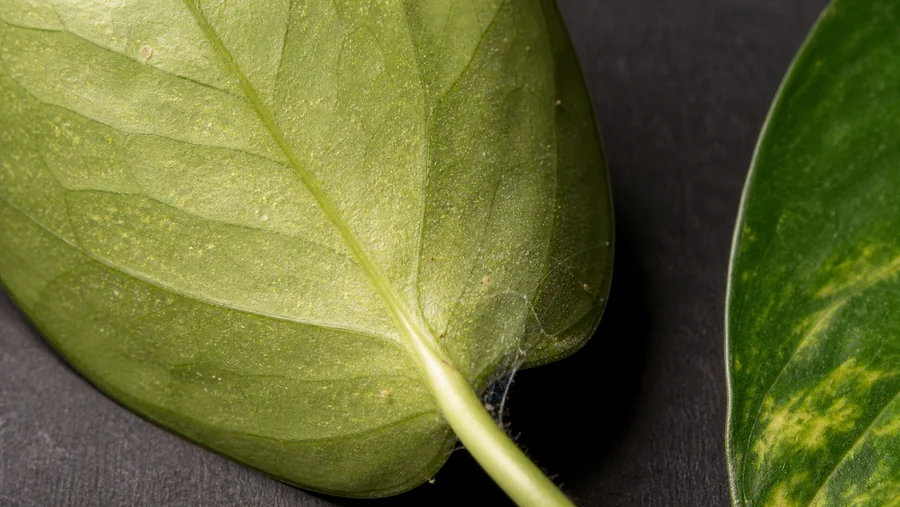
Mealybugs may leave cottony wax around joints, scale may appear as attached bumps, and spider mites can cause fine stippling and webbing. These are reasons for a closer pest inspection rather than proof from a yellow leaf.
Both leaf surfaces, petioles, and stems matter. Some pests are small or concealed, so clean-looking foliage does not rule them out. Sticky residue can have other causes, and some scale insects do not produce honeydew.
How to identify it
- Fine yellow stippling appears before the whole blade loses color.
- White cottony material collects where the petiole meets the vine.
- Brown or tan bumps remain attached to stems and leaf surfaces.
- Webbing, sticky residue, sooty growth, or moving insects provide direct evidence.
What to do
- Isolate the plant and inspect nearby houseplants before treatment.
- Rinse and wipe the leaves to remove dust, webbing, honeydew, and loose pests.
- Use spider-mite treatment when inspection supports mites. Any product must permit the indoor site, plant, and identified target.
- Repeat inspection and any label-directed treatment because protected insects and eggs can survive the first pass.
10 Escalate suspicious decline
Disease with black veins, dark lesions, or fungal growth
Disease cannot be excluded because a leaf is simply yellow or the crown looks clean. UF/IFAS describes pothos diseases in commercial greenhouses, where infected cuttings and shared water can spread problems. That setting does not establish how frequently each disease occurs in a home.
Dark veins or stems, expanding lesions, collapse, or fungal growth justify separation and diagnostic advice. Similar-looking injury can have noninfectious causes. A home cut-stem test is not necessary to choose the first precaution.
How to identify it
- Rapid decline, spreading dark tissue, or expanding lesions.
- Unusual growth on stems or medium, assessed with the whole plant and its care history.
What to do
- Separate the affected plant and prevent runoff or splashes from reaching others.
- Consult an Extension plant diagnostic service about sampling a valuable or ambiguous plant before cutting it for a test.
- Bag and discard a severely deteriorated plant when salvage is unsuitable, and clean tools and the work area.
- Do not select a fungicide or bactericide from leaf color alone.
Recovery Shows in Continuing Growth
A dry brown patch will not become healthy leaf tissue again, and an old leaf undergoing senescence will continue to decline. Retaining firm green portions is reasonable while the cause is assessed, unless disease management requires their removal.
The useful trend is whether further deterioration slows and sound growth continues. A newly opened leaf is encouraging, but it does not certify the entire root system or prove the first diagnosis.
Several simultaneous treatments can injure a plant and obscure what helped. Correcting the identified exposure or root-zone problem first keeps the response proportionate, while rapid decline or suspected infection may require prompt additional action.
What Each Clue Can and Cannot Tell You
The observations below narrow the next check. They overlap, so a match in one row does not clear the other possibilities.
- Leaf position and age
- An isolated old leaf may be senescing. Repeated loss or weakening growth increases concern.
- Soft or crisp tissue
- Texture describes damage. Root moisture, heat, salts, and disease may produce overlapping results.
- Pot condition
- Center moisture, drainage, root texture, and runoff help distinguish a dry root zone from saturation or impaired uptake.
- Surface and recent exposure
- Pest signs, lesions, sprays, cold, and strong sun direct further investigation without confirming a single cause.
When a Rescue Cutting Is Worth Considering
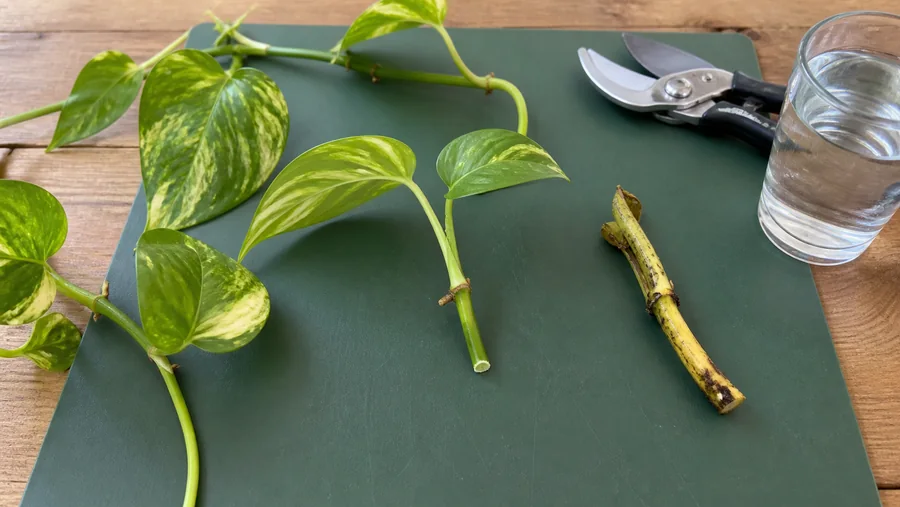
A cutting can be an option when root damage has left too little sound tissue to support the plant. It is unnecessary for an isolated aging leaf, and it is a poor way to preserve a plant with suspected spreading infection.
The stem-cutting method requires main-stem tissue with a node and a viable growing point. A detached leaf stalk is not equivalent. A root nub helps locate a node but is not a compulsory visible feature or proof of health.
- Select firm material without visible pests or decay, and use clean tools. If infection is suspected, seek advice or discard the plant instead of distributing cuttings.
- Keep a suitable node on the cutting and foliage above the rooting water or medium.
- Root separately in fresh water or suitable airy medium under warm, bright indirect light.
- Judge readiness by actual root development. Discard material that softens or deteriorates rather than repeatedly recutting it.
Commercial propagation timings do not predict the recovery of a stressed household vine. A new shoot can begin before enough roots have formed to support transfer to a pot.
Recovery Plan
Correct the supported cause
Drain trapped runoff, rewet a genuinely dry root ball, or remove the identified exposure. Separation is appropriate when pest or disease evidence creates a spread risk.
Track new damage and moisture
Existing damaged leaves can continue to decline. The useful record follows whether additional leaves change, how the pot dries, and whether stems remain sound. No fixed day proves recovery.
Assess roots before rebuilding density
Sound new growth and a functioning root zone support later pruning or repotting decisions. Persistent decline warrants a fresh assessment or diagnostic help rather than more fertilizer.
Bright indirect light, an airy root zone, and open drainage reduce common care problems. Watering follows moisture in the pot, while runoff is removed and feeding follows growth and the product label.
Routine inspection includes leaf undersides and stem joints. A newly acquired plant with pests or unexplained decline needs separation while its condition is assessed. Pothos sap can irritate skin, so gloves are useful for pruning and handling damaged material.
Sources
- University of Wisconsin Horticulture: Pothos, Epipremnum aureum
- ENH894/EP151: Cultural Guidelines for Commercial Production of Interiorscape Epipremnum
- PP340/PP340: Pothos (Epipremnum aureum) Diseases: Identification and Control in Commercial Greenhouse Production
- University of Minnesota Extension, Managing Insects on Indoor Plants
- University of Georgia Extension, Growing Indoor Plants with Success, Bulletin 1318
- Iowa State University Extension, How to Propagate Houseplants by Stem Tip Cuttings
- Royal Horticultural Society, Monsteras and More: At Home with Arums
- NC State Extension, Epipremnum aureum Plant Details