
Why Are My Nerve Plant Leaves Brown at the Edges?
Brown edges on Nerve Plant leaves are damaged tissue that will not turn green again. Dry air, interrupted water uptake, accumulated salts, intense light and pests can produce overlapping symptoms.
The useful distinction comes from moisture and exposure history together with root and pest observations, rather than the brown margin alone.
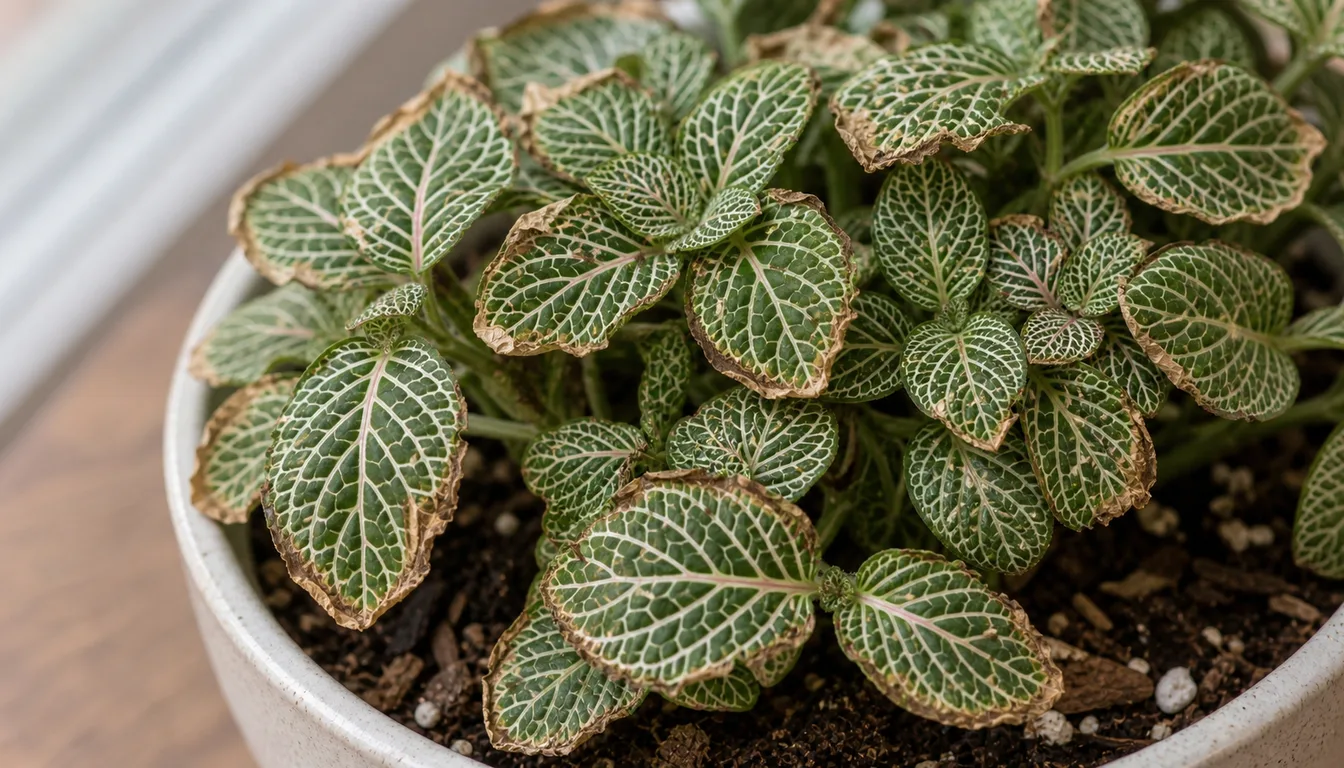
Quick diagnosis
Start with air exposure and root moisture
Crisp margins do not identify a single cause. A light pot with a dry center supports a drying episode. A persistently wet pot warrants a drainage check, while mineral crust and recent feeding raise the possibility of salt accumulation. A room humidity reading helps test a dry-air explanation.
Open the full diagnosisWhat You Are Seeing
A dead brown margin records earlier damage rather than reporting the room's condition at this moment. The affected leaves and the timing of heat, watering or feeding help reconstruct what happened.
This problem is different from a whole Fittonia collapsing while its leaves remain flexible. Rapid loss of turgor belongs to the drooping diagnosis, while this page addresses margins that have become permanently dry, soft, spotted, or stippled.
Avoid responding with more water until you lift the pot and touch the mix. Dry air and a dry root ball can produce similar crisp edges, but saturated damaged roots can also fail to deliver water while the soil remains wet.
New margins without injury are encouraging, but improvement does not prove which single cause was responsible. Existing dead rims stay brown after conditions improve.
Common Causes
01 Check dry rooms
Low indoor humidity
Fittonia has thin leaves that lose water quickly in dry indoor air. Heating vents, radiators, air conditioners, and exposed shelves can dry the outermost tissue across many leaves even while the potting mix remains appropriately moist.
How to identify it
- Many leaves develop narrow dry margins at about the same time.
- The patterned centers remain firm and colorful at first.
- The pot does not become unusually light before damage appears.
- Crisping worsens near moving heated or cooled air.
What to do
- Move the plant away from vents, radiators, and hot glass.
- Use a room humidifier when the growing area stays persistently dry.
- Group compatible humidity-loving plants without crowding their leaves.
- Keep airflow gentle. Repeated misting does not provide sustained room humidity.
- Judge improvement by clean margins on leaves formed after the move.
02 Check drying history
A root ball that dried too far
Fittonia has shallow roots and loses turgor quickly when its mix dries. Repeated severe drying can kill the leaf edge even when the plant stands up again after watering, leaving a permanent rim behind.
How to identify it
- The pot felt very light before the edge appeared.
- Mix pulled away from the pot wall or resisted the first watering.
- The plant drooped during the same dry episode and later recovered.
- Older exposed leaves show more marginal damage than new growth.
What to do
- Rewet a shrunken root ball slowly until the center accepts water.
- Let excess water leave the drain holes and empty the saucer.
- Check pot weight and the upper mix before the next watering.
- Use a mix that retains even moisture while still draining freely.
- Recheck sooner during hot, bright or heated indoor conditions, and water according to the root-zone moisture.
03 Check feeding and crust
Soluble salt buildup
Fertilizer and dissolved minerals remain in potting mix after water evaporates.
Concentrated salts make water harder for roots to absorb, damage fine root tips, and produce brown leaf tips or margins even when the pot is watered regularly.
How to identify it
- A white or tan crust appears on the soil, pot rim, or drainage hole.
- Browning followed frequent fertilizer or repeated partial watering.
- Growth slows and lower leaves may drop along with tip burn.
- Root-tip damage may accompany the leaf injury, but its appearance is not specific to salts.
What to do
- Pause fertilizer while the plant is producing damaged margins.
- Remove a heavy surface crust without disturbing shallow Fittonia roots.
- Leach only through a pot with open drainage, then discard all runoff.
- Use lower-salt water if buildup returns despite proper drainage.
- Replace exhausted compacted mix when water cannot pass through evenly.
04 Exposure dependent
Direct-sun scorch
Fittonia prefers bright to medium filtered light. Strong direct rays through glass can bleach exposed tissue before it turns tan and crisp. Damage concentrated on the exposed side supports an exposure check, but its distribution is not a unique test for sun injury.
How to identify it
- Damage faces the brightest window or grow light.
- Exposed tissue looks pale or bleached before browning.
- The boundary is sharp where another leaf or frame cast shade.
- Protected leaves at the same watering level remain patterned and green.
What to do
- Move the pot beyond the harsh direct beam.
- Filter strong window light with a sheer curtain.
- Increase exposure gradually after any move from a dim location.
- Keep a scorched leaf if most of its center remains green and firm.
05 Check persistent wetness
Saturated mix and root decline
Constant saturation can limit root oxygen and favor root disease. Damaged roots may fail to supply water even while the mix stays wet. Yellowing, persistent limpness or stem-base decline strengthen concern, but crisp margins do not exclude a root problem.
How to identify it
- Margins may be dry or soft. Their texture alone cannot rule root decline in or out.
- Leaves yellow or remain limp while the pot feels heavy.
- The mix smells sour or stays wet for many days.
- Soft, collapsing roots or outer tissue that slips away warrant concern. Dark color alone is insufficient.
What to do
- Empty standing water and confirm that drain holes are open.
- Allow the active root zone to approach lightly moist before watering again.
- Inspect roots only when wet-pot and plant-decline evidence agree.
- Remove clearly collapsed tissue with a clean tool, preserving sound roots. Extensive decay may require diagnostic help or disposal.
- Do not compensate for damaged roots with constant surface misting.
06 Check warm dry rooms
Spider mites
Spider mites damage leaf cells, leaving pale stippling that can develop into bronzing. Fine webbing and the mites themselves provide stronger evidence than a brown edge, and moisture stress may be present at the same time.
How to identify it
- Many tiny pale dots appear before the margin turns bronze.
- Fine webbing spans vein junctions or leaf-to-stem contact points.
- Tiny moving mites or eggs are visible with magnification.
- Damage is worse on dusty leaves in a warm dry location.
What to do
- Isolate the plant and inspect neighboring foliage.
- Rinse or wipe both surfaces gently without leaving the plant wet overnight.
- Use an indoor-plant product labeled for spider mites and repeat only as directed.
- Continue inspections at the treatment label interval and watch for renewed activity as well as new leaf damage.
07 Pattern dependent
A leaf spot reaching the margin
Some fungal or bacterial leaf spots begin as separate lesions that later reach the margin. Similar-looking spots can also have noninfectious causes, so shape or a yellow halo alone cannot identify a pathogen.
How to identify it
- Separate round, angular, or water-soaked spots appear inside the blade.
- A yellow halo or wet margin surrounds a fresh lesion.
- New lesions form on leaves that touch wet foliage.
- Damage expands from isolated points rather than evenly around the leaf.
What to do
- Keep foliage dry and separate the plant while lesions are expanding.
- Remove a heavily affected leaf with a disinfected tool.
- Increase spacing without exposing the plant to a drying draft.
- Seek diagnosis before selecting a fungicide or bactericide.
Why Do Nerve Plant Leaf Edges Turn Brown First?
Leaf-edge injury can develop when water loss exceeds replacement or roots cannot take up enough water. Several problems converge on this same outcome, which is why the margin alone cannot distinguish them.
Room humidity and root moisture provide different evidence. Dry air may affect many leaves even when watering is steady, while a drying episode may leave a light pot, shrunken mix and an earlier droop. These conditions can occur together.
Salt accumulation also interrupts water uptake. The pot can contain moisture, yet concentrated dissolved salts make that water harder to absorb and can damage root tips. A visible crust prompts investigation but does not measure the concentration around the roots.
Soft tissue, discrete spots or stippling add other possibilities. They justify inspection of roots or pests and sometimes professional disease diagnosis, rather than another untested humidity adjustment.
Is Dry Air or Dry Soil Browning the Leaf Edges?
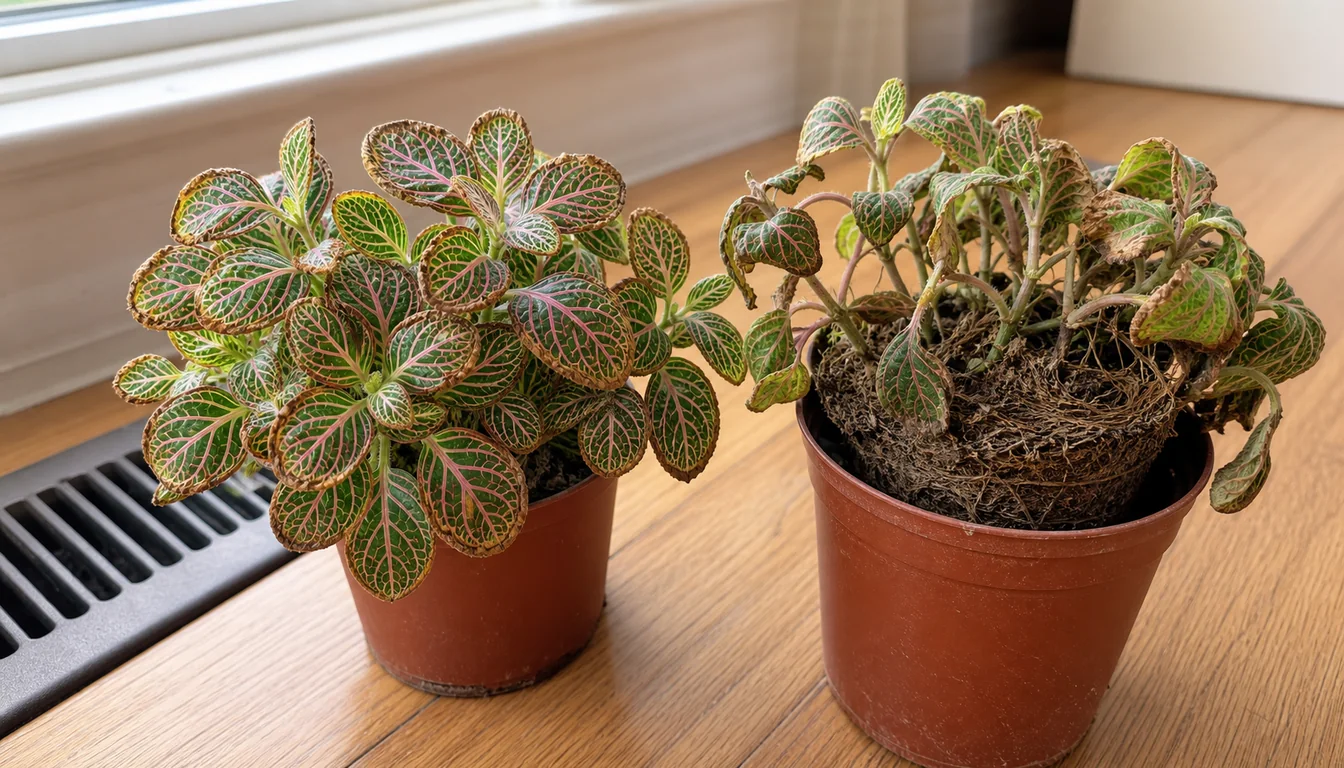
The pattern helps decide what to inspect, but it is not a diagnosis. Damage following a limp, light-pot episode supports a drying history. Repeated marginal injury near a vent warrants a humidity and airflow check even when the mix stays moist.
Lift the pot at the same time for several days and feel the upper mix. Pot weight gives a better record than a dry-looking surface, especially in a small Fittonia container with shallow roots.
If the root ball dried and shrank, apply water slowly in more than one pass so the center rewets instead of shedding water down the gap.
When moisture has stayed suitable, a room humidity reading and the position of vents can help assess the air around the leaves. Salt deposits, direct sun and pests still remain possible explanations.
Do not chase a universal humidity number. The useful target is a location where new margins remain supple without the mix staying saturated or the foliage remaining wet.
Dry room air
- Many leaves affected
- Mix stays evenly moist
- Worse near vents
Dry root ball
- Pot became very light
- Mix shrank from wall
- Droop occurred first
Signs to follow
- Stable pot moisture
- No new crisp margins
- Firm patterned centers
Can Tap Water or Fertilizer Burn Nerve Plant Leaves?
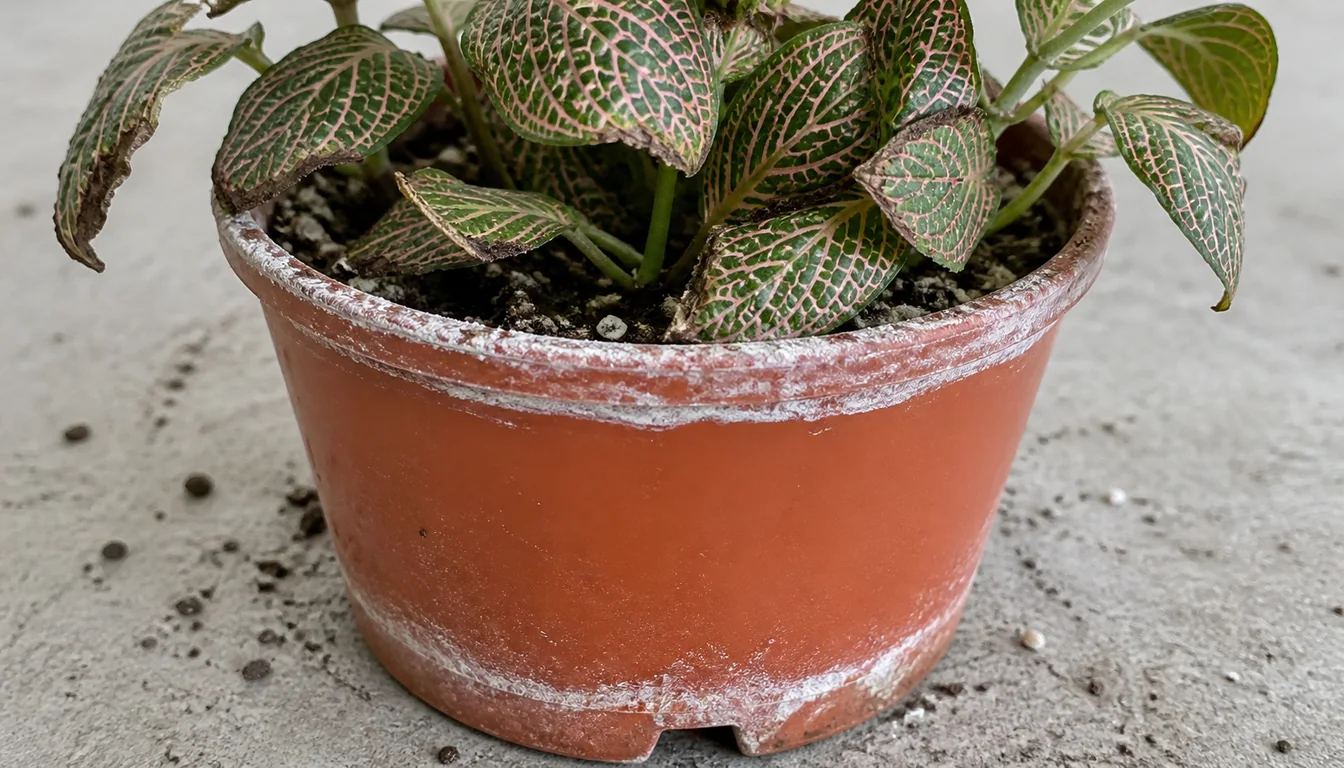
A hard pale deposit on the soil, rim or drain opening supports mineral accumulation. That is more useful evidence than assuming all tap water is harmful, but the deposit does not identify its composition or establish an injurious dose. Feeding history and, when problems persist, water or potting-medium testing can clarify the source.
Review how fertilizer and water entered and left the pot. Frequent small doses add minerals while little drainage removes them, and a saucer that reabsorbs runoff returns the dissolved salts to the mix.
Leach only when the container drains freely and the roots are not already rotting. Water through the mix, allow it to drain completely, repeat after several minutes, and discard the runoff instead of letting the pot stand in it.
When compacted mix will not drain evenly, replace it rather than forcing a large volume of water through suffocating roots. Resume light fertilizer only after new growth opens cleanly.
- Look for crust at the soil line, rim, and drain hole.
- Review recent fertilizer strength and watering volume.
- Confirm clear drainage before leaching the mix.
- Track whether new margins stay clean after salts are reduced.
When Do Brown Edges Point to Root Rot or Mites?
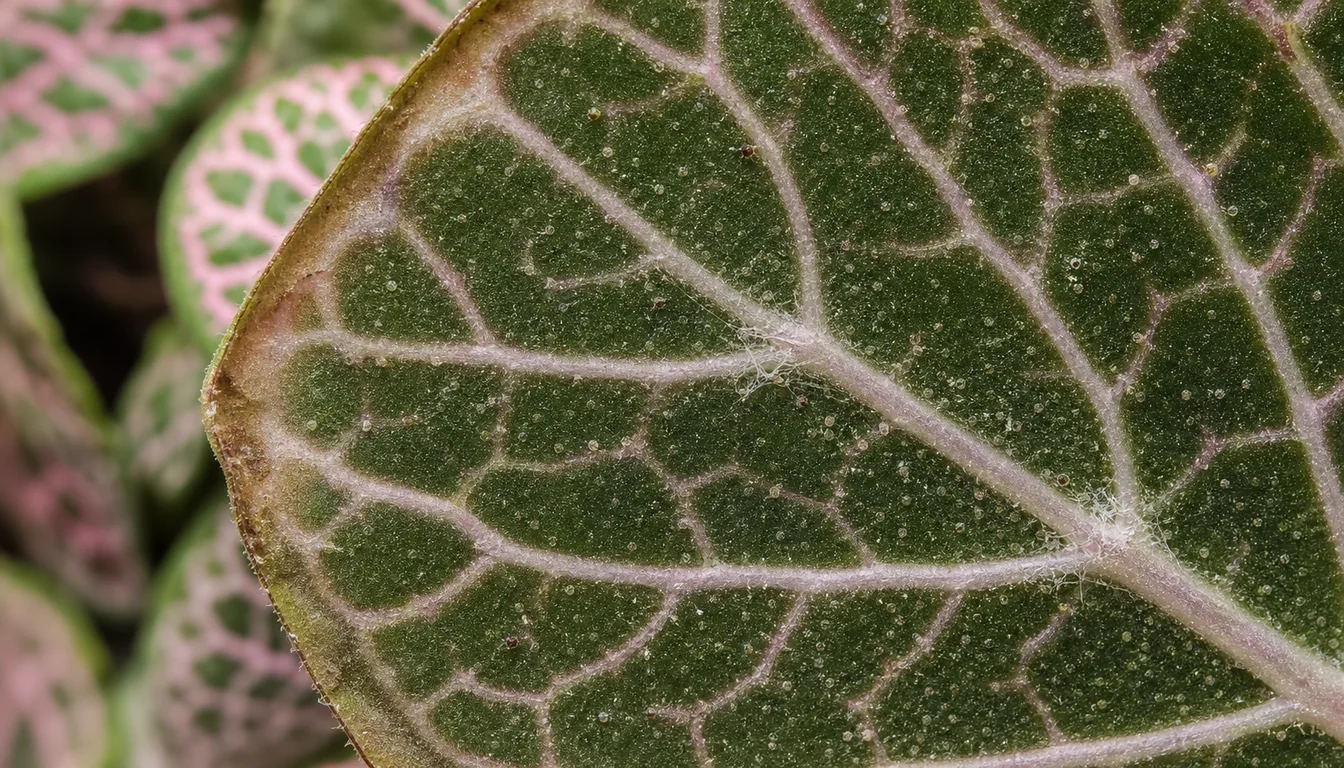
Gentle observation preserves useful evidence. Texture and the location of new injury matter more than squeezing a live edge or repeatedly disturbing the crown.
Persistent wetness with declining foliage directs attention to roots, while pale stippling and webbing warrant a close pest inspection. Either can occur alongside an earlier drying episode.
Use a hand lens on the underside and along veins.
The mites themselves, identified with magnification, support treatment for spider mites. Expanding spots or water-soaked lesions require a different assessment. Isolation and dry foliage can limit spread while the cause is investigated.
Open the pot only when yellowing, persistent limpness, sour odor, or prolonged wetness supports root decline. Fittonia roots are shallow and easy to damage during an unnecessary inspection.
A supported correction is easier to assess when the rest of the routine stays steady. Ongoing decline or unclear root and leaf lesions may need a local Extension office or plant diagnostic service before chemical treatment.
Should You Trim Brown Edges Off a Nerve Plant?
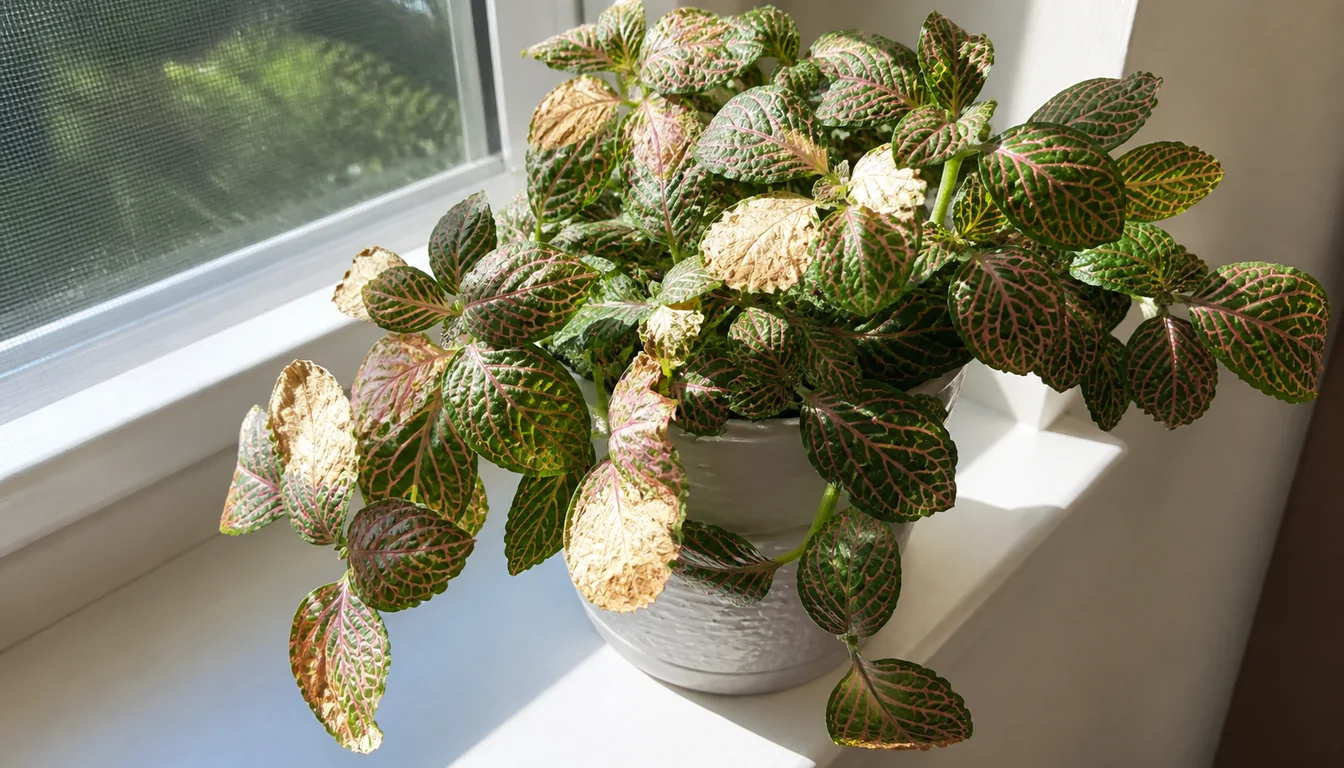
Trimming is optional once a dry margin is stable. Cutting during active injury removes useful landmarks and can make it harder to follow whether damage is spreading.
For appearance, follow the natural leaf outline with clean fine scissors and leave a narrow brown line. Cutting into green tissue creates a fresh wound that can dry into another visible rim.
Remove a whole leaf only when it is mostly dead, has an expanding suspected lesion, or blocks inspection of the crown. A partly green stable leaf still contributes energy to this small plant.
Photos of developing leaves and the old injury boundary help track change. New supple margins are encouraging, while spreading damage warrants another look at the recorded conditions.
Recovery Plan
Stop the repeated stress
Move the plant from harsh airflow or sun, check pot weight and drainage, and isolate it only if mites or expanding lesions are plausible.
Watch the boundary
Existing edges remain brown. Progress means the margin stops advancing and the patterned center stays firm without another severe dry or wet swing.
Judge new margins
Clean supple edges support improvement without repairing the older damage. Repeated crisping calls for a review of air, moisture, salts and exposure, while stippling or spreading lesions need their own assessment.
Trim for appearance
Shape stable dry margins if desired, retain useful green tissue, and resume light feeding only after the root system and new leaves are functioning normally.
Prevent Fittonia brown edges with filtered light, gentle airflow, a freely draining pot, steady root-zone moisture, restrained fertilizer, and periodic checks for salt crust and spider mites.
Sources
- Fittonia albivenis, NC State Extension Plant Toolbox
- Watering Indoor Plants, University of Maryland Extension
- Leach Your Houseplants to Avoid Salt Problems, University of California Cooperative Extension
- Why Does My Houseplant Have Brown Leaf Tips and Edges, Iowa State University Extension
- Managing Houseplant Pests, Colorado State University Extension
- University of Maryland Extension - Diagnose Indoor Plant Problems