
Why Wandering Jew Leaves Fade and Which Light Change Helps
Faded Tradescantia zebrina leaves usually point to the light at the newest shoot. Smooth green new leaves with weak silver bands need brighter filtered light, while pale patches and dry edges on the window side need protection from direct sun, and roots and leaf surfaces need checking before any fertilizer change because wet roots and spider mites can also drain color.
Start diagnosis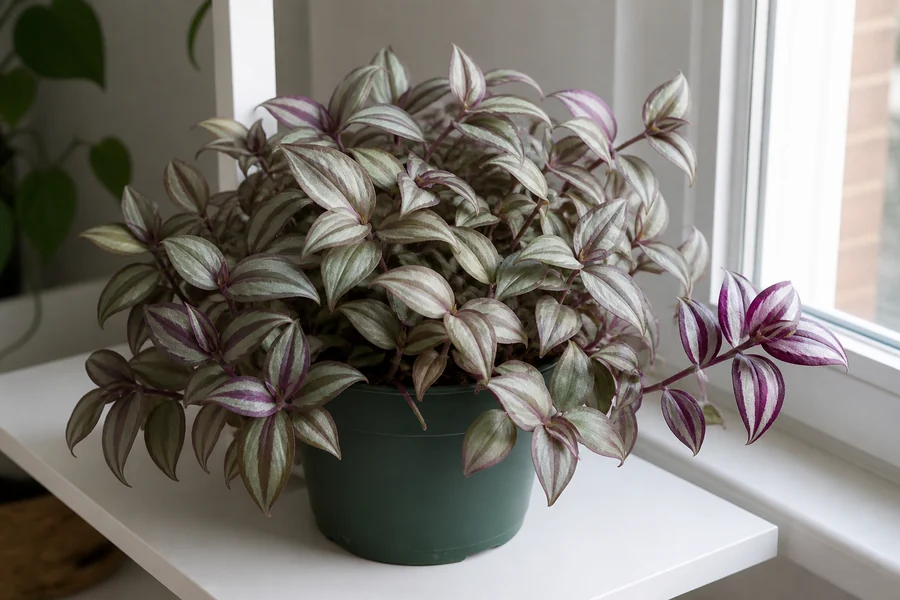
What You Are Seeing
Healthy Tradescantia zebrina has two broad silver bands on the upper surface, green-to-purple tissue between them, and a purple underside. Cultivar and leaf age affect the exact shade, so compare the plant with its own earlier healthy growth rather than an online photo taken under different light.
Color is strongest when the plant receives abundant filtered light without abrupt exposure to hot afternoon sun. Low light reduces contrast gradually, while excessive direct sun washes or burns the surface facing the glass.
One old lower leaf that pales and drops does not describe this problem. Look for a repeatable change across several leaves or one side of the pot, then use leaf texture, soil condition, and pest evidence to identify the cause.
Long gaps between leaves and a bare crown indicate etiolation even when the remaining leaves are pale. That stem-habit problem belongs to the separate leggy-growth diagnosis, while this page follows color loss on leaves that may still sit on compact stems.
Common Causes
Low light weakens new stripe contrast
In weak light, new zebrina leaves often open greener and flatter in color because the plant cannot maintain the same silver-purple contrast. Smooth color loss across a shoot separates this pattern from isolated dead patches.
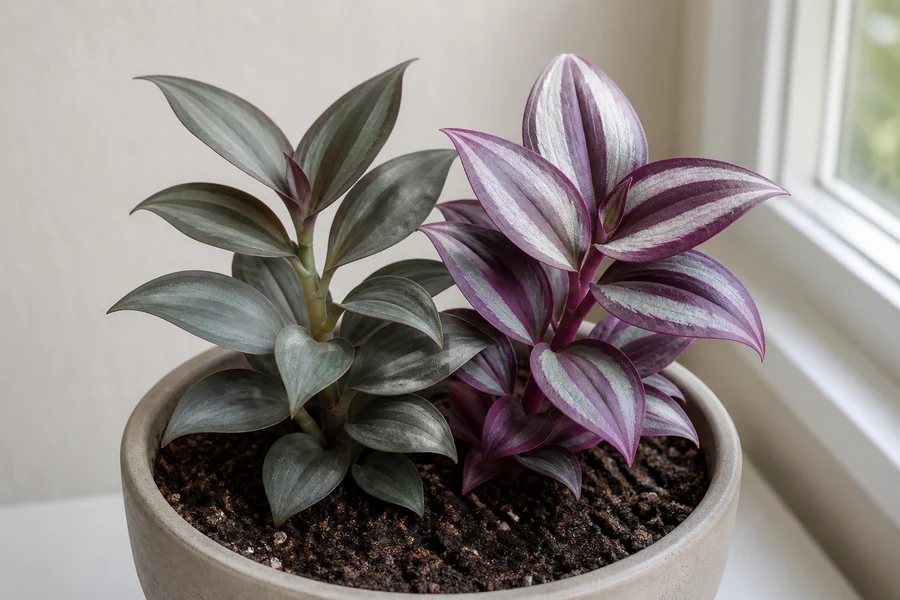
- Several newly opened leaves have smooth, weak silver bands and less purple than older leaves from the same plant.
- The shaded crown is duller than shoots that reach the window.
- The tissue remains flexible and intact without dry tan patches, fine stippling, or webbing.
- Color loss developed during a darker season or after the pot moved farther from a window. Long internodes may occur too, but they belong to the leggy-growth diagnosis.
- Move the crown into brighter filtered light rather than placing only the trailing ends near the window.
- Change one placement variable and mark the first leaf that opens afterward.
- Use a full-spectrum grow light when the room cannot provide a bright window position, keeping the lamp at the maker's stated distance and checking that leaves stay normally cool.
- Judge the response on new leaves because existing faded leaves may not regain their former contrast.
Direct sun washes out the window side
Strong direct sun can bleach zebrina color, especially after a plant moves outdoors or closer to south- or west-facing glass without acclimation. Damage on the exposed side only is the useful clue, and the worst areas may turn dry and tan.
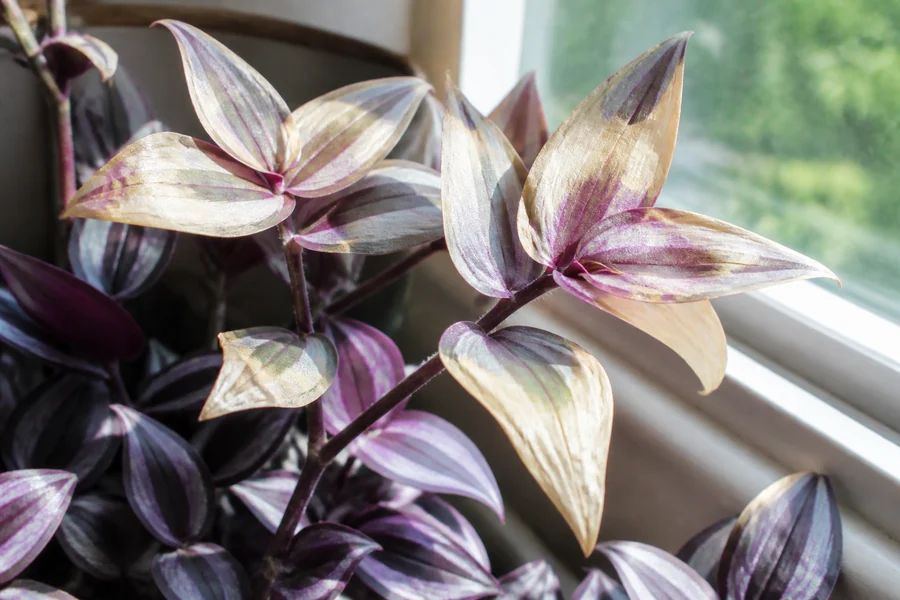
- Pale patches occur on the side facing the brightest glass or open patio.
- Protected leaves beneath the canopy retain stronger silver and purple color.
- The worst patches become papery or tan instead of staying evenly green.
- Damage followed a sudden seasonal increase in sun or a move outdoors while the roots and protected leaf layer remained healthy.
- Pull the pot back a small distance or filter the harshest direct rays with a sheer curtain.
- Keep bright ambient light around the crown instead of moving the plant into a dark room.
- Acclimate an indoor plant to outdoor light in a sheltered bright-shade position before allowing gentle sun, and wait for healthy foliage before removing badly scorched leaves.
- Use new unmarked leaves to confirm that the adjusted exposure is safe.
Wet roots cause broad pallor and soft growth
A root zone that stays saturated loses oxygen and can progress to root or stem rot. Here, fading is part of a broader decline that includes yellow lower leaves, slow growth, soft stems, or wilting despite wet mix.
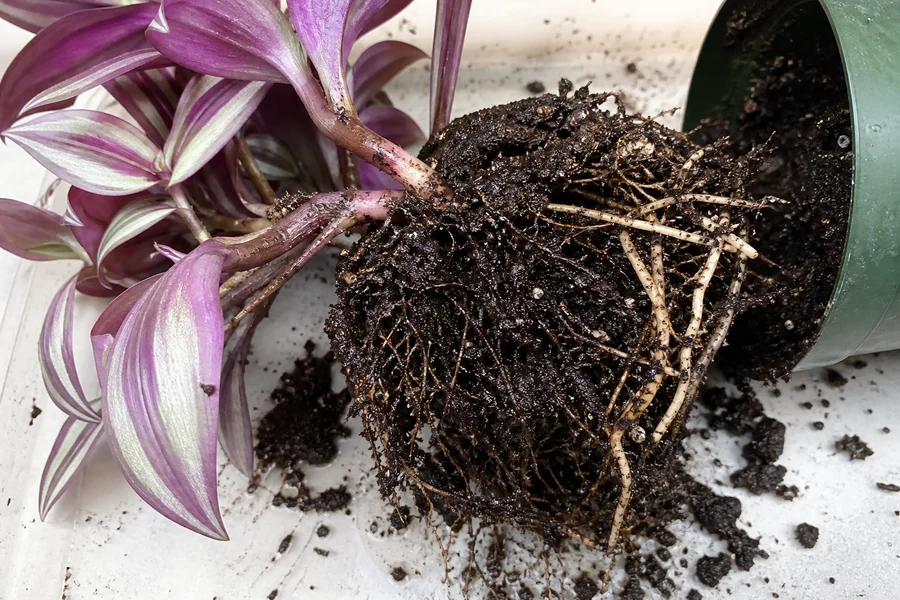
- The pot remains heavy and wet well after watering.
- Lower leaves turn uniformly pale or yellow rather than losing only the purple stripe.
- Stems near the mix feel soft, dark, or easy to pull free.
- Roots are brown or black and soft in the wettest area instead of firm and pale.
- A cachepot or saucer holds runoff, or the container has no open drainage path.
- Empty standing water and let the upper mix begin to dry before watering again.
- Confirm that water can leave through open drainage holes and that the inner pot never sits in runoff.
- Slide the root ball out only when wetness, odor, softness, or continued decline supports a root inspection.
- Use an overwatered-plant root check to decide whether clearly soft dead roots need trimming while preserving every firm root.
- Repot in fresh airy mix when the old mix has collapsed or decay is established, then keep the recovering plant warm and brightly lit without direct scorch.
Dry mix or a root-filled pot adds curl and crisp edges
Prolonged dry-down can dull the leaves, but water stress rarely erases stripe contrast by itself. Look for curling, loss of stem firmness, crisp margins, a light pot, or mix that has pulled from the wall before treating dryness as the main cause.
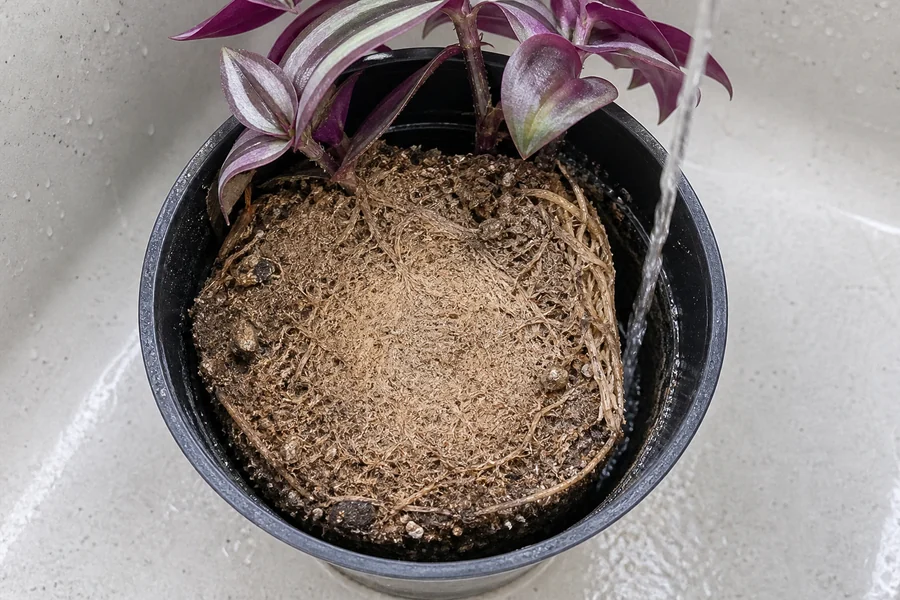
- The pot feels unusually light and the mix is dry below the surface.
- Water runs down a gap at the pot wall without moistening the center, while leaves fold or develop papery margins.
- Dense roots circle the outside of the root ball and very little mix remains to hold water.
- The plant improves in firmness after a complete watering but old pale tissue remains.
- Rewet contracted mix slowly in several passes and confirm that the center becomes evenly damp.
- Water again when the upper inch begins to dry instead of waiting for the whole root ball to become hard and light.
- Move a genuinely root-filled plant into a container only one size larger, follow the houseplant repotting steps, and match the fresh mix to the roots so excess soil does not remain wet.
- Check more often near hot glass or moving air because small hanging pots can dry quickly, and never use misting as a substitute for water reaching the roots.
Spider mites remove color as fine stippling
Spider mites pierce many tiny cells and turn a bold stripe pattern into a finely speckled or gray-green surface. Fine stippling plus pest evidence justifies treatment, while smoothly faded leaves without dots, webbing, cast skins, or moving specks do not.
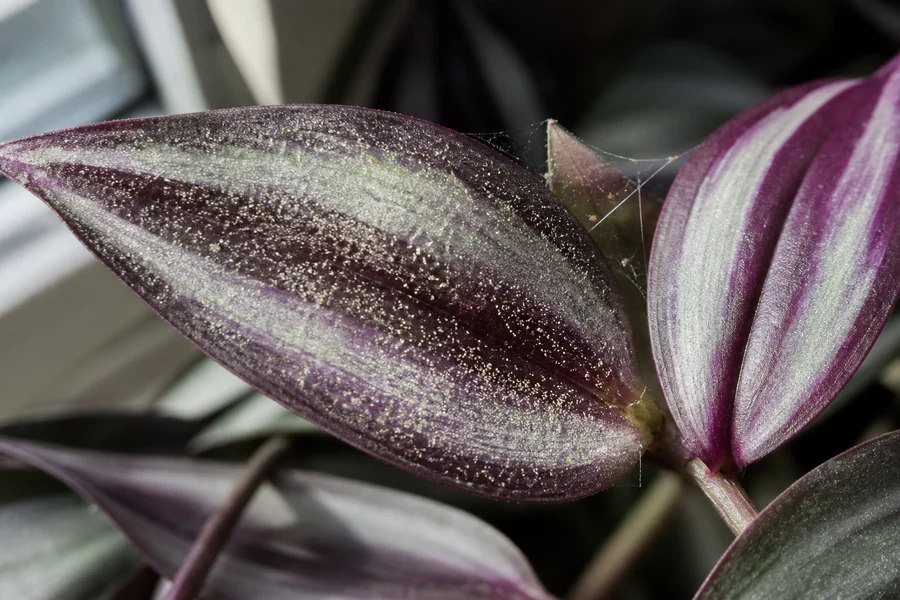
- Many pin-size pale dots interrupt the silver, green, and purple areas.
- The underside or leaf sheath carries delicate webbing, cast skins, or tiny moving mites.
- Damage is strongest in warm dry conditions or near another infested plant.
- A white-paper tap test releases tiny moving specks, and continued feeding may leave new leaves small or distorted.
- Isolate the plant from nearby houseplants after mite evidence is confirmed.
- Rinse both leaf surfaces and stem sheaths thoroughly with lukewarm water.
- Remove the worst damaged shoots when enough healthy foliage remains, then follow a houseplant spider-mite treatment labeled for indoor ornamentals with its coverage, interval, and safety directions.
- Recheck new tips and neighboring plants because one wash may not reach every life stage.
Nutrients and salts are late checks
A depleted mix can produce uniformly light green growth, while excessive fertilizer or hard-water salts can injure roots and burn margins. Neither condition can be diagnosed from lost purple color alone, so review inputs only after light, moisture, and mites fit poorly.
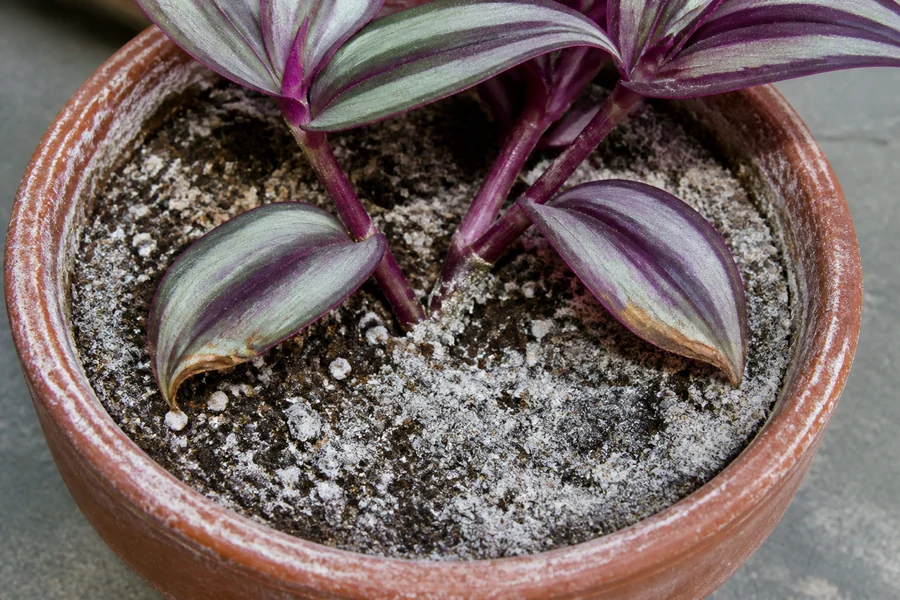
- New growth is uniformly light green across the plant rather than faded only on one exposure.
- The plant has remained in the same mix through long active growth without feeding, or repeated strong feeding and hard water have left a white-gray crust.
- Salt injury adds brown margins, stalled roots, or wilting despite damp mix.
- Light position, root texture, and leaf-surface checks do not explain the pattern.
- Review the fertilizer label, dose, frequency, water source, and last repot date before adding anything.
- Choose fertilizer for the pot and active growth only when the plant has no salt crust or failing roots, then use the labeled rate.
- Leach documented excess salts only through a freely draining pot and discard all runoff, replacing degraded mix when root condition makes flushing unsuitable.
- Judge the correction on new leaves because fertilizer cannot repaint old bleached or mite-damaged tissue.
Compare the newest leaf with the window-facing leaf
Find a new leaf that opened indoors and compare it with a normally striped leaf. Smooth fading across a whole new shoot supports low light, while one-sided bleached patches support excess sun, and fine dots, webbing, yellow lower leaves, soft stems, or wet mix move the diagnosis away from a simple light adjustment.
Open full diagnosisRead Pattern, Position, and Texture Before Changing Care
A smooth change across every new leaf points toward light or whole-root nutrition, while directional pale patches point toward direct exposure. Fine stippling belongs to mites, and broad yellowing with soft growth belongs to a root-zone problem.
Leaf age prevents false alarms. One lower leaf may fade as the fast-growing vine replaces it, but several new leaves losing contrast show that current conditions are shaping the plant.
Stem spacing answers a different question. Long internodes, a bare crown, and color held only at the trailing tips need the leggy-growth repair even if the remaining leaves also look dull.
Stable green growth may also reflect plant identity rather than damage. Confirm that the plant is Tradescantia zebrina, since other Tradescantia species and cultivars do not share the same purple-silver pattern.
Move Light in Small Steps
Choose one controlled move based on the pattern you found. A smoothly faded crown moves closer to filtered light, while a bleached window side moves just far enough back to remove the harsh direct rays.
Keep the crown and newest nodes within the useful light zone rather than letting only the hanging tips reach the window. A bright shelf beside the glass often serves the top of the pot better than a hook above the window.
When natural light is weak, a grow light can create a stable exposure without the heat of direct sun. Follow the fixture maker's distance and duration guidance, and verify that leaves remain normally cool.
- Photograph one faded new shoot in neutral daylight before moving the plant.
- Change only the distance, filtering, or lamp exposure that the diagnosis supports.
- Mark the first leaf that begins opening after the change.
- Compare later new leaves with the marked leaf and watch for scorch, stippling, or continued pallor.
Judge Recovery on New Leaves
Old faded leaves may stay faded because established pigments and bleached tissue do not simply reset after placement improves. Their condition can stabilize, but the useful recovery evidence arrives in leaves that form afterward.
A stronger silver band and purple underside on each successive new leaf support the light diagnosis. Firmer stems and normal dry-down support a root-zone recovery, while fewer fresh stipples support successful mite control.
Reconsider the diagnosis when new leaves remain uniformly pale after light and roots are stable, or when they develop distortion, irregular mosaic, fine dots, or continuing edge death. Those patterns justify a closer pest, input, or professional diagnostic check rather than another blind care change.
- Old faded leaf
- Use it as history, not as proof that today's correction failed.
- New leaf with stronger stripes
- Keep the new placement steady and avoid adding another treatment.
- New leaf still abnormal
- Return to pattern, root, pest, and input evidence before changing care again.
Recovery Plan
Stop the active stress
Make the single light or root-zone correction supported by the evidence, or isolate the plant when mites are confirmed. Existing pale leaves will not measure success yet.
Watch the stripe pattern develop
Mark leaves that open after the change and compare their silver bands, purple tissue, texture, and exposed side. Keep conditions steady when the pattern improves.
Escalate only persistent abnormal growth
Continued smooth pallor calls for an input and root review, while stippling, distortion, mosaic, or spreading tissue death calls for a closer diagnosis. Long bare stems belong to the leggy-growth repair rather than another color treatment.
Keep the crown of Tradescantia zebrina in bright filtered light, acclimate it gradually when seasonal sun increases, and water from the condition of the mix rather than a calendar. Empty runoff, inspect leaf undersides during warm dry periods, and feed only active growth at the labeled rate so the next leaves provide a clear signal instead of several overlapping stresses.
Sources
- Tradescantia zebrina, NC State Extension Gardener Plant Toolbox
- Tradescantia zebrina, Wisconsin Horticulture Extension
- Tradescantia zebrina, Missouri Botanical Garden Plant Finder
- Managing insects on indoor plants, University of Minnesota Extension
- Houseplant Diseases and Disorders, Clemson Cooperative Extension
- Lighting for indoor plants, University of Minnesota Extension