
Norfolk Island Pine Brown Tips Need a Pattern Check, Not More Water
Brown tips on a Norfolk Island Pine do not point to one automatic fix.
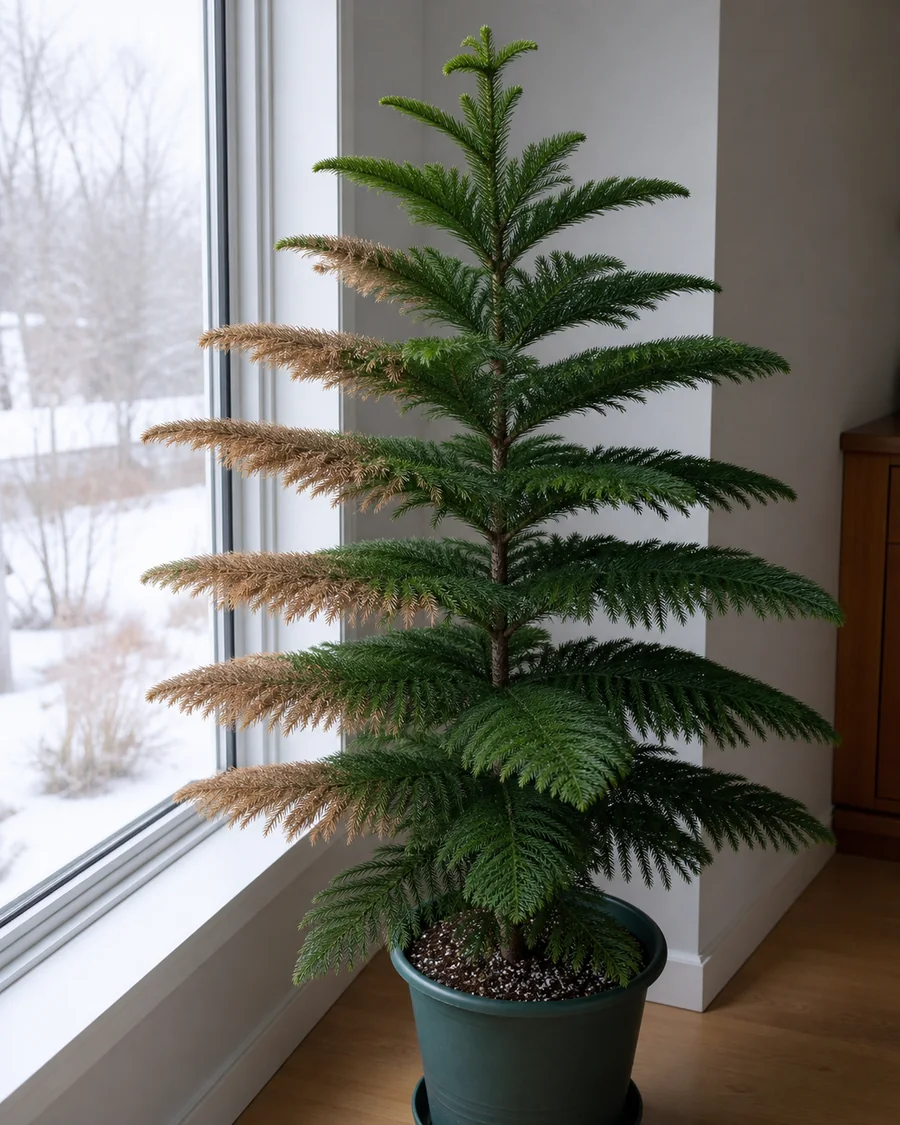
First decide whether the damage stays on narrow needle ends or comes with a dry root ball, wet roots, white residue, webbing, black specks, or a dated exposure on one side.
Quick diagnosis
Tip-only or whole-branch damage decides the next check
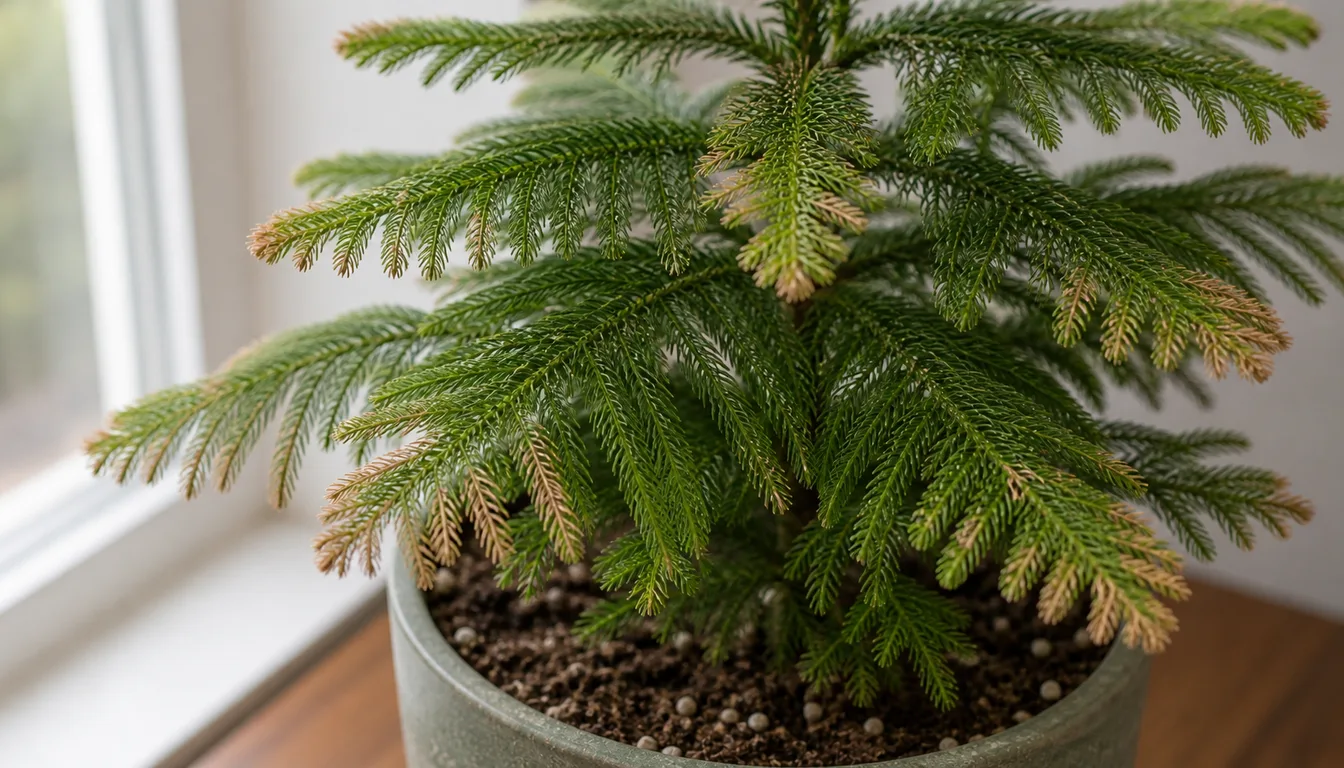
Many crisp ends on otherwise green branch tiers favor dry moving air, a root ball that dried too far, or soluble salts. A heavy wet pot, broad one-sided patches, fine webbing, black fruiting bodies, yellowing, wilt, or whole branches browning sends the diagnosis down a different path.
Open the full diagnosisWhat You Are Seeing
Mark the boundary between brown and green tissue before changing care. Clean narrow ends across several green tiers suggest a water-balance problem, while spots, bronzing, sticky residue, soft roots, or a whole damaged branch provide more specific evidence.
Use the pot to separate air stress from root stress. Lift it when practical, probe the center of the mix, check where water exits, empty any standing runoff, and inspect the rim and soil surface for white crystals.
Then map the room. Damage concentrated beside a vent, cold window, exterior door, hot pane, or holiday decoration carries more weight than a humidity reading taken across the room.
Long gaps between branch tiers and weak stretched growth belong to a separate light and form diagnosis. This article concerns tissue that changed from green to brown, including the signs that make that damage more than cosmetic.
Common Causes
01 High likelihood indoors
Low humidity or dry moving air is pulling moisture from the tips
A Norfolk Island Pine carries many fine needle ends that lose water quickly in heated or air-conditioned rooms. Direct airflow can dry one sector of the canopy even when average room humidity seems acceptable.
This cause fits best when numerous narrow tips are crisp and tan while the branch bases, central leader, and newest needles remain firm and green. The pot should not be extremely light, persistently wet, sour-smelling, or crusted with mineral residue.
Compare branch tiers around the tree.
Worse tips on the side facing a supply vent, heater, or frequently opened door support moving air, while equal damage around every tier points back toward the root ball or salts. Move the tree out of the direct stream before trying to humidify the entire room.
How to identify it
- Many otherwise green branches have a similar narrow band of dry brown tissue at the needle ends.
- Damage is strongest near a furnace vent, air conditioner, fan, radiator, or frequently opened door.
- A humidity reading near the canopy stays well below the roughly 50 percent level this tropical conifer prefers.
- The root ball accepts water evenly and is neither extremely dry nor saturated.
- There is no stippling, webbing, sticky residue, black fruiting bodies, or sudden one-sided scorch.
What to do
- Move the branches out of direct heated or cooled airflow while keeping the light level similar.
- Use a clean room humidifier when the daily low remains dry, and measure humidity beside the foliage rather than across the room.
- Keep the root ball consistently moist without leaving the nursery pot in standing water.
- Avoid relying on occasional misting because its humidity rise is brief and wet foliage can complicate disease problems.
- Judge the change by a stable brown boundary and clean new needles because dead tips cannot turn green.
02 High likelihood
The root ball dried out or water bypassed its center
If roots cannot replace the water lost through the foliage, exposed needle ends dry first and lower branches may begin to droop or brown. A small holiday pot can become light much sooner after watering as the tree grows.
Old peat-rich mix may also shrink from the container wall.
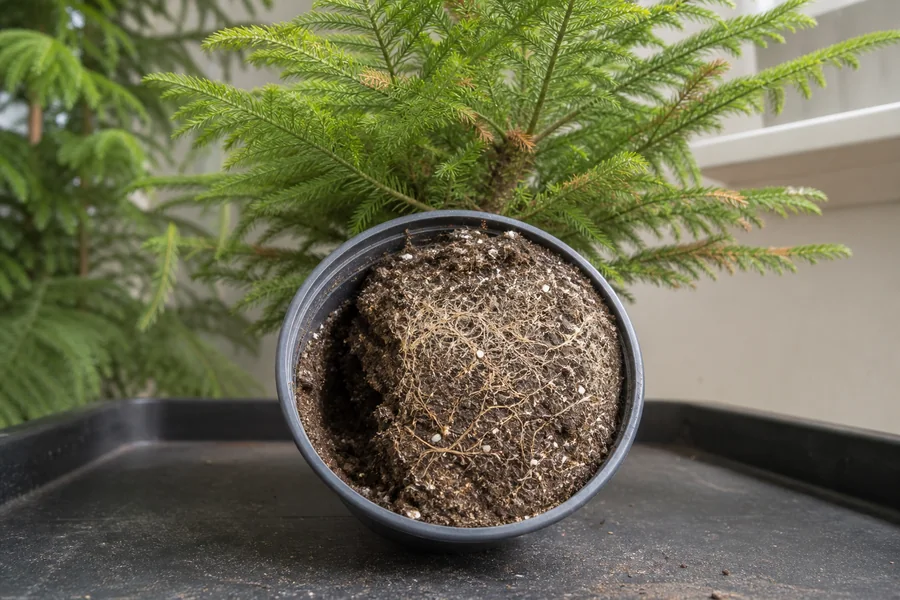
Water then races down the gap and out of a drainage hole while the center remains dry, so visible runoff does not prove that the roots were wetted.
Probe the center soon after watering and compare it with the edge. A dry core beside a wet wall confirms bypass and calls for slow staged rewetting.
If the center is moist and the pot is still heavy, another soak will reduce oxygen and cannot fix damage caused by airflow or salts.
How to identify it
- The container feels much lighter than it did after a thorough watering.
- A wooden skewer or moisture probe comes out dry from the center, not just the upper surface.
- Potting mix has pulled away from the wall or formed a hard dry core.
- Water exits immediately along one side and leaves other areas of the mix dry.
- Lower branches droop before watering and the brown boundary advances after repeated severe drying.
What to do
- Water slowly over the full surface until the center becomes evenly moist and excess drains below.
- If dry mix repels water, set the nursery pot in shallow water briefly and remove it once the center has rewetted.
- Let the pot drain completely and empty the saucer so rewetting does not become prolonged saturation.
- Use pot weight and moisture at depth to decide the next watering instead of following a weekday schedule.
- Inspect for a dense root mass when the pot dries much faster than it did earlier, but repot only during active growth and only when roots are crowded.
03 Medium likelihood
Saturated mix is depriving roots of oxygen
Brown tips do not always mean the tree needs more water. Roots held in wet airless mix cannot supply the canopy normally, and root rot can follow when the condition persists.
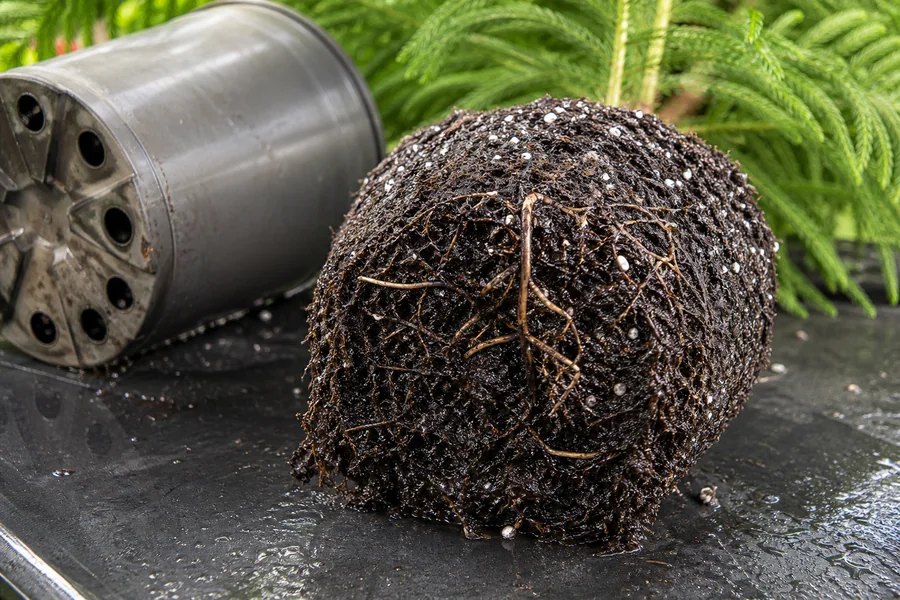
The brown ends alone are weak evidence for overwatering. A pot that stays heavy, standing runoff, slow growth, wilt in wet mix, yellowing, a sour smell, or soft brown-to-black roots makes this diagnosis stronger.
Check whether a nursery pot sits inside a cover pot where runoff collects below view. Dry surface fibers can hide a saturated lower root ball.
Empty standing water and open the drainage path first, then judge whether the mix begins a normal wet-to-moist cycle before disturbing viable roots.
How to identify it
- The middle and bottom of the root ball remain wet long after the surface was watered.
- The decorative outer pot holds runoff or the nursery pot has blocked drainage holes.
- Branches droop or lower foliage yellows while the pot is still heavy.
- Potting mix smells sour and visible roots are soft and dark instead of firm.
- The central leader weakens or whole branch sections decline rather than showing only clean dry tips.
What to do
- Stop watering until the upper mix begins to dry and the container loses some weight.
- Empty the saucer or outer pot and clear every drainage opening.
- Lift the root ball only when persistent wetness, odor, or decline justifies an overwatered-plant root inspection.
- Remove clearly rotted roots, preserve firm tissue, and replace collapsed mix with fresh airy potting mix.
- Keep the tree warm with gentle room circulation while avoiding a vent that blows directly on the foliage.
04 Medium likelihood with visible residue
Soluble salts are interfering with root water uptake
Fertilizer and minerals in irrigation water remain in the pot as water evaporates. At high concentrations they make water harder for roots to absorb and can injure fine root tips, which appears above the soil as brown needle ends, wilt, or weak growth.
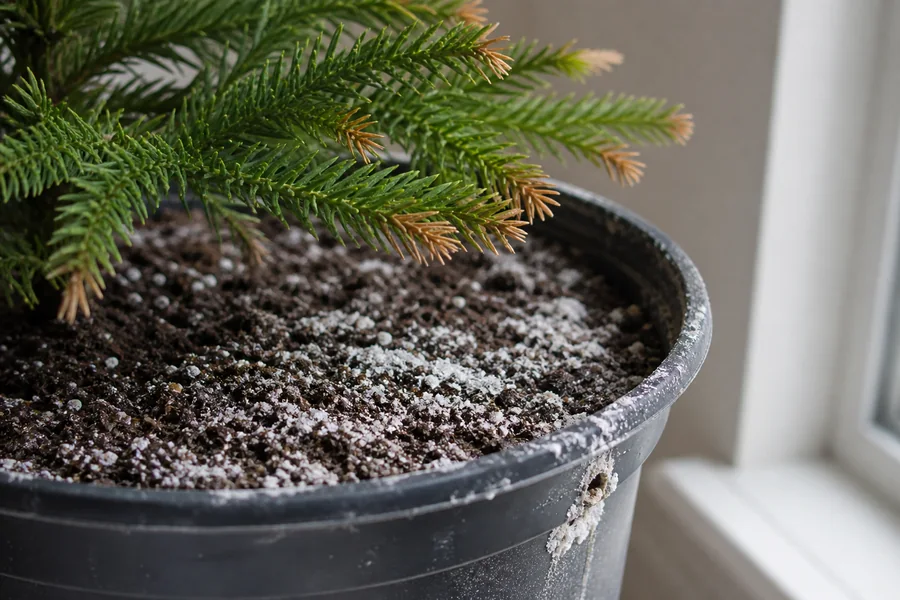
Norfolk Island Pine comes from a coastal environment, but that does not make a container immune to concentrated fertilizer or softened water. White crystals, a recent strong feeding, and repeated small drinks with no drainage provide the useful evidence.
Pair residue with the care history because a small old deposit does not explain every brown tip.
Pause feeding, confirm that the drainage holes are open, and flush only when the mix can drain freely and is not already saturated. Judge the next needles rather than expecting mineral-burned ends to recover.
How to identify it
- White or tan crystalline residue coats the soil surface, pot rim, drainage edge, or saucer.
- Tip burn worsened after a strong fertilizer dose or feeding dry potting mix.
- The tree receives sodium-softened water or hard water that leaves scale on nearby fixtures.
- Older branches show more tip burn while the pot otherwise drains and the roots are not rotting.
- Watering usually stops before any water passes through the bottom of the pot.
What to do
- Pause fertilizer while the tree is stressed and remove loose surface crust without damaging shallow roots.
- Flush only a freely draining pot with lower-mineral water, then let all excess escape and empty the saucer.
- Do not flush saturated or poorly draining mix because extra water would deepen root oxygen loss.
- Replace heavily crusted or compacted mix when water cannot move through the root ball evenly.
- Resume light label-rate feeding only during active growth after clean new needles appear.
05 Seasonal
A cold draft or transport chill injured one side
This tropical conifer can be injured by a cold night, contact with chilled glass, or an unprotected trip from store to car. The affected needles often darken or brown suddenly on the exposed side instead of developing matching dry tips throughout the canopy.
Timing settles the diagnosis. Damage that appeared after temperatures near or below 50 degrees Fahrenheit, an open exterior door, or cold transport fits chilling better than a gradual humidity problem.
How to identify it
- Browning is concentrated on branches that faced a window, door, or cold airflow.
- Some foliage touched glass during a cold night.
- The marks appeared soon after transport or a sudden temperature drop.
- Sheltered branch tiers on the same tree remain green.
- Pot moisture, residue, mites, and disease signs do not explain the one-sided pattern.
What to do
- Move branches far enough from glass that they cannot touch it overnight.
- Keep the tree outside the direct path of exterior doors and cold air.
- Hold the new position steady instead of moving chilled foliage into hot direct sun.
- Keep mostly green branches in place while a clean central leader and new needles show whether damage has stopped.
- Reopen the root or disease diagnosis when browning continues after the cold event has ended.
06 Event-linked
Abrupt sun or concentrated heat scorched exposed needles
A tree moved from indoor light into strong afternoon sun can scorch before its foliage adjusts. Hot window glass or heat-producing holiday lights can create a similarly local patch.
Scorch usually forms broader tan or bleached areas on the newly exposed side rather than a thin uniform band at every needle end.
The damage should match a recent move, a hot pane, or the exact position of a light string.
How to identify it
- Tan or pale brown patches occur mostly on the window-facing or outdoor-facing side.
- Damage appeared after a move into stronger light without gradual acclimation.
- A hot pane, lamp, or holiday light sat close to the affected needles.
- The protected inner and opposite-side foliage remains greener.
- There is no dry root-ball center, wet-root decline, webbing, or black-spotted lesion to explain the marks.
What to do
- Move the tree back to bright filtered light and remove concentrated heat from the foliage.
- Acclimate an indoor tree to outdoor shade first before increasing sun exposure.
- Use cool lightweight LED decorations and remove them soon after the holiday period.
- Leave partially green branches in place and trim only fully dead needle ends.
- Use the unexposed new growth to judge the placement instead of expecting scorched tissue to recover.
07 Localized
Rubbing, bending, or decorations damaged specific branch ends
A Norfolk Island Pine has soft horizontal branches that are easily bent by traffic, pets, heavy ornaments, or repeated contact with a wall. Crushed needle clusters dry where the pressure occurred, leaving a few sharply localized brown ends.
The contact pattern matters because pruning carries a permanent cost. A lateral branch that breaks or is removed is unlikely to rebuild the missing tier the way a leafy houseplant replaces a stem.
How to identify it
- Only the points that touched a wall, walkway, ornament, tie, or pet-access area are brown.
- A crease, abrasion, or broken branchlet appears at the start of the dead tissue.
- The rest of the branch tier remains green and the pot condition is normal.
- Damage began during holiday decorating, moving, cleaning, or another handling event.
- No matching tips appear across sheltered branches.
What to do
- Remove heavy ornaments, tight ties, or any object resting on the foliage.
- Give the branch tiers enough clearance that people and doors do not brush them.
- Support a bent but attached branch gently without forcing it into a sharp new angle.
- Trim only dead loose needle ends and keep any branch that still carries useful green tissue.
- Cut a fully broken branch cleanly only when it cannot be supported, knowing the empty tier may remain.
08 Lower but important to inspect
Spider mites or scale insects are damaging more than the tips
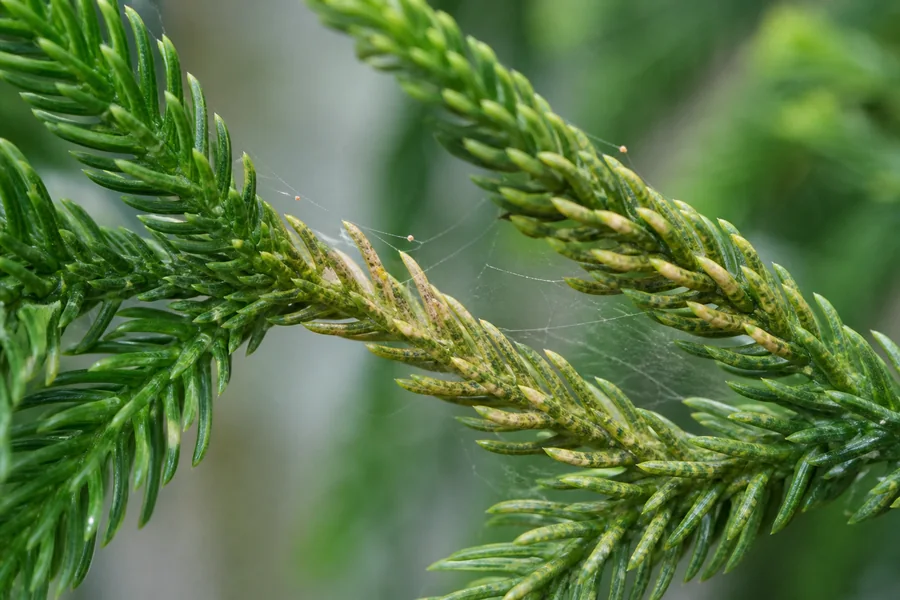
Twospotted spider mites can feed through the fine foliage of Norfolk Island Pine, leaving pale stippling that merges into bronze or orange-brown tissue. Fine silk may collect between needle clusters or around branchlets as the population grows.
Scale and mealybugs leave different evidence. Look for fixed covers, cottony masses at branch junctions, sticky honeydew, or dark sooty residue rather than treating every crisp tip as an insect problem.
Inspect several inner branchlets with bright side light and tap one over white paper. Dust coats surfaces evenly and can be wiped away; mite injury remains as stippling in the needles, and living specks move.
Isolate a confirmed infestation and inspect nearby plants before selecting a product labeled for both the pest and indoor use.
How to identify it
- Needles have fine pale stippling or a dull bronzed cast beyond the brown ends.
- Delicate webbing spans nearby needles or branch junctions.
- A white sheet held below a tapped branch catches tiny moving specks.
- Scale covers or cottony insects sit along stems and whorls, sometimes with sticky residue below.
- Damage spreads through the foliage instead of stopping at a clean old tip boundary.
What to do
- Separate the tree from nearby plants while inspecting every branch tier and junction.
- Rinse confirmed mites from the foliage with lukewarm water while keeping excess runoff out of the potting mix.
- Remove a small scale or mealybug population manually where the fine foliage allows.
- Use insecticidal soap, horticultural oil, or another product only when its label permits the pest and indoor plant use.
- Repeat inspection and any label-directed treatment because sheltered eggs or insects may survive one pass.
09 Rare indoors
Anthracnose is spreading from spotted needles into branches
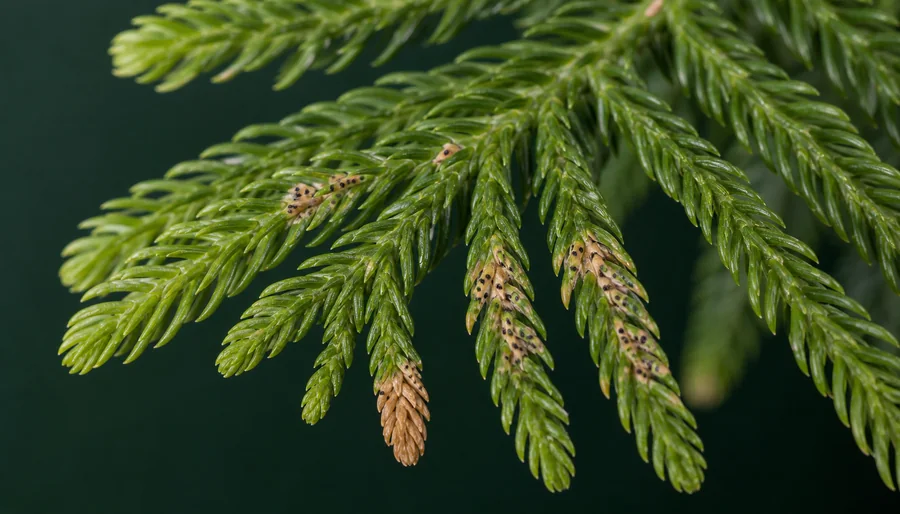
Anthracnose begins as small dead areas on needles and can progress until whole needles and larger branch portions brown and drop. Pinpoint black fungal fruiting bodies inside the dead tissue separate it from a clean environmental tip.
Do not diagnose disease from brown color alone. Concern rises when spotted lesions multiply, black specks are embedded in them, and browning moves beyond the exposed ends despite a stable pot and room.
Keep affected foliage dry during inspection and separate the tree from healthy plants while the pattern is confirmed. Photograph the advancing boundary before pruning.
Rapid spread into branch bases, repeated lesions on new tissue, or an uncertain black-speck pattern warrants a diagnostic sample because dead tissue can collect harmless surface organisms after another injury.
How to identify it
- Small tan or brown dead areas form within needles rather than only at their tips.
- Pinpoint black fruiting bodies appear inside the dead tissue.
- Entire needles die and larger portions of a branch begin to brown.
- Foliage has been kept wet by overhead watering or frequent misting.
- The pattern spreads despite suitable root moisture and no recent cold, heat, or handling event.
What to do
- Stop overhead watering and misting so the foliage can remain dry.
- Separate the tree from other susceptible plants while the cause is confirmed.
- Remove heavily spotted dead material with clean tools without stripping healthy branch tiers.
- Bag diseased clippings and clean the blades before touching healthy foliage.
- Ask a plant diagnostic service to confirm spreading lesions before choosing any fungicide treatment.
Trim the damage without sacrificing a branch tier
Brown needle tissue is dead and will not become green after conditions improve. A conservative trim can neaten the outline, but it does not repair the cause.
Mark and photograph one boundary before cutting so continued spread can still be measured.
Clean sharp scissors before trimming and follow the shape of the needle cluster while leaving a narrow dry edge beside living green tissue. Cutting into green needles can create a fresh brown boundary.
Do not remove a whole branch because only its ends are marked. Norfolk Island Pine needs little pruning, and a missing lateral branch is unlikely to rebuild the same tier.
Use new tissue as the recovery record.
Stable old tips plus clean new needles and a firm leader show improvement, even though the outline remains marked. Browning that crosses the photographed boundary or appears first on new growth means the active cause remains.
Remove an entire branch only when it is fully dead, broken beyond support, or carrying confirmed disease that requires sanitation. Preserve the central leader because cutting it can permanently spoil the tree's upright form.
A soft leader, extensive root decay, or progressive loss of whole tiers needs expert help rather than cosmetic pruning.
Match the Pattern Before You Change Care
Map the brown tissue across the tiered canopy before adding water or removing branches. Uniform ends, one exposed side, isolated contact points, and lesions that continue along needles and stems each lead to a different inspection.
Keep the central leader and branch structure in view. A green leader with narrow tip burn allows measured correction, while disease evidence or browning that moves into branch tissue requires isolation and closer diagnosis.
Uniform Narrow Tips
- Check dry airflow and room humidity
- Test center moisture and pot weight
- Inspect the rim for mineral residue
One-Sided Branch Tiers
- Match the side to cold glass or a door
- Review transport and temperature timing
- Compare protected tiers on the same plant
Isolated Broken Ends
- Look for bends rub points ties or decorations
- Check whether damage stops at one contact
- Protect the remaining green branch structure
Spreading Lesions
- Inspect needles for bounded tan areas
- Look for black fruiting bodies or pest evidence
- Track whether browning advances into stems
Recovery Plan
Record the boundary and choose one correction
Photograph one marked branch, check the root-ball center, pot weight, drainage, residue, exposure history, and needle surfaces.
Correct the strongest match instead of changing water, fertilizer, humidity, and light together.
Confirm how the pot wets and drains
The center should accept water and the pot should drain without staying saturated. Reopen the root diagnosis when water still bypasses the middle, the pot stays heavy, or branches droop in wet mix.
Watch the old boundary for movement
Existing brown tissue will remain brown, but its edge should stop moving into green needles. New stippling, lesions, sticky residue, yellowing, or spreading branch damage means the first explanation was incomplete.
Use fresh needles and the leader as the clean test
New needles should remain green and the central leader should stay firm. Seek local diagnostic help when new growth browns, roots continue to rot, black-spotted lesions spread, or a confirmed pest remains after label-directed treatment.
Keep Norfolk Island Pine in bright filtered light with stable room temperatures and no direct furnace, air-conditioner, or door draft. Measure humidity near the foliage during the heating season and use a clean humidifier when the daily low stays far below the roughly 50 percent level the plant prefers.
Water from moisture at depth and pot weight, then wet the full root ball and let excess drain completely. Keep runoff out of the outer pot, watch for mix pulling from the wall, and do not add fertilizer while roots or foliage are stressed.
During active growth, feed lightly at the product's label rate and look for white residue before it becomes a thick crust. Inspect fine branchlets for stippling, webbing, scale covers, and black-spotted lesions, and keep heavy ornaments or hot lights off the soft branch tiers.
Sources
- Norfolk Island Pine, Colorado State University Extension PlantTalk
- Norfolk Island Pine, University of Connecticut Home Garden Education Office
- Norfolk Island Pine, University of Illinois Extension
- Norfolk Island Pine, University of Florida IFAS Gardening Solutions
- Houseplant Problems, University of California Statewide IPM Program
- Leach Your Houseplants to Avoid Salt Problems, University of California Cooperative Extension
- Norfolk Island Pine Araucaria, Connecticut Agricultural Experiment Station
- Araucaria heterophylla, Royal Horticultural Society
- Norfolk Island Pine Diseases, Penn State Extension