
How to Use a Soaker Hose: Layout, Pressure, and Run Time
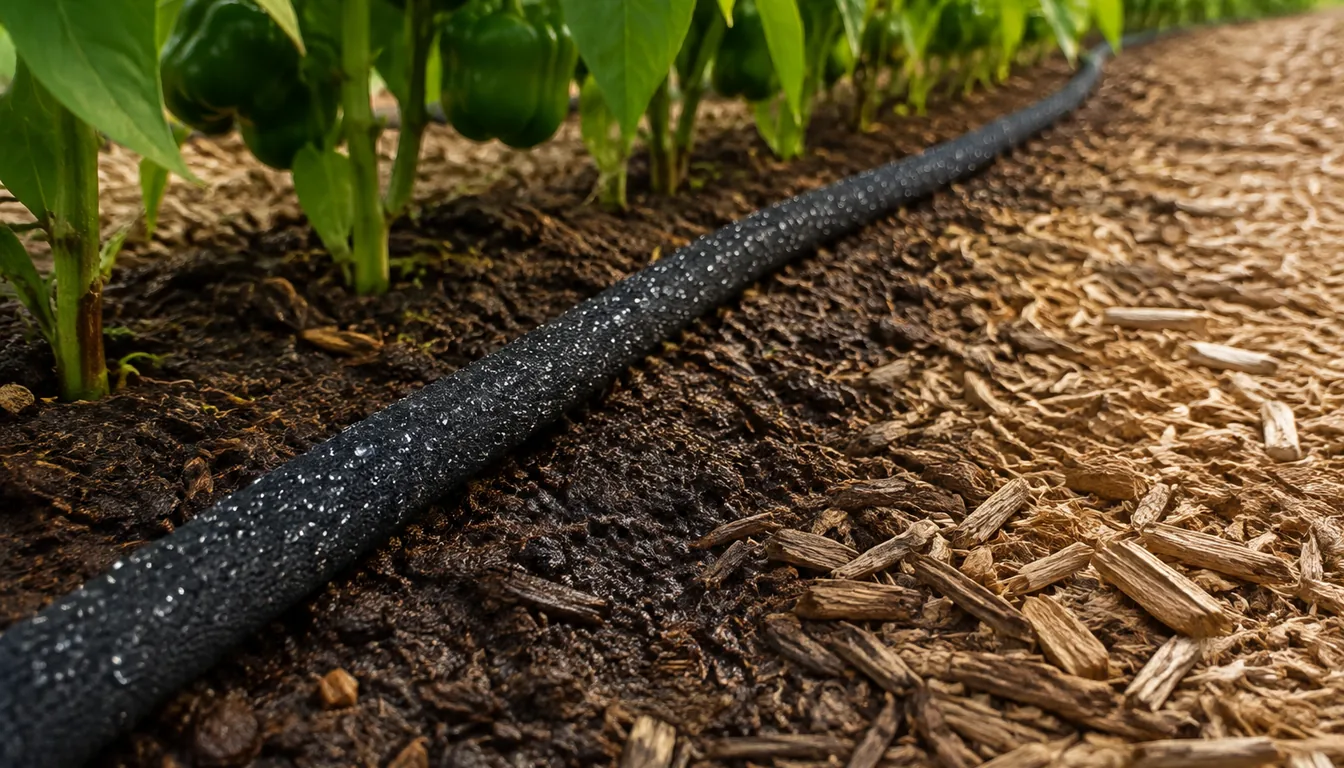
A soaker hose seeps water along its whole length, so it suits vegetable rows, raised beds, and planting beds where the line can run close to the roots. It works well when three things are right. The runs are short and level, the water passes through a pressure regulator, and the run time comes from checking the soil rather than from a number on the package.
Run time varies with the brand of hose, the water pressure, and the spacing of plants, so a fixed figure from someone else's garden rarely transfers. The test that works is the same for every setup. Run the hose, wait, and dig to see how deep the water went.
At a glance
Where does a soaker hose work well?
Soaker hoses put water on the soil instead of the leaves, which reduces disease problems. A hose laid along a vegetable row or snaked through a perennial bed reaches each plant without wetting the foliage, and a line under mulch loses no water to wind drift and little to evaporation.
| Setting | How a soaker hose performs |
|---|---|
| Vegetable row or raised bed | Good fit, since the line can run beside every plant |
| Perennial or shrub bed | Good fit when the line loops through the planting |
| Crops prone to leaf disease, such as tomatoes | Good fit, because the leaves stay dry |
| Run longer than about 25 feet | Poor fit, since output drops toward the far end |
| Sloped bed | Poor fit unless the line is split into several short level runs |
| Widely scattered plants | Poor fit, because the hose wets the soil between them and Iowa State notes this can encourage weeds |
The main limit is evenness. Colorado State University Extension explains that soaker hoses have holes but no emitters that meter the water, so the amount released varies along their length. Where plants need precise amounts, such as a mixed bed with very different water needs, drip emitters do that job better. The tradeoffs between the two methods are compared in drip irrigation versus sprinklers.
What fittings does a soaker hose need?
Household water pressure is higher than a soaker hose is built for. Without some form of regulator, the hose tends to rupture and send streams of water to a few spots instead of seeping along the line. The same extension lists the order of parts in a hose-end assembly as backflow preventer, filter, then pressure regulator, with a timer or faucet valve at the start.
| Part | What it does |
|---|---|
| Backflow preventer | Keeps garden water from being drawn back into household drinking water, which Colorado State calls critical |
| Filter | Catches grit that clogs the pores. Colorado State suggests a 150 to 200 mesh screen for drip systems on municipal water |
| Pressure regulator | Lowers the pressure to the level the hose is rated for. The Colorado State example reduces it to 25 psi |
| Timer | Shuts the water off after a set time so the hose is not left running |
Many half-inch soaker hoses come with a small plastic disc inside the female fitting. Colorado State University Extension explains that this disc limits flow rather than regulating pressure, so a hose fitted only with the disc may need around an hour to water a garden, while a hose on a hose-end pressure regulator may need ten to twenty minutes. Quarter-inch soaker tubing sold with drip supplies needs an inline regulator, or its fittings may pop.
Elevation changes the pressure along the line. Colorado State University Extension advises a separate regulator for every 2-foot change in elevation across a garden, which is another reason to keep each line on level ground.
How should you lay out a soaker hose?
Placement decides which roots get water. Iowa State University Extension recommends laying the hose within a few inches of the plant stems, closer for smaller plants, and using an S-pattern or a loop around plants with larger root zones.
- Soften the hoseIowa State suggests leaving it in the sun for a few hours first so it bends without kinking.
- Keep each run shortColorado State University Extension recommends lines of about 25 feet or less for even delivery. Feed a longer bed with several short lines rather than one long one.
- Follow the plantsRun the hose along each row. In a 4-foot raised bed, Colorado State spaces lines 12 inches apart, which gives four runs up and down the bed, or three runs for large crops such as squash and corn.
- Pin it downHold the hose in place with landscape staples so it stays where the roots are.
- Cover itPut mulch over the hose to protect it from sunlight and reduce evaporation. Colorado State notes it can also be buried about 2 inches deep.
Soil changes how far water spreads sideways from the line. Water moves only a short way sideways in sandy soil, so plants there need a line close beside them. For drip emitters, Colorado State University Extension spaces outlets 12 inches apart in sand, 18 in loam, and 24 in clay, which shows how much wider water travels in finer soil. Lines in sandy beds need to sit closer together than lines in clay. Shrubs such as hydrangeas usually need a full loop rather than a single pass, since their roots spread well beyond the stems.
How long should you run a soaker hose?
There is no single run time to copy. The extension figures show why. Colorado State University Extension notes that a hose with only the flow disc may need around an hour, while a hose on a pressure regulator may need ten to twenty minutes. Iowa State University Extension suggests running soakers for a few hours every one to two days. The difference comes from flow, hose brand, and soil, so the reliable guide is the depth the water reaches.
- Start with dry soilColorado State suggests watering vegetables when the top 2 to 4 inches are dry to the touch.
- Run a timed testRun the hose for a set time and note it.
- Wait, then digAfter the water has had time to spread, dig beside the line near the start and again near the far end.
- Compare with the rootsIowa State aims for soil wet 10 to 12 inches down in vegetable and perennial beds, and Colorado State samples the vegetable root zone at 6 to 8 inches.
- Adjust and recordLengthen the run if the soil is dry at root depth, shorten it if the soil is soggy, and keep the time that worked.
The run time that wets the root zone is the amount. How often you repeat it depends on weather. Colorado State University Extension estimates that vegetables use about a quarter inch of water a day in typical summer weather, and more in hot, windy spells, while needs are low in spring when crops are small. The weekly totals behind that are worked out in how much to water plants.
How do you fix uneven watering and store the hose?
Most problems trace back to length, pressure, or a blockage, and each one shows up in a recognizable way.
| What you see | Likely cause | Fix |
|---|---|---|
| Wet near the faucet, dry at the far end | Line too long or on a slope | Split it into shorter runs of about 25 feet |
| Streams or spurting from a few spots | Pressure too high, or a split | Add a pressure regulator and replace the damaged section |
| Damp surface, dry soil a few inches down | Run too short | Lengthen the run and dig again |
| Weak seepage everywhere | Soil or grit inside the hose, or a clogged filter | Open the end cap and flush the line, then clean the filter |
| Dry patches along a bend | Kink | Reroute in gentle curves |
Opening the end of a half-inch soaker now and then flushes out soil deposits, and this style tolerates small amounts of dirt better than other drip types.
Soakers sit on separate timing from other watering. Colorado State advises against putting a vegetable garden on the same zone as a lawn because their water needs differ, and quarter-inch soaker tubing cannot share a zone with other drip parts because it delivers water faster.
Freezing water splits hoses and fittings. Iowa State University Extension recommends disconnecting the system before winter, bringing the timer, regulator, and backflow preventer indoors, and draining the lines. For soaker hoses it is often simplest to lift the whole hose, let it drain, and store it inside.
Pro Tips
- Mark the run time that wet the root zone on a tag at the faucet so the next watering starts from a tested number.
- Dig near the far end of each line as well as the near end, since output drops along the hose.
- Pull mulch aside before checking, because dry mulch can hide wet soil and damp mulch can hide dry soil.
- Flush the line at the start of each season by opening the end cap and running water until it comes out clear.
- Subtract a week's useful rain before running the hose, using a rain gauge rather than a guess.
Frequently Asked Questions
How long should I run a soaker hose?
Long enough to wet the soil through the root zone, which you find by digging after a timed run. Extension figures range from ten to twenty minutes on a pressure-regulated hose to an hour or more on a hose with only a flow disc, so a tested time from your own garden is the one to use.
Can I use a soaker hose in a vegetable garden?
Yes. Lay it along each row within a few inches of the stems, or in lines about 12 inches apart in a raised bed. Keeping water off the leaves helps crops that are prone to leaf diseases.
Should I bury a soaker hose?
Covering it with mulch is the usual method, and Colorado State University Extension notes that it can also be buried about 2 inches deep to protect it from sunlight. Either way, leave the fittings and end cap where you can reach them for flushing.
Do I need a pressure regulator with a soaker hose?
Yes. Household pressure can split the hose and send water out in streams. A hose-end pressure regulator works better than the small flow disc that comes in many hoses. Put a backflow preventer ahead of it to protect household water.
Can I connect several soaker hoses together?
Joining them end to end makes the line long, and the far end then gets less water. Colorado State University Extension recommends lines of about 25 feet or less, so feed several short lines from a splitter or manifold instead.
Sources & References
- Colorado State University Extension, CMG GardenNotes #714: Irrigating the Vegetable Garden
- Colorado State University Extension, Drip Irrigation for Home Gardens
- Iowa State University Extension, Using Drip Irrigation in the Garden
- UNH Extension, Using Water Efficiently in the Landscape
- University of Minnesota Extension, Watering the vegetable garden
Related Guides
A Drought Tolerant Plant Is Not Drought Tolerant Yet
Colorado State puts it in one sentence. Drought tolerant plants are not drought tolerant until…
11 min read
An Overwatered Tree Hides It for a Year, Then Thins
A tree gives you almost no warning. Colorado State says the symptoms of root problems may appear…
12 min read
Best Time to Water Flowers for Stronger Blooms
Watering flowers at the wrong time does more damage than skipping a day.
10 min read
Best Time to Water Indoor Plants: Morning or Evening?
Morning is the better default for watering indoor plants.
6 min read
Best Time to Water Plants for Healthier Roots
Watering at the wrong time wastes water and stresses plants, even if you are generous with the…
11 min read
Deep Watering vs Frequent Watering: What Roots Need
Deep watering usually serves established lawns, vegetables, trees, and shrubs better than repeated…
17 min read