
Why Majesty Palm Tips Turn Brown and How to Stop It
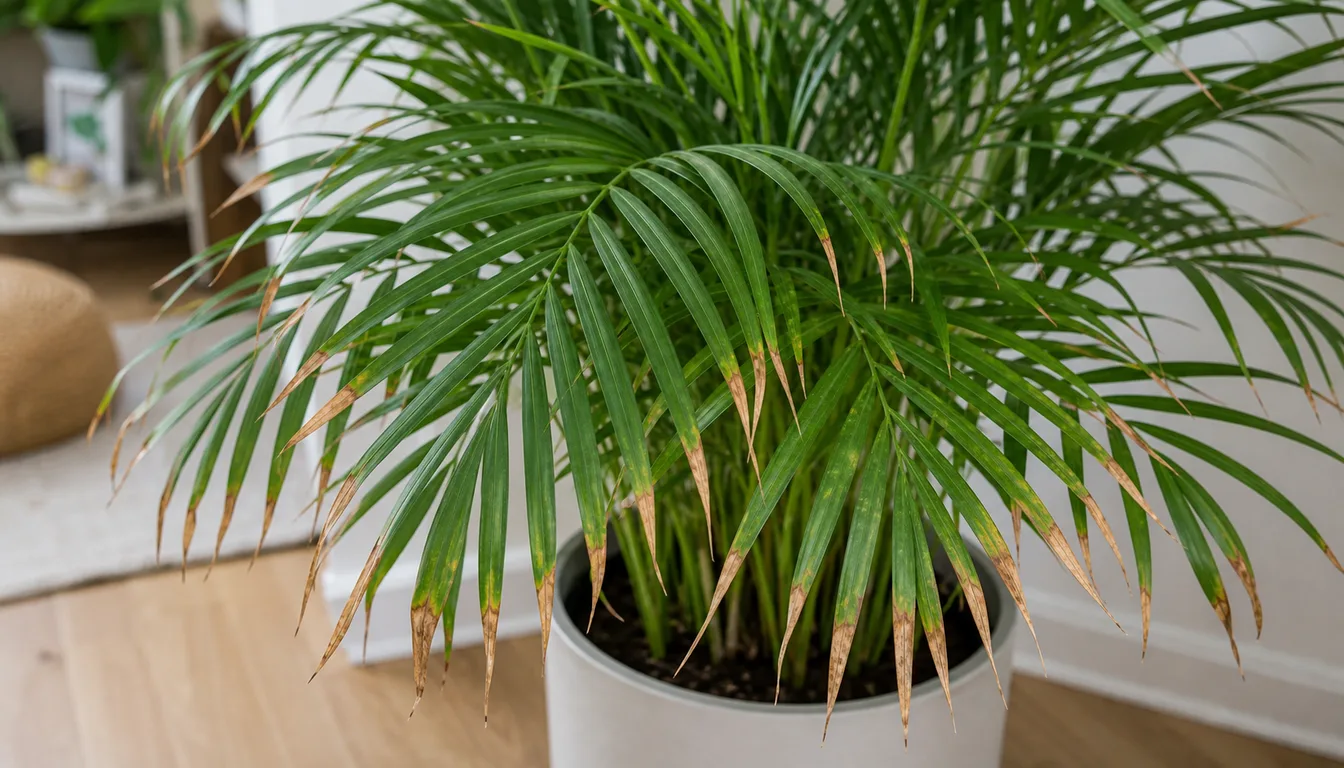
Brown tips on a Majesty Palm usually mean the leaflet ends are losing water faster than the roots can replace it. Dry indoor air, a root ball that dries unevenly, soluble salts, or stressed roots can all create that pattern, but the pot and fronds show which correction fits.
Quick diagnosis
Dry air or an unevenly moist root ball
Confirm that the damage starts at narrow leaflet tips while most of each leaflet stays green.
Then check whether the pot is light and dry, still heavy and wet, rimmed with white residue, or accompanied by stippling and fine webbing. When an entire frond turns yellow instead, follow the yellow-leaf diagnosis.
Open the full diagnosisWhat You Are Seeing
A brown tip is dead tissue, so it will not become green after conditions improve. The useful goal is to keep the next opening frond from developing the same crisp ends.
Start by mapping the damage. Dry-air or moisture stress usually reaches many narrow leaflet tips, while sun injury makes broader bleached patches and cold injury often marks the side facing glass or a draft.
Check the root zone before adding water. Push a finger or wooden skewer several inches into the mix, lift the pot if it is manageable, inspect the drainage holes, and look for white crust on the soil or rim.
Keep this symptom separate from whole-frond yellowing. A yellow lower frond, widespread pale foliage, or a yellow new spear raises different questions about aging, light, nutrition, and root health even when a few old tips are also brown.
Common Causes
01 High likelihood indoors
Low humidity and moving dry air
A Majesty Palm carries a large surface of narrow leaflets, and their far ends lose moisture quickly in heated or air-conditioned rooms. A vent can keep stripping moisture from one part of the canopy even when the root ball is watered correctly.
Humidity is the stronger explanation when many fronds have narrow crisp tips but their bases remain green, firm, and evenly colored. The pot should not be extremely light, waterlogged, sour-smelling, or heavily crusted with salts.
Compare exposure within the canopy before buying a humidifier.
Tips that are worst on the side facing a supply vent or heater support moving dry air, while equal damage around the plant points back toward root-ball moisture or salts. Moving the palm out of the air stream can matter more than raising the average humidity across the room.
Measure near the leaflets at several times, especially while heating or cooling runs.
A comfortable room average can hide short periods of very dry moving air at the canopy. Grouping plants or using a humidifier may help after placement is corrected, but misting does not keep humidity stable and wet foliage can complicate spotting or disease checks.
How to identify it
- Several otherwise green fronds carry a similar narrow band of brown at the leaflet tips.
- Damage is strongest near a heat vent, air conditioner, radiator, fan, or frequently opened door.
- New fronds open clean and develop dry tips only after spending time in the room.
- There is no stippling, fine webbing, sour potting mix, or sudden whole-frond yellowing.
- A humidity reading taken near the canopy stays low or swings sharply when heating or cooling runs.
What to do
- Move the canopy out of the direct path of heated or cooled air while keeping its light level similar.
- Use a room humidifier when the air remains dry for long periods, and clean it as its manufacturer directs.
- Measure humidity near the leaves for several days so a short shower or one misting does not hide the daily low point.
- Keep the root ball evenly moist without leaving the pot standing in drainage water.
- Judge the adjustment by the next frond because existing brown tissue cannot recover.
02 High likelihood
The root ball dries too far between waterings
Peat-rich potting mix can shrink from the pot wall when it becomes very dry. Water then runs down the gap and out of the drainage holes while the center of the root ball remains dry, which makes a quick pour look more effective than it was.
This cause fits when the pot becomes unusually light, the mix pulls from the edge, or a skewer comes out dry from the center. Leaflets may fold or lose their fresh green look before the ends become crisp.
Test both the edge and the center shortly after watering.
A wet edge beside a dry core confirms channeling and calls for a slow, thorough rewetting in stages. If the entire ball is still moist and heavy, another drink would reduce root oxygen and make the diagnosis less clear.
After the root ball is evenly rewetted, note how many days it takes to become moist rather than wet.
Brighter light, warmer weather, root growth, and a move away from a vent can all change that interval. Let the next center-moisture check trigger watering instead of preserving a calendar that belonged to the old conditions.
How to identify it
- The pot feels much lighter than it did after a thorough watering.
- Potting mix has pulled away from the pot wall or feels dry several inches down.
- Irrigation water races down one side and exits almost immediately.
- Fronds lose firmness or fold before watering and improve afterward, but dead tips remain.
- The palm dries fastest during warm bright weather or after roots have filled most of the pot.
What to do
- Water slowly across the full surface until the root ball accepts water evenly and excess drains freely.
- If water keeps bypassing a shrunken root ball, set the nursery pot in shallow water briefly and remove it once the mix is evenly damp.
- Empty the saucer after drainage so rewetting does not become prolonged saturation.
- Check moisture at depth rather than watering by weekday, and water before the entire root ball becomes dry and light.
- Inspect for a dense root mass if the palm needs water far more often than it used to, but let root condition and growth rate decide when to repot rather than a few old brown tips.
03 Common with repeated feeding
Soluble salts from water or fertilizer
Minerals left by hard water and fertilizer remain in the pot after water evaporates or drains. As their concentration rises, roots have more difficulty taking up water, and older leaflet tips often show the injury first.
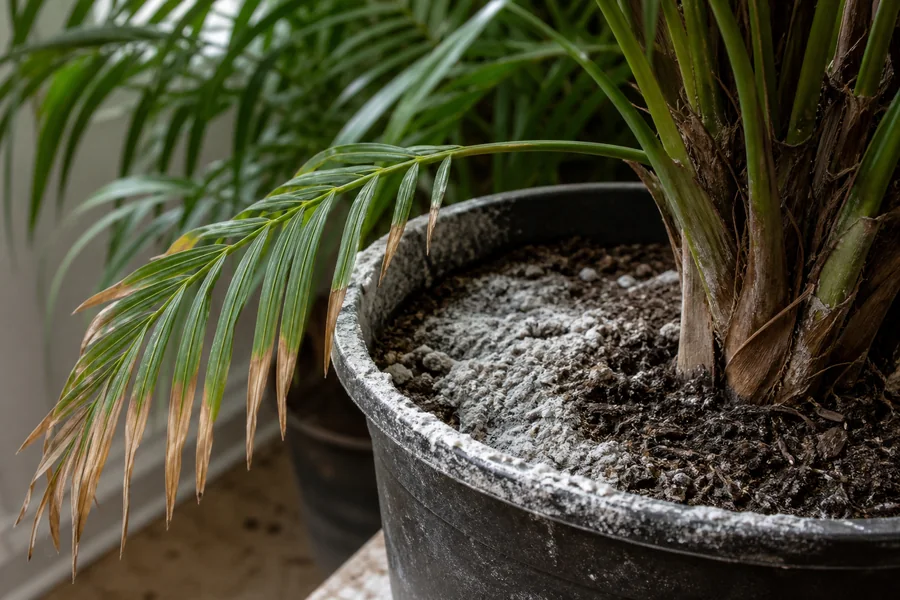
A chalky white crust on the soil, pot rim, or saucer supports this diagnosis. It is stronger evidence when tip burn worsened after feeding or when small drinks have never flushed water through the whole container.
Residue alone does not prove that every brown tip came from salts, so pair it with the care history.
Repeated fertilizer doses, softened water, or long periods without drainage-through make the case stronger. Pause feeding first, then flush only when the mix drains freely and the roots are not already sitting wet.
Inspect the drainage holes and saucer after flushing so dissolved salts actually leave the container.
Water that collects in a cover pot and is absorbed again keeps the minerals in the root zone. Cleaner new tips after the feeding and drainage pattern change provide the useful confirmation.
How to identify it
- White or tan crystalline residue coats the soil surface, pot rim, drainage holes, or saucer.
- Older fronds carry more tip burn than a newly opened frond.
- The palm receives fertilizer frequently, receives more than the label rate, or was fed while dry.
- Water leaves visible scale on kettles, fixtures, or the humidifier.
- The pot drains, but watering usually stops before any water passes through the bottom.
What to do
- Pause fertilizer while the palm is stressed instead of trying to feed away the brown tissue.
- Flush a freely draining pot with a generous volume of suitable water, then let it drain completely and empty the saucer.
- Do not flush a pot that is already saturated or has poor drainage because that would deepen root stress.
- Use rainwater, distilled water, or another lower-mineral source for several waterings when residue returns quickly.
- Resume light feeding only during active growth and follow the product rate for indoor palms or foliage plants.
04 Medium likelihood
Saturated mix is depriving roots of oxygen
Brown tips do not always mean the palm needs more water. Roots held in saturated, airless mix cannot supply the canopy normally, so the leaf ends may die while the pot still feels heavy.
This diagnosis needs root-zone evidence. A wet pot that remains heavy for many days, blocked drainage, a sour smell, soft dark roots, drooping in wet soil, or a weak new spear matters more than the brown tips alone.
Check whether the nursery pot is trapped inside a decorative cover with runoff at the bottom.
A dry-looking surface can sit above a saturated lower root ball. Empty standing water, open the drainage path, and let the moisture reading change before deciding whether repotting is justified.
How to identify it
- The mix stays wet well below the surface long after watering.
- The container has no drainage hole, the cachepot holds runoff, or drainage holes are blocked.
- The palm droops even though the root ball is moist and heavy.
- Potting mix smells sour, or visible roots are dark and soft instead of firm.
- New growth is weak or the central spear loosens, while whole fronds may also begin to yellow.
What to do
- Stop watering until the upper mix begins to dry and the pot loses some weight.
- Remove standing water from the saucer or cachepot and confirm that every drainage hole is open.
- Keep the palm warm with gentle air movement around the pot, but do not aim a drying vent at the fronds.
- Follow an overwatered-plant root check when the pot stays saturated despite correct drainage or when roots are soft and decayed.
- Treat a loose or soft central spear as a more serious crown or root problem rather than waiting for humidity changes to help.
05 Lower but easy to miss
Spider mites are feeding beyond the tips
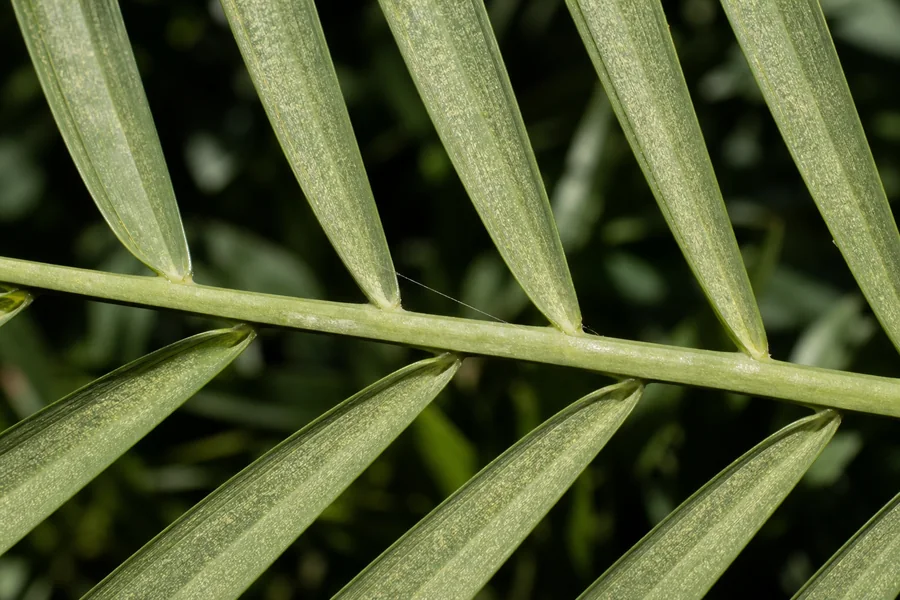
Spider mites remove cell contents and leave fine pale stippling across the leaflet, not just a clean brown edge. As feeding increases, foliage looks dull or gray-green and delicate webbing may appear along the midrib, leaflet bases, or between nearby leaflets.
Warm dry rooms favor mites, which is why an infested palm can also have ordinary dry tips. Treat mites only after finding stippling, moving specks, shed skins, or fine webbing beyond the dead tissue.
Inspect several leaflets from the newest fully opened and middle-aged fronds with bright side light.
Dust wipes away as an even film; mite stippling remains in the tissue, and webbing stretches between surfaces. Isolate a confirmed infestation before treatment so nearby houseplants can be checked without assuming humidity alone will solve it.
How to identify it
- Leaflets have many tiny pale dots or a dull sandblasted look outside the brown tip.
- Fine web strands span the underside, midrib, leaflet base, or the gap between leaflets.
- A white sheet of paper held below a tapped frond catches tiny moving specks.
- Damage is spreading across fronds instead of stopping at old crisp ends.
- Nearby houseplants show similar stippling or webbing.
What to do
- Separate the palm from other plants while you inspect both sides of every frond.
- Rinse the canopy thoroughly, including leaflet undersides, while keeping excess runoff out of the potting mix.
- Remove only fronds that are heavily damaged because mostly green foliage still supports the palm.
- Apply a product labeled for spider mites and indoor plants exactly as directed, including any repeat interval on the label.
- Recheck the newest and most sheltered leaflets because one rinse rarely proves the infestation is gone.
06 Seasonal
Cold glass or a cold draft injured one side
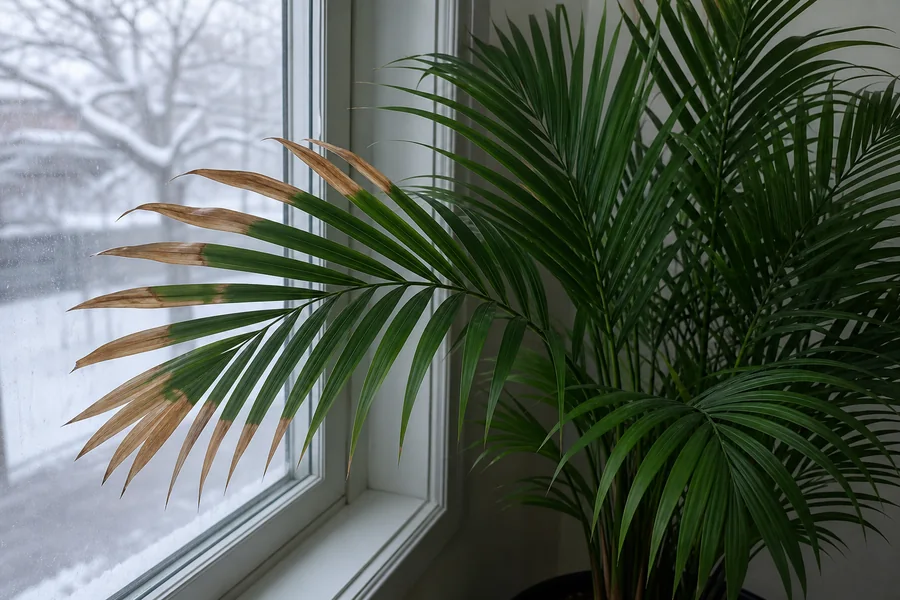
A tropical Majesty Palm can develop brown tissue after leaflets touch cold glass or receive a burst of cold air. The pattern often appears suddenly on the exposed side instead of advancing evenly across every frond.
Timing is the deciding clue. Look for damage after a cold night, a move, an open exterior door, or contact with a window rather than assuming a gradual humidity problem caused it.
Trace the damaged leaflet tips back to their positions before the fronds were turned.
Injury that matches a pane, door gap, or transport side supports chilling, while equal narrow tips across old and new directions do not. Move the palm into stable warmth without placing it beside a heater or abrupt strong sun.
Cold slows water use as well as injuring foliage, so check the root ball before the next scheduled watering.
Keeping wet mix on the old warm-season interval can add root stress after the original event. New tissue, not the chilled tips, shows whether the plant recovered.
How to identify it
- Brown or darkened tips and patches are concentrated on the window-facing or door-facing side.
- Some leaflets were touching glass when outdoor temperatures fell.
- The marks appeared shortly after a cold draft, transport, or an abrupt temperature drop.
- Sheltered fronds on the same palm remain cleaner.
- There is no mineral crust, prolonged dry root ball, mite stippling, or webbing to explain the pattern.
What to do
- Move the fronds far enough from glass that they cannot touch it overnight.
- Keep the palm out of the path of exterior doors and cold air while preserving bright filtered light.
- Avoid an abrupt move into hot direct sun because chilled tissue is already stressed.
- Leave mostly green fronds in place and wait for a new spear to show whether the new position is safer.
- Inspect roots and the central spear if damage continues after the cold exposure has ended.
Trim the damage without sacrificing green tissue
Scissors can improve the outline of a frond, but they do not repair the cause. Clean the blades first and follow the natural point of each leaflet while leaving a very narrow brown border between the cut and living green tissue.
Do not remove a whole frond because only its tips are marked. Its green area still makes energy, and stripping several useful fronds leaves the palm with less capacity to open the next spear.
Before trimming, mark one damaged frond with a loose tag and photograph it.
If the brown boundary stays fixed, the old injury is stable. If tan tissue continues moving inward while the root ball is wet, or new spots begin away from the tips, return to the diagnosis instead of cutting away the evidence.
Read the shape of the boundary as well as its movement.
A narrow repeated end on many leaflets fits water balance or salts. A broad one-sided patch follows sun, cold, or contact.
Stippling and webbing extend across living tissue, while a spot that begins away from the tip deserves a lesion diagnosis.
Measure recovery on new tissue.
A new frond that opens green and keeps clean tips shows that the current air, water, and root conditions are better even though older tips remain brown. Majesty palms open fronds slowly indoors, so stable old damage is useful progress while the next spear develops.
Change one major condition at a time whenever the palm is otherwise stable. Moving it away from a vent, correcting the watering method, and pausing fertilizer can each be evaluated; simultaneous repotting, feeding, pruning, and relocation create fresh stress and make the result impossible to interpret.
Worsening damage on the newest frond deserves another diagnosis.
Recheck moisture deep in the pot, drainage, soluble salts, mites, and the firmness of the central spear before making a second correction. A soft or foul-smelling spear, widespread collapse in wet mix, or rapidly spreading lesions is no longer a cosmetic-tip problem.
Keep enough green area to support that spear.
A frond with brown tips but a firm green rachis still contributes energy, while removing several marked fronds at once reduces the palm's working canopy. Prune a whole frond only after it is spent or when confirmed pest or disease sanitation requires it.
Match the Brown Pattern Before You Change Care
Look at the width and distribution of the damage before adding water or treating pests. A narrow end on many leaflets, a broad injury on one side, and pale stippling across the blade each send the inspection in a different direction.
Then confirm one physical clue. Check moisture inside the root ball for uniform tips, review cold contact for one-sided injury, and inspect leaflet undersides under bright light when the green tissue itself looks speckled.
- Narrow Tips Across the Palm
- Check center moisture, dry airflow, and mineral residue before changing the watering interval.
- Broad Damage on One Side
- Match the injured frond to cold glass, a door, transport, or another brief chilling event.
- Stippling Beyond the Tips
- Use a bright underside inspection to look for fine webbing and tiny moving mites.
Recovery Plan
Choose one correction from physical evidence
Check the moisture depth at the center and edge, pot weight, drainage path, residue, leaflet undersides, and recent cold exposure.
Correct the strongest match and photograph one marked frond so later changes are easier to judge. Do not add water merely because the tips look dry when the lower root ball is still heavy and wet.
Watch for spread rather than color reversal
Old brown tissue will remain brown. Stable damage, a pot that now wets and drains evenly, and no new stippling suggest the correction is helping, while expanding marks or a persistently wet sour pot require another root or pest check.
Use new leaflets as the clean test
Inspect the new leaflet tips as they unfold and harden. Cleaner edges show improvement, while fresh browning directs attention back to dry airflow, uneven moisture, salt residue, or the root condition that still has evidence.
Escalate persistent decline
Seek experienced local help when new growth stays weak, the central spear softens or pulls free, roots are decaying, or confirmed mites persist after label-directed treatment. These signs indicate more than cosmetic tip damage.
Keep new Majesty Palm leaflets intact by checking moisture below the surface and watering the full root ball before it becomes extremely dry. Let excess water drain completely, keep runoff out of the cachepot, and pause feeding whenever the palm is stressed.
Watch for white residue and flush only a freely draining pot. A lower-mineral water source can help when crust returns quickly, while a clean humidifier and distance from heating or cooling vents address the air side of the problem.
Inspect leaflet undersides when you water and keep fronds off cold glass. These small checks catch mites, a blocked drainage path, a shrinking root ball, or a seasonal draft before the next opening frond records the same damage.