
Why Camellia Leaves Turn Yellow
Camellia leaves turn yellow in several distinct patterns.
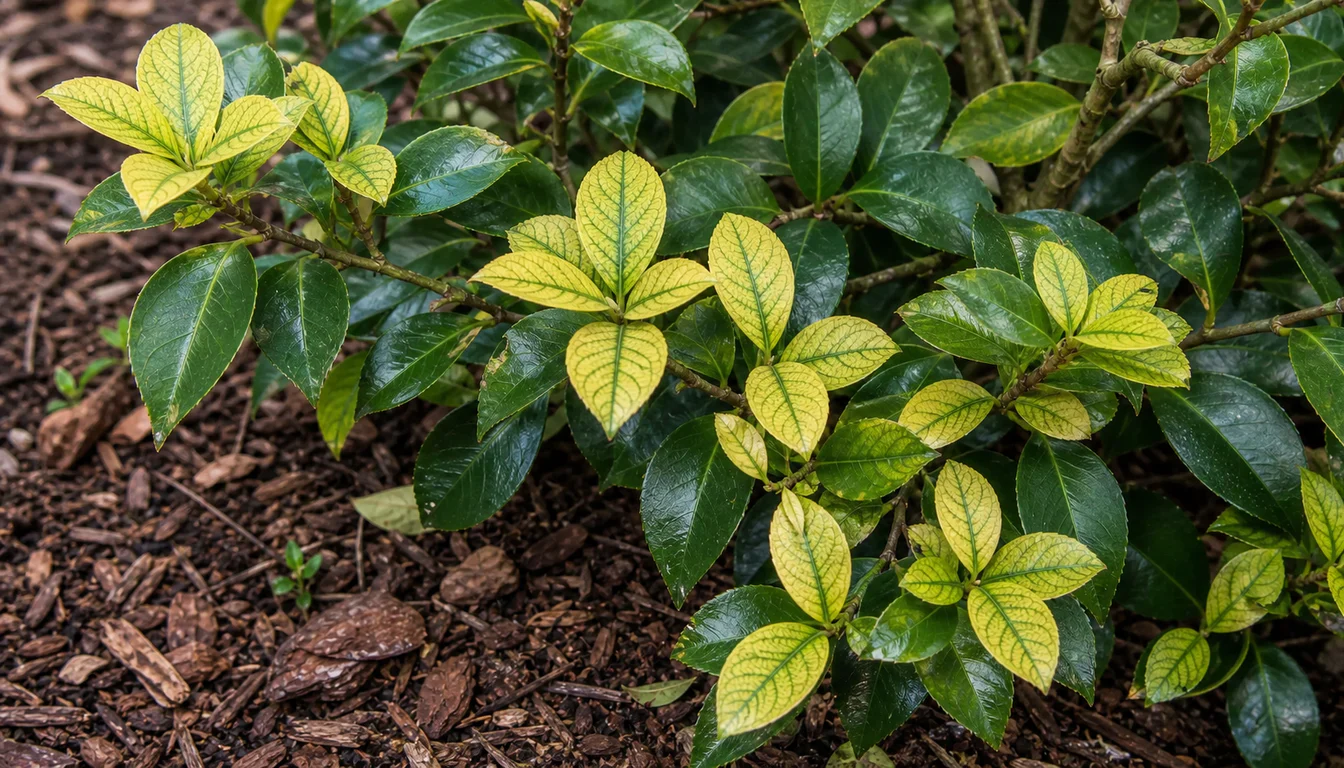
Yellow tissue between green veins on young leaves supports iron chlorosis, whole-leaf fading with wilt points toward root or moisture stress, and yellow splotches above hidden insects point toward tea scale.
Quick diagnosis
Leaf age and the yellow pattern identify the first branch
Compare a yellow leaf with healthy foliage from the same shrub. Check whether veins remain green, whether the newest or oldest leaves changed first, whether the affected area follows wet soil or exposed branches, and whether yellow patches on top align with scale insects underneath.
Open the full diagnosisWhat You Are Seeing
Camellias need slightly acidic soil with good drainage, but yellow foliage does not automatically prove that the soil lacks iron. A high pH can make existing iron unavailable, while damaged roots can stop the shrub from taking up water and nutrients even when the soil test shows enough.
Begin with the leaf itself. Interveinal yellowing on young leaves, uniform fading and wilt, scattered upper-surface splotches, and a few aging interior leaves are different patterns that need different responses.
Use leaf-blade changes together with root and pest evidence for this symptom. If the leaves remain glossy while formed flower buds fall intact, use the separate Camellia bud drop diagnosis.
Common Causes
01 High likelihood
High-pH iron chlorosis
Camellias grow best in a slightly acidic root zone, where iron remains available to the roots. When soil becomes too alkaline, young leaves can turn pale yellow between veins that remain visibly green even though the soil may contain iron.
How to identify it
- The newest expanded leaves are paler than the older foliage.
- Leaf veins and tissue immediately beside them remain green.
- The shrub grows near concrete, masonry runoff, alkaline fill, or soil that has received lime.
- A representative soil test shows pH above the preferred range for Camellia.
- The soil drains normally and the shrub does not show the wilt or root decay pattern of saturated soil.
What to do
- Submit a soil sample before choosing sulfur, iron, or fertilizer because the test separates high pH from a true nutrient shortage.
- Keep lawn lime, wood ash, and alkaline construction runoff out of the Camellia root zone.
- Use an iron product only according to its label when the leaf pattern and soil evidence support iron unavailability.
- Follow local soil-test guidance if elemental sulfur is recommended because soil type changes the safe amount and response time.
- Judge the correction from new leaves rather than expecting every old yellow leaf to become dark green.
02 High likelihood
Poor drainage and damaged roots
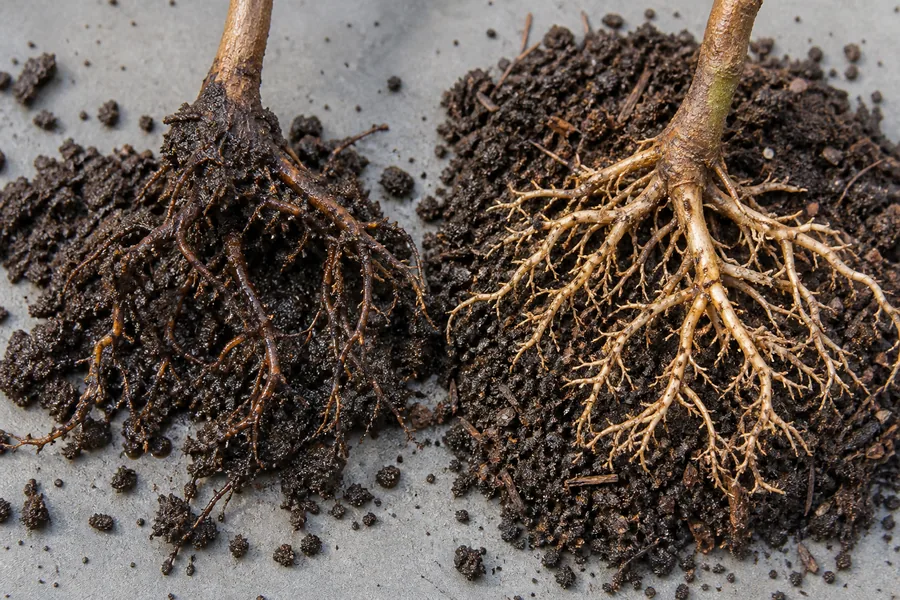
Camellia feeder roots need both moisture and air. Saturated or compacted soil can injure roots and cause uniform yellowing, weak growth, wilt in wet ground, leaf drop, and eventual branch decline.
How to identify it
- Whole leaves fade rather than showing a clean green-vein network.
- The root zone remains slick or saturated for days after rain or irrigation.
- The shrub wilts while the soil still feels wet below the mulch.
- The trunk flare is buried, the planting pocket sits low, or roof runoff collects nearby.
- Accessible roots are dark, sparse, or soft instead of firm and branching.
What to do
- Pause irrigation until an inspection shows that the root zone has started to drain normally.
- Redirect downspouts and runoff rather than trying to dry a constantly refilled planting pocket.
- Expose a buried trunk flare carefully and keep mulch off the stem base.
- Correct a blocked container outlet or move the shrub into a fresh acidic mix with open drainage when container roots are affected.
- Seek a local diagnostic confirmation when roots or branches continue to decline because serious root rot is not corrected by adding fertilizer.
03 Medium likelihood
Drought around the shallow root system
Camellia roots spread near the soil surface and can dry beneath eaves, competing trees, or thin mulch even when nearby lawn soil feels damp. Prolonged moisture stress can dull foliage, yellow older leaves, scorch edges, and cause early leaf drop.
How to identify it
- Soil beneath the mulch is dry several inches down across much of the root zone.
- Yellowing followed hot, windy weather or a missed watering period.
- Leaf margins may look dry while shoots remain firm rather than soft and water-soaked.
- The driest or most exposed side shows damage first.
- There is no persistent wet-soil odor or soft-root evidence.
What to do
- Check moisture in several places beneath the branch spread instead of testing beside the trunk only.
- Water slowly across the root zone so moisture penetrates instead of running away over dry soil.
- Use soil and weather evidence to decide when another watering is needed.
- Maintain a two to three inch organic mulch layer while leaving the trunk flare open.
- Reduce competing weeds and correct an irrigation pattern that wets nearby lawn but misses the shrub roots.
04 Medium likelihood
Tea scale feeding beneath the leaves
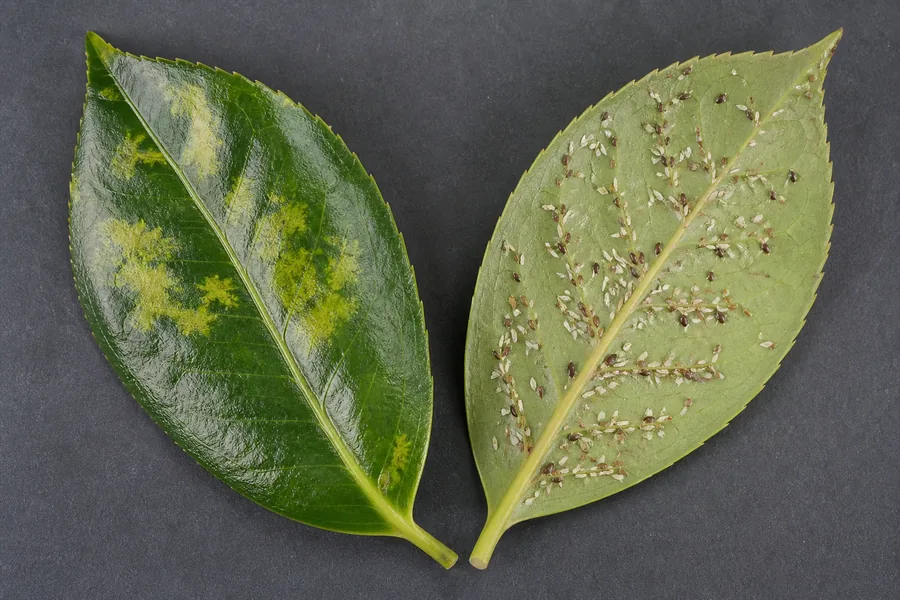
Tea scale is a serious Camellia pest that feeds from the underside of leaves. Its feeding produces irregular yellow splotches on the upper surface, while white male covers and darker female covers remain hidden below.
How to identify it
- Yellow dots or splotches appear unevenly across the upper leaf surface.
- Turning the same leaf over reveals white waxy material or small brown to dark scale covers.
- Infestation is concentrated on certain branches rather than matching the whole root zone.
- Heavy populations occur with leaf drop, fewer flowers, weak twigs, or cottony-looking material below leaves.
- The scale covers remain attached when the leaf is moved and do not resemble loose dust.
What to do
- Inspect multiple leaves from the interior and lower canopy before deciding how extensive the infestation is.
- Remove heavily infested twigs when pruning will not strip most of the shrub.
- Preserve beneficial insects and avoid treating a yellow leaf when no live scale is present.
- Use horticultural oil or another product only when its label names the plant, pest, site, rate, and safe application conditions.
- Recheck new foliage because damaged old leaves can remain yellow after the insects are controlled.
05 Low likelihood
A nutrient shortage supported by testing
Low fertility can pale foliage and slow shoots, but leaf color alone cannot name the missing nutrient. A soil test, the age of the affected leaves, growth history, and root condition are needed before feeding an acid-loving shrub.
How to identify it
- Older leaves fade along with weak annual growth or unusually small new leaves.
- The soil test identifies a specific shortage or pH-related availability problem.
- Drainage, drought, planting depth, and tea scale do not match the pattern.
- The shrub has not received nutrients from mulch or a measured feeding program for an extended period.
- Symptoms occur across the plant rather than on one exposed or infested branch.
What to do
- Correct only the nutrient or pH issue named by the test.
- Follow tree and shrub fertilizer timing and use a product labeled for acid-loving shrubs rather than adding extra for faster color.
- Do not fertilize drought-stressed, waterlogged, or visibly damaged roots.
- Keep granular products away from the trunk and water them as the label directs.
- Compare the next flush of growth with untreated old leaves to judge the response.
06 Low likelihood
Sun, reflected heat, or cold exposure
Camellias prefer partial shade and shelter from drying winter wind. Harsh afternoon sun, reflected heat, or a cold exposed edge can bleach, bronze, or yellow foliage on the side that receives the damaging exposure.
How to identify it
- Damage is strongest on one side or on outer leaves rather than evenly distributed.
- Protected interior leaves retain their normal dark glossy color.
- The pattern appeared after a heat event, transplant exposure, freeze, or drying wind.
- Leaf edges may tan or bronze instead of preserving a crisp green-vein pattern.
- Soil and root evidence do not explain why one face of the shrub is affected.
What to do
- Provide temporary filtered shade during severe reflected heat without wrapping wet material around the foliage.
- Use a breathable wind screen when cold dry wind repeatedly damages the same side.
- Keep the root zone normally moist during exposure stress without saturating it.
- Avoid removing all damaged foliage at once because remaining leaves still support the shrub.
- Choose a more sheltered site if the exposure pattern returns despite practical protection.
07 Low likelihood
Normal turnover of older leaves
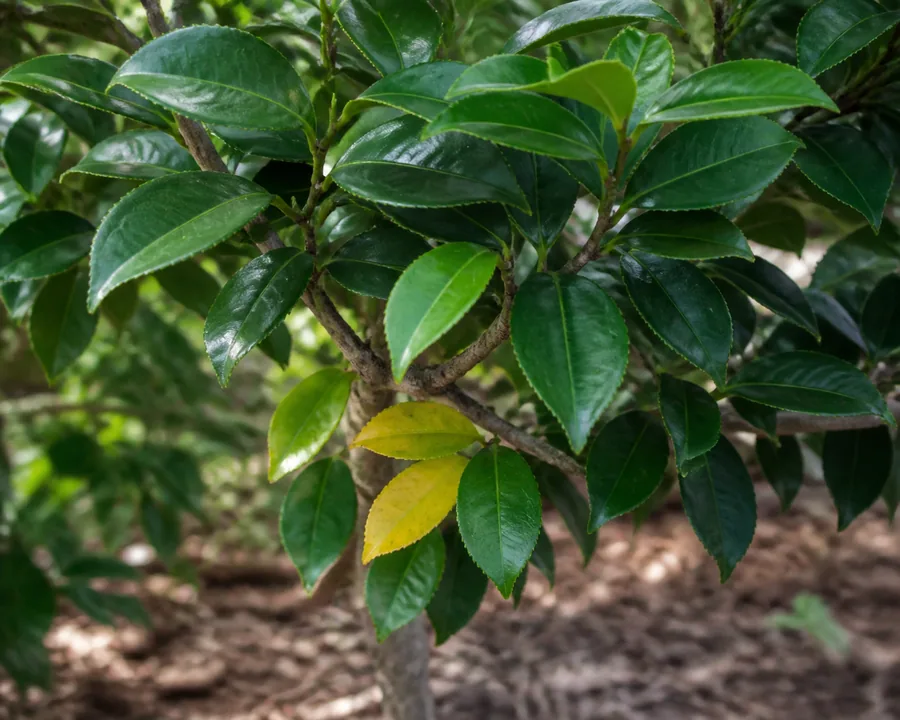
An evergreen Camellia still replaces old foliage. A limited number of older interior leaves may yellow and fall while young leaves, shoot tips, buds, and the rest of the canopy remain healthy.
How to identify it
- Only scattered older leaves inside the canopy turn yellow.
- New leaves remain glossy, normally sized, and evenly green.
- The shrub continues to grow and does not wilt or lose branches.
- No green-vein chlorosis, wet-root pattern, exposure edge, or underside pest evidence appears.
- Leaf loss stops after the older cohort drops.
What to do
- Monitor new growth instead of treating normal turnover.
- Collect fallen leaves so a later increase in loss is easy to notice.
- Keep the existing watering and mulch routine stable when the shrub otherwise looks vigorous.
- Investigate again if yellowing moves into young leaves or begins concentrating on branches.
- Avoid fertilizer or pesticide added only to stop a normal aging process.
Use four checks before treating yellow leaves
First compare leaf age.
Iron chlorosis usually declares itself on younger leaves, a general nutrient or moisture problem may involve older foliage, and natural turnover remains limited to scattered old interior leaves.
Next read the geometry of the yellowing.
Green veins form a network inside chlorotic tissue, tea scale makes less orderly upper-surface splotches, and exposure injury follows the sunniest or windiest face of the shrub.
Then inspect both hidden surfaces.
Turn leaves over for scale and check soil moisture, drainage time, trunk depth, and accessible feeder roots before deciding that a product is needed.
Finally use testing to choose an amendment. Iron may be present but unavailable at the wrong pH, while injured roots can produce a deficiency-like leaf even when nutrient levels are adequate.
Recovery Plan
Stop the supported stress
Correct the one branch supported by leaf, soil, root, exposure, pest, or test evidence. Avoid stacking iron, fertilizer, pesticide, extra water, and pruning because several simultaneous changes erase the evidence and can add root injury.
Watch the next leaves and live pests
New growth should hold better color and firmness as the root zone improves, though existing yellow leaves may remain marked. After scale treatment, check for live insects and healthy new foliage rather than judging success from old damaged leaves alone.
Confirm a durable correction
Repeat soil testing only at the interval recommended by the lab, maintain drainage and an open trunk flare, and compare the next flush with photographs from this season. Continued decline after the matched correction needs local diagnostic help rather than a stronger guess.
Keep Camellia foliage green by maintaining slightly acidic, well-drained soil, protecting shallow roots with organic mulch, and checking moisture across the whole root zone. Inspect leaf undersides for tea scale, keep lime and concrete runoff away, and use soil-test evidence before applying iron, sulfur, or fertilizer.