
Calathea Crispy Leaves: Checking Dry Margins and Curling
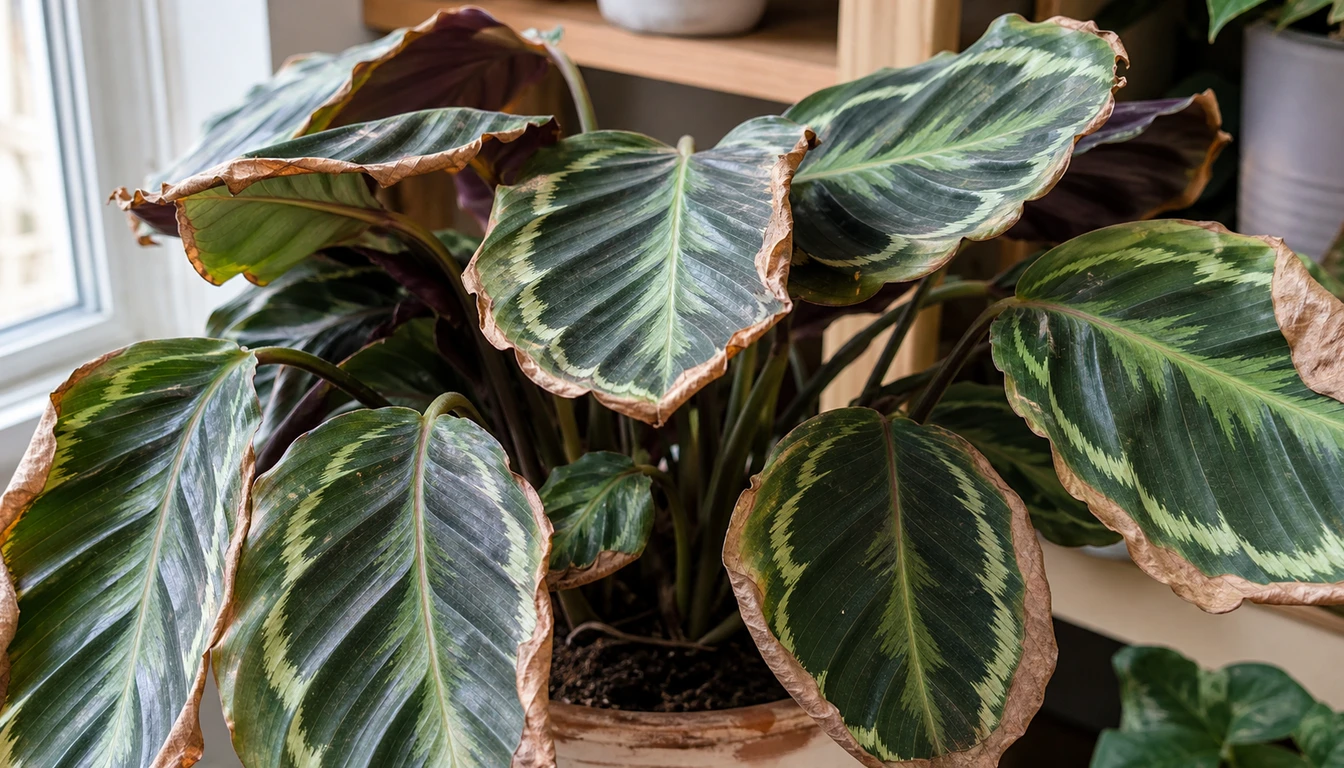
Crispy Calathea leaves have dry tissue extending along the margin or farther into the patterned blade, often with curling or rolling.
Check the leaf underside and pot condition first because dry air, a root ball that no longer wets evenly, direct sun, salts, damaged roots, and spider mites need different responses.
Quick diagnosis
Start with the leaf underside, then the pot
Fine stippling, webbing, and visible mites justify pest inspection. Yellowing, soft growth, or persistently wet mix also call for a root-zone check.
Missing these signs does not rule out either problem. Leaf position, pot weight, moisture inside the root ball, and recent exposure help choose the next check without establishing a diagnosis from the pattern alone.
Open the full diagnosisWhat You Are Seeing
A papery margin describes dead tissue along the edge of a leaf. Dry moving air or inadequate root uptake can contribute, while chemical, temperature, and pest injury may produce overlapping damage.
The amount of brown tissue shows the extent of injury, not a single cause.
Map the damage before changing care. Window-facing pale patches support sun scorch, matching damage near a vent supports dry air, and a very light pot with mix pulled from the wall supports a root ball that dried too far.
Localized brown tips and wider crispy margins can share the same causes. A larger damaged area does not by itself identify a different problem.
Separate lesions, stippling, webbing, or continuing collapse justify closer inspection alongside the moisture and exposure checks.
Common Causes
01 Check the supporting evidence
Low humidity or moving heated air
Dry air and a direct stream from a heater or fan can increase water loss. Rolling and dry margins can occur with this exposure, but firm leaf centers and petioles do not establish that the root zone is healthy.
How to identify it
- Several exposed leaves develop a similar dry edge during the same period.
- The brown boundary is crisp and dry without a wet halo or separate spots.
- Damage is strongest near a heater, air vent, fan, or frequently opened door.
- A hygrometer at leaf height remains below the plant's preferred range through heating or cooling cycles.
What to do
- Move the pot beyond the direct stream from vents and fans before changing its watering schedule.
- Measure humidity beside the leaves for several days instead of relying on a room average from another location.
- Use a room humidifier when the measured air stays dry, and clean the unit on its recommended schedule.
- Group compatible humidity-loving plants with enough space for air to move between leaves.
- Judge the correction on the next unfurling leaf because old dry margins cannot rehydrate.
02 Check the supporting evidence
A root ball that dried hard or sheds water
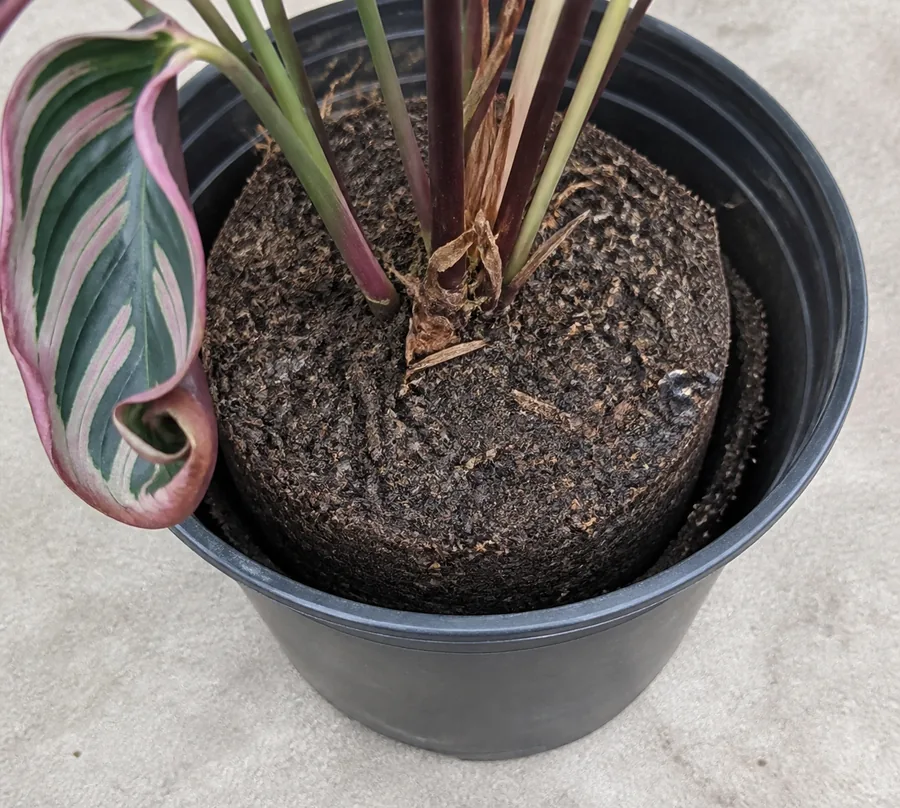
When potting mix dries until it contracts, water can race down the gap beside the pot and leave the center of the root ball dry. Calathea leaves then roll, droop, and crisp along larger sections of the margin even after a quick watering appears to drain normally.
How to identify it
- The pot feels unusually light and the mix has pulled away from the container wall.
- Water exits the drainage holes quickly while the center of the mix remains dry.
- Leaves curl or fold before broad edges become tan and brittle.
- A wooden skewer or finger check below the surface finds a dry core rather than evenly moist mix.
What to do
- Rewet a contracted root ball slowly in several passes so the center absorbs water instead of channeling it around the edge.
- Let excess water leave completely and empty the saucer after the mix is evenly moist.
- Use pot weight and moisture below the surface before the next watering rather than following a fixed day count.
- Consider replacing deteriorated medium when it repeatedly repels water or has compacted into a hard mass.
- Choose a pot close to the root-ball size so a correction does not leave a large volume of wet unused mix.
03 Check the supporting evidence
Direct sun on the exposed leaf surface
Strong direct sun can bleach foliage before the injured tissue turns tan and crisp. The exposed side and timing of a move may support that explanation, but uneven damage cannot rule out root stress or another contributor.
How to identify it
- The palest or crispiest tissue faces the window or the path of a sunbeam.
- A bleached tan patch extends inward from the edge instead of following every margin.
- Leaves shaded by the rest of the plant remain cleaner.
- Damage appeared after a move or a seasonal change in the sun angle.
What to do
- Move the plant into bright indirect light or filter the direct beam with a sheer curtain.
- Shift the pot gradually so leaves formed in shade are not exposed suddenly to stronger light.
- Do not add extra water unless the root-zone check also shows dryness.
- Leave green parts of scorched leaves in place while the plant is producing replacement foliage.
04 Check the supporting evidence
Fluoride, mineral water, or fertilizer salts
NC State describes fluoride sensitivity in species including Goeppertia fasciata and G. warszewiczii. Fertilizer and irrigation salts can also contribute to damaged margins.
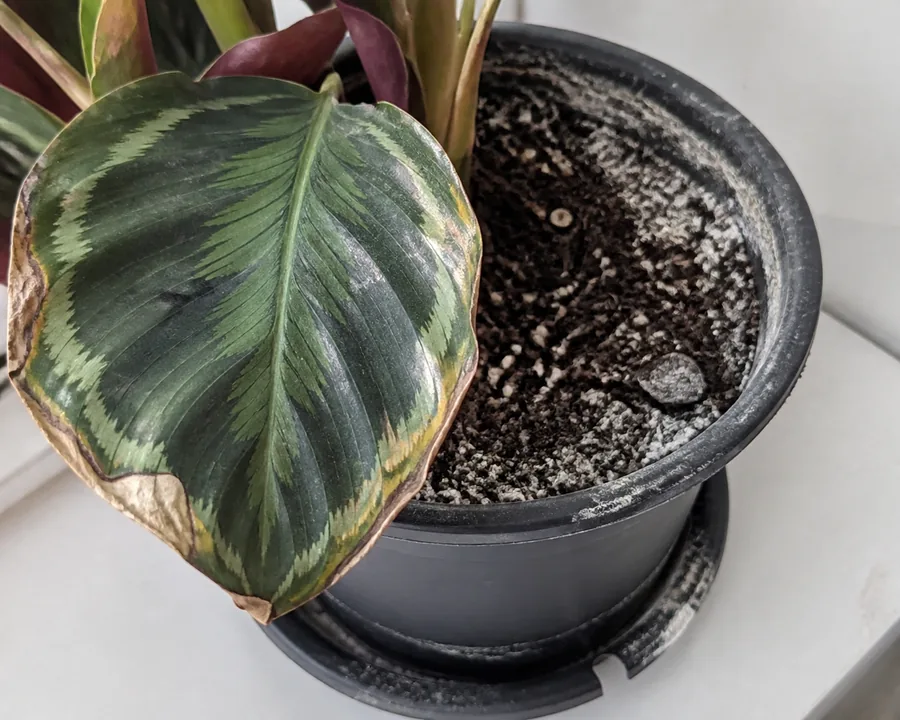
A pale deposit makes water and feeding history worth checking, but cannot identify fluoride, measure exposure, or prove the cause of the leaf injury.
How to identify it
- A thin hard white deposit forms on the pot rim, mix, or saucer.
- New leaves continue to develop margin burn after room humidity and root moisture stabilize.
- Damage increased after more frequent feeding or fertilizer applied to dry mix.
- Other fluoride-sensitive or salt-sensitive plants watered from the same source show similar edges.
What to do
- Pause fertilizer while fresh leaves are still opening with new damage.
- Consider distilled or another suitable low-mineral water source when the evidence supports a water-quality change. A filter removes only substances specified for that device.
- Flush only when the pot drains freely and the mix is not already saturated.
- Replace heavily crusted or compacted mix when water no longer moves through it evenly.
- Resume feeding during active growth with a rate suited to an indoor pot rather than compensating for stress with extra fertilizer.
05 Check the supporting evidence
Waterlogged mix and damaged roots
Crispy tissue does not always mean a plant needs more water. Persistent saturation can reduce root aeration and water uptake, while root injury can also follow cold, salts, or infection.
Penn State describes similar symptoms across several causes of root damage. Its commercial-crop guidance supports seeking a diagnosis before fungicide treatment, not diagnosing infection from a leaf or root color.
How to identify it
- The mix stays wet and the pot remains heavy long after watering.
- Older leaves yellow through the blade while margins brown or dry.
- The root zone smells sour or the cachepot holds standing drainage water.
- Roots have deteriorating texture or lose their outer tissue. Dark color alone does not establish rot.
What to do
- Empty standing water and confirm that the pot has clear drainage openings.
- Wait until the root zone reaches its normal moisture threshold before watering again.
- Inspect roots when persistent wetness, odor, softness, or stalled growth supports the disturbance.
- If inspection shows dead roots or degraded medium, use clean tools and an airy moisture-retentive mix for necessary repotting. Continuing decline or suspected infection needs diagnostic advice.
- Use a container close to the remaining root system instead of surrounding it with a large volume of wet mix.
06 Check the supporting evidence
Spider mites feeding on the leaf surface
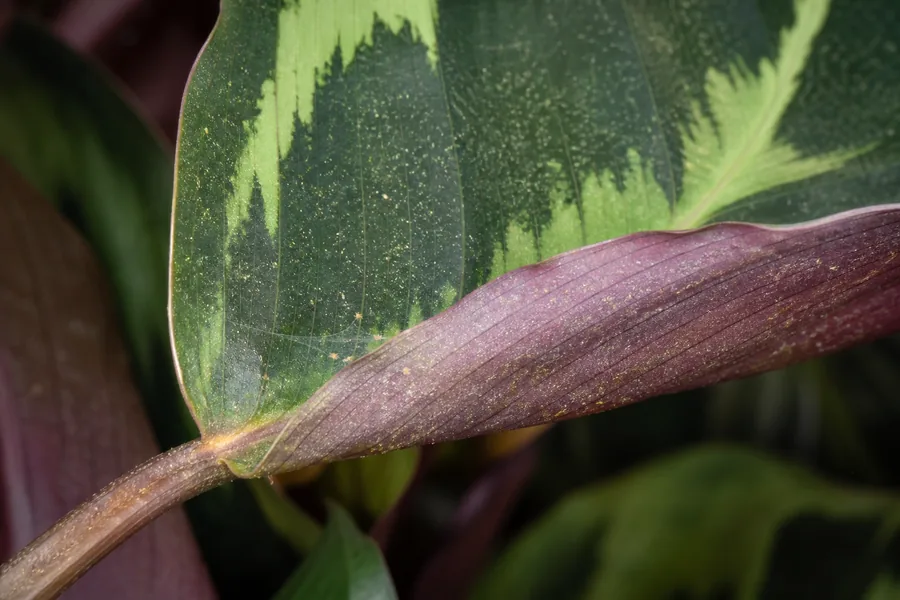
Spider mites thrive in warm dry indoor conditions and pierce leaf cells, creating fine pale stippling that can merge into bronzed, brittle tissue. The key evidence is on the leaf surface and underside rather than in the shape of the dry margin alone.
How to identify it
- Tiny pale dots create a dusty or stippled look across the patterned blade.
- Fine web strands appear near veins, petioles, or folded leaf edges.
- Small moving dots are visible on the underside under bright light or magnification.
- Nearby leaves develop the same stippling even when their pot moisture is normal.
What to do
- Isolate the plant while checking nearby houseplants for the same evidence.
- Rinse upper and lower leaf surfaces with lukewarm water to remove dust and many mites.
- Follow spider mite treatment steps only when the evidence is present, and test a labeled product on a small leaf area first.
- Repeat inspection because eggs and protected mites can survive one treatment.
- Keep the plant out of hot dry airflow while it replaces damaged foliage.
07 Check the supporting evidence
Cold glass or a cold draft
A tender Calathea can be injured where a leaf touches cold glass or encounters a cold draft. A recent exposure and the affected side help interpret the damage, but dark or limp tissue can also have other causes.
How to identify it
- Only leaves touching the window or facing the door show the strongest damage.
- The affected area looked water-soaked, dark, or limp before becoming dry.
- Protected leaves on the same plant remain firmer and cleaner.
- The symptom followed a cold night, a move, or repeated door drafts.
What to do
- Move leaves away from cold glass while keeping the plant in useful indirect light.
- Choose a position outside the direct path of exterior doors and cold air-conditioning streams.
- Keep the root ball only normally moist during recovery because cold tissue does not need repeated watering.
- Remove a leaf only when it has become mostly dead or soft rather than cutting firm green tissue immediately.
What the damaged tissue can and cannot tell you
A dead leaf margin records where cells lost water or function, but brown color does not identify the cause by itself. The distribution, pot condition, leaf underside, and sequence of events carry more useful evidence than the shade of tan.
Old crispy tissue will not rehydrate or turn patterned green again.
Keep a damaged leaf while most of its blade remains firm and green, or trim only dead tissue with clean scissors for appearance.
Photographs of the same boundary can show whether damage has spread. A stable mark and sound new growth are encouraging, while one cleaner leaf cannot certify that every problem has resolved.
Spreading stippling, visible pests, enlarging lesions, soft petioles, odor, or deteriorating roots justify further investigation. Some clues may identify a pest, but symptoms alone do not confirm a pathogen or exclude overlapping stress.
Recovery Plan
Correct the best-supported cause
Record the current leaf boundary, then change the one condition supported by the inspection. Rewet a dry core, move the plant out of direct exposure, change the water source, treat confirmed mites, or inspect persistently wet roots instead of applying every remedy together.
Compare the next unfurling leaf
Compare old boundaries, developing leaves, and pot moisture over time. Fresh stippling, expanding injury, continued yellowing, or abnormal drying means further assessment is needed. There is no fixed week that proves recovery.
Remove only tissue the plant no longer uses
Dead edges may be trimmed for appearance with clean scissors, leaving a narrow dry border rather than cutting living tissue. Sound green leaf area remains useful; removing damaged foliage does not correct its cause.
Reduce recurring Calathea injury by checking pot weight and moisture below the surface, measuring humidity at leaf height, filtering strong direct sun, and keeping the pot away from hot or cold airflow. Inspect leaf undersides during routine cleaning, keep drainage open, and judge water or fertilizer changes from new leaves rather than permanent old margins.
Sources
- North Carolina Extension Gardener Plant Toolbox - Goeppertia warszewiczii
- North Carolina Extension Gardener Plant Toolbox - Goeppertia fasciata
- University of Wisconsin Horticulture: Houseplant Care
- Penn State Extension - Fungal Root Rots and Chemical Fungicide Use
- University of Minnesota Extension, Managing Insects on Indoor Plants
- University of Georgia Extension, Growing Indoor Plants with Success, Bulletin 1318