
Why Does My Monstera Have Brown Spots on Its Leaves?
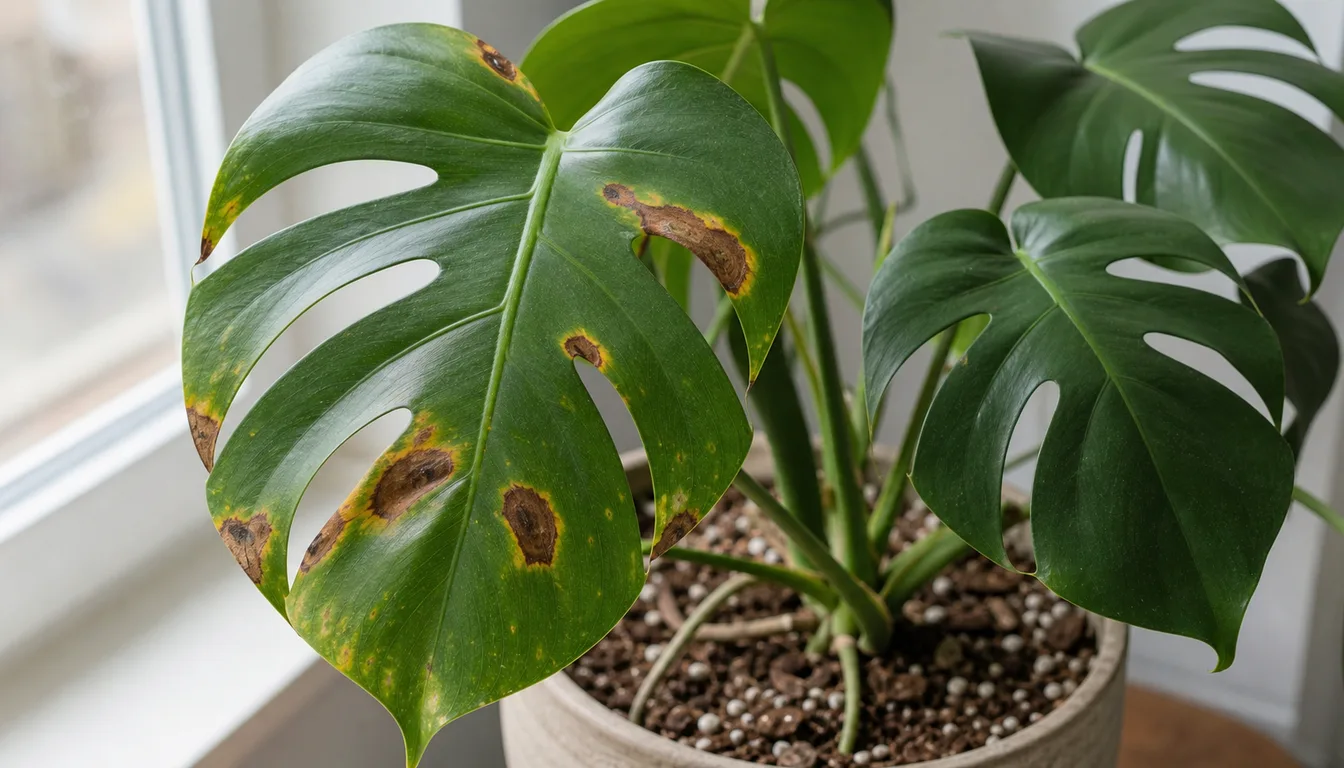
Brown spots on Monstera deliciosa can come from wet roots, leaf disease, direct sun, cold contact, or thrips.
Inspect the newest spot, both leaf surfaces, and the pot before changing how you care for the plant.
Quick diagnosis
Root stress or a leaf lesion favored by wet conditions
Soft dark spots with yellow borders or sticky residue support bacterial leaf spot. Yellowing that begins at an edge and turns tan then dark brown supports anthracnose, while a crisp bleached patch confined to the window-facing side supports sun scorch.
Open the full diagnosisWhat You Are Seeing
Brown describes dead tissue, not its cause. The useful evidence sits at the living margin around a fresh spot, where texture, color sequence, vein boundaries, residue, and direction of expansion are still visible.
Check whether the pattern changed after one event or continues to appear. Sun and cold injuries usually stop after the exposure ends, while root failure, leaf disease, and feeding pests can keep marking new tissue.
Do not repot every spotted Monstera or mist a leaf that may have an infectious lesion. Inspect the leaf first, then open the pot only when prolonged wetness, sour odor, wilt, or stem-base damage points below the soil line.
Old brown tissue will not turn green. Judge recovery by stable lesion margins and a clean next leaf rather than by the appearance of tissue that has already died.
Common Causes
01 High likelihood when lesions are wet and bordered
Bacterial leaf spot
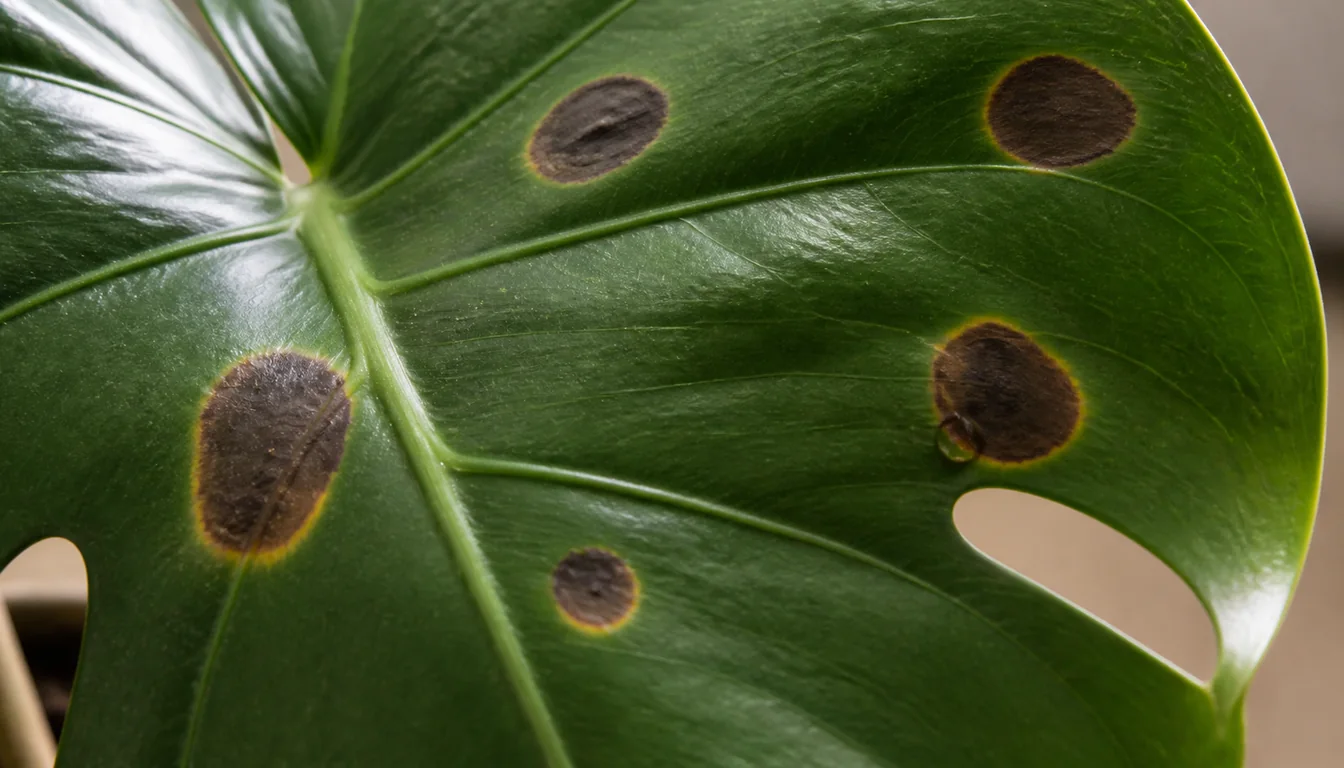
Bacterial leaf spot on Monstera can produce similarly sized dark brown lesions with yellow borders. Fresh spots may look water-soaked or release a subtle sticky ooze, and water movement or handling wet foliage can spread bacteria.
How to identify it
- Fresh spots look translucent or water-soaked before becoming dark brown.
- A yellow border surrounds lesions of similar size.
- Sticky residue may appear on a fresh lesion without an insect population.
- New spots emerge after misting, wet handling, or crowded humid conditions.
What to do
- Separate the plant from nearby foliage while new lesions are forming.
- Stop misting and keep irrigation water off the leaves.
- Remove a badly affected leaf with disinfected shears when lesions are expanding.
- Increase spacing and gentle airflow without placing the plant in a cold draft.
- Seek a plant-clinic diagnosis if clean leaves continue developing wet lesions.
02 Medium likelihood
Anthracnose
Anthracnose caused by Colletotrichum can begin as yellowing along a Monstera leaf edge. The affected band turns tan and then dark brown as it advances inward, and serious cases may also form large lesions on petioles or stems.
How to identify it
- Yellow tissue develops first along a leaf edge rather than around separate wet dots.
- The edge progresses from yellow to tan and then dark brown.
- Damage expands inward in an uneven band.
- A sunken or dark lesion may also appear on a petiole or stem.
What to do
- Avoid misting and prevent water from sitting on the leaf margin.
- Remove severely affected tissue with clean tools and contain the clippings.
- Avoid wounding healthy leaves and petioles during handling.
- Improve spacing and keep the plant out of stagnant humid corners.
- Confirm the diagnosis before choosing any labeled fungicide.
03 High likelihood with wet mix and wilt
Root or stem rot
Dense mix, an oversized pot, blocked drainage, or standing water can deprive roots of oxygen and favor rot. Leaf necrosis becomes a root-zone diagnosis when it occurs with wilt, a sour pot, a soft stem base, or roots whose outer tissue slips away.
How to identify it
- The pot remains heavy and wet long after watering.
- Leaves flag or yellow in addition to developing brown areas.
- Roots are brown or black, soft, and easy to strip from their inner core.
- The stem at soil level is dark, soft, or constricted.
What to do
- Empty standing water and pause irrigation while you inspect drainage.
- Slide the root ball out only when root evidence is present.
- Trim confirmed soft dead roots with sanitized tools.
- Follow overwatered plant recovery while repotting in a draining container only slightly larger than the surviving roots.
- Use a coarse, airy mix and water after the active root zone begins to dry.
04 Medium likelihood after an exposure change
Direct-sun scorch
A Monstera moved close to unfiltered glass can receive more radiation than an acclimated leaf can use. The exposed sector bleaches, turns tan, and becomes crisp while portions shaded by another leaf or window frame remain green.
How to identify it
- Damage is confined to the side or sector facing strong direct sun.
- The center is pale tan or bleached rather than water-soaked.
- The patch feels dry and crisp with a sharp exposure boundary.
- Leaves shaded at the same height remain clean.
What to do
- Move the plant out of harsh midday or afternoon rays.
- Use a sheer curtain while retaining bright indirect light.
- Acclimate gradually if the plant will receive gentle direct morning sun.
- Keep a partly green scorched leaf unless it is structurally damaged.
05 Event dependent
Cold glass or draft injury
Tropical Monstera tissue can die after touching cold glass or sitting in a cold airflow. The injury may look dark and soft at first, then dry brown, but it appears on the exposed side after a temperature event rather than spreading randomly.
How to identify it
- The damaged leaf touched a cold window or stood in an exterior-door draft.
- Symptoms appeared soon after a cold night or transport outdoors.
- One side of the plant is affected while protected leaves remain green.
- No new spots form after the plant is moved to stable warmth.
What to do
- Move leaves away from cold glass and heating or cooling vents.
- Keep the plant in a stable room temperature suitable for tropical foliage.
- Wait for the injury margin to stabilize before trimming.
- Investigate another cause if lesions continue appearing in warm conditions.
06 Check new growth
Thrips feeding
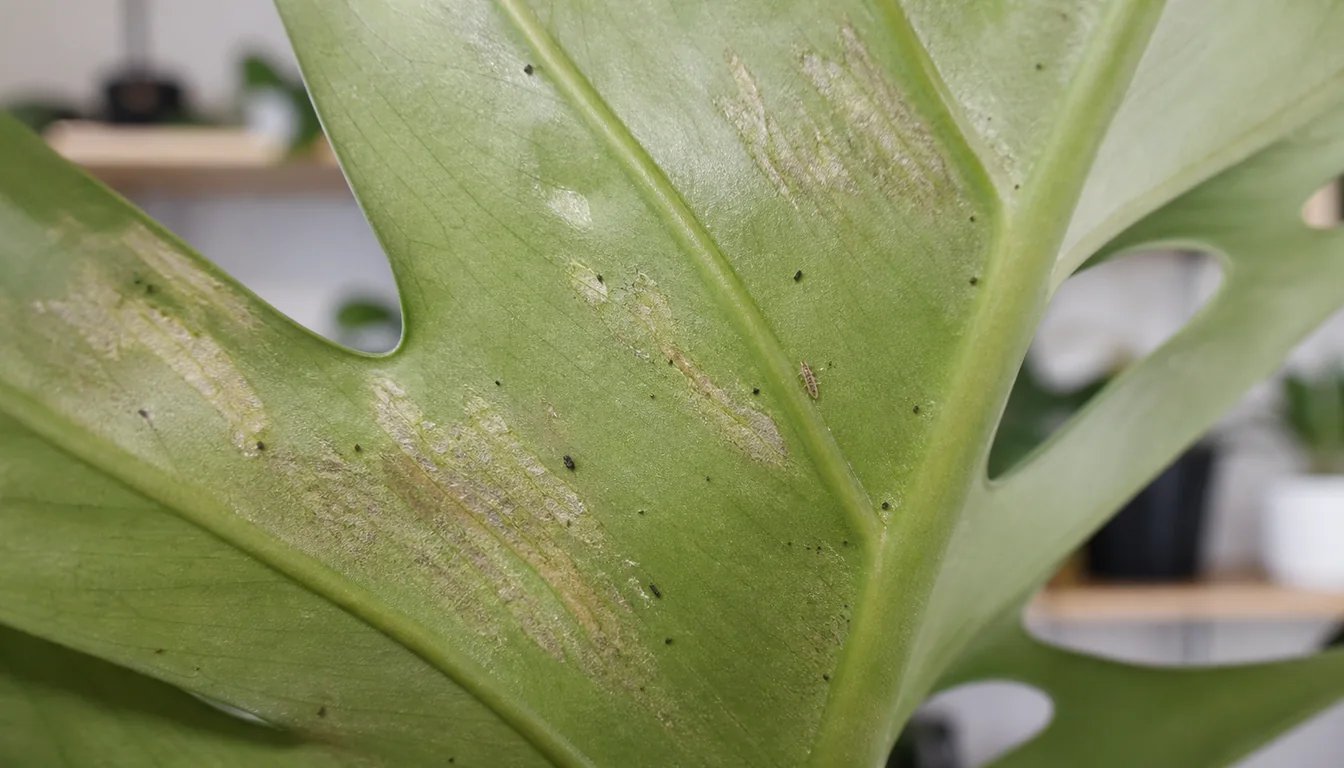
Thrips scrape young leaf cells and feed on the contents. Damaged areas first look silvery or bronze, then coalesce into dry brown scars, especially on a leaf that was attacked while still furled.
How to identify it
- Silvery scrape marks surround or precede the brown patches.
- Tiny black fecal specks remain on the leaf surface.
- A new leaf unfurls scarred, distorted, or stuck along one edge.
- Slender pale or dark insects move along veins and the leaf underside.
What to do
- Isolate the plant and inspect neighboring houseplants.
- Wipe both surfaces to remove insects and fecal specks before treatment.
- Use a product labeled for thrips on indoor plants and repeat only as its label directs.
- Inspect each newly unfurling leaf until a full growth cycle stays clean.
07 Easy to test
Mineral or product residue
Hard-water deposits, dried fertilizer spray, leaf-shine products, and dust can leave tan or brown marks that resemble tissue damage in a photograph. Residue sits on the surface and changes when gently wiped, while true necrosis remains part of the leaf.
How to identify it
- The mark has a crust, ring, or droplet outline on the surface.
- A damp white cloth removes or lightens it.
- The tissue below remains flexible and green.
- New marks follow misting, foliar feeding, or use of a leaf product.
What to do
- Test one small mark with a damp soft cloth.
- Stop spraying products that leave residue or risk leaf injury.
- Use water with lower dissolved salts for occasional leaf cleaning if needed.
- Do not cut a healthy leaf because of a removable surface deposit.
What Does the Edge of a Fresh Monstera Spot Reveal?
Dead tissue converges on brown, but the transition into living green tissue remains different.
Wet yellow-bordered lesions, edge-first bands, bleached exposure patches, and silver feeding scars each preserve a different sequence.
Root evidence must agree with the leaf before you cut roots.
Moist mix alone is not rot, and firm pale roots in a wet pot need a drying and drainage correction rather than surgery.
Two causes can occur together. A stressed root system can weaken the plant while wet leaves support disease, so record which symptoms stop after each correction instead of forcing every mark into one diagnosis.
A clean next leaf is the most useful outcome.
It shows that the plant can build intact tissue under the new conditions even though older leaves retain permanent scars.
How Can You Tell What Caused a Monstera Brown Spot?
Choose the newest complete lesion rather than a large dry patch. Photograph it in natural light and note whether the margin is wet, yellow, bleached, silver, or sharply aligned with an exposure.
Touch the surface with a clean tissue before touching another leaf. Sticky ooze, black fecal specks, and a removable mineral ring occupy the surface in different ways, while dead tissue does not wipe away.
Turn the leaf over and inspect along veins, folds, and the petiole. Thrips often shelter there, while an infectious lesion may show the same tissue boundary through both surfaces.
Mark the lesion edge with a dated photo rather than drawing on the leaf. Expansion or matching spots on a new leaf matters more than the final darkness of the original mark.
- Choose a fresh lesion with green tissue around it.
- Record texture, border, position, and exposure direction.
- Inspect both surfaces for residue, insects, ooze, or spores.
- Photograph the margin and compare it after several days.
When Should You Check Monstera Roots for Rot?
Check the drainage hole, saucer, pot weight, smell, and stem base before disturbing roots. A pot that dries normally and supports firm growth makes root rot less likely than a leaf-level cause.
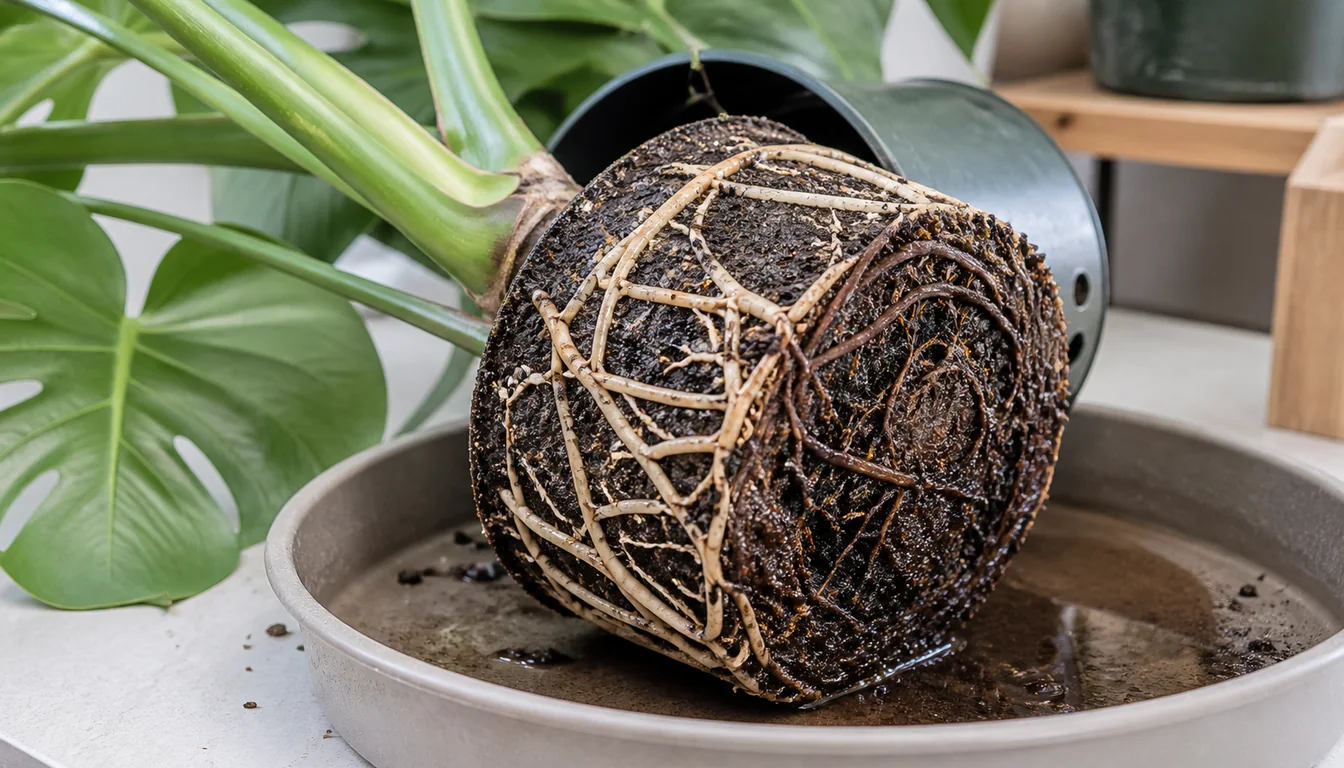
If the pot stays wet, smells sour, or the plant flags, slide the root ball out while supporting the stems. Inspect the outside and bottom first so a small problem does not trigger unnecessary removal of healthy mix.
Firm cream, tan, or light-brown roots can be healthy depending on age and mix staining. Confirmed rot feels soft, loses its outer layer when gently pulled, or connects to a dark stem base.
Match the new pot to the surviving root mass, not the leaf span. Monstera tolerates a close-fitting pot better than a large volume of mix that remains wet beyond the roots' use.
Should You Cut Off Brown Monstera Leaves?
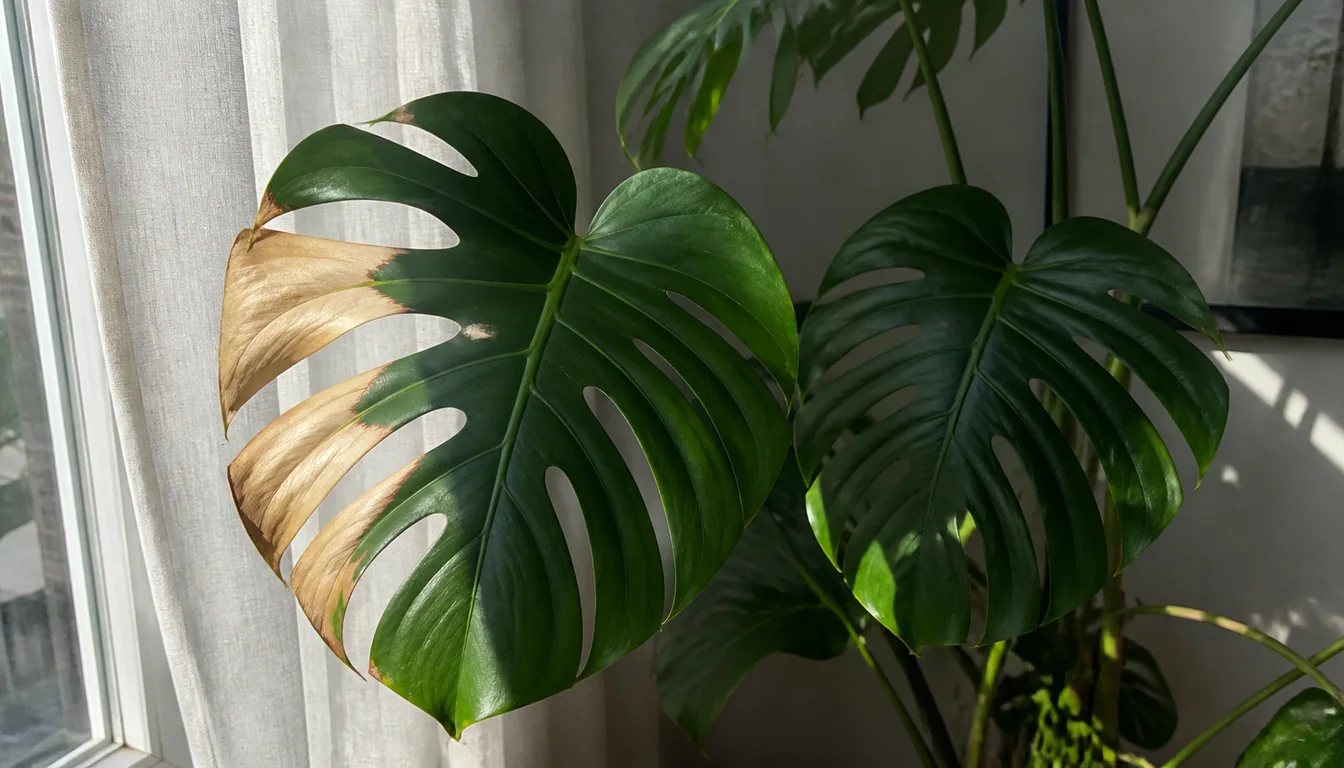
Keep a stable scorched, cold-damaged, or mechanically scarred leaf when most of its surface remains green. That tissue still captures light and supports the next leaf.
Remove a whole leaf when wet lesions are multiplying, when a suspected infection occupies much of the blade, or when the petiole itself has a spreading lesion. Cut at the petiole with a disinfected tool and contain the leaf.
Partial trimming is cosmetic and does not cure a cause. Use it only after a dry edge has stabilized, and leave a narrow dry margin rather than cutting into living green tissue.
Keep
- Stable dry damage
- Mostly green surface
- No new matching lesions
Trim
- Dry stable edge
- Cosmetic purpose only
- Do not cut living margin
Remove
- Wet lesions expanding
- Large infectious pattern
- Petiole or stem involved
Recovery Plan
Separate the patterns
Inspect a fresh lesion, isolate the plant if disease or thrips is plausible, and correct an obvious sun, cold, standing-water, or leaf-wetting exposure.
Watch the marked margin
The original brown area stays brown. Progress means its margin stops expanding and no matching lesions appear on other leaves.
Test the active cause
A clean unfurling leaf supports the correction. Silver scars, wet spots, or repeated edge necrosis route the next action back to pests, leaf disease, or roots.
Rebuild without overcorrecting
Resume watering from measured root-zone moisture, retain useful green leaves, and change only the condition supported by evidence.
Prevent recurring Monstera brown spots by using a draining pot sized to the roots, keeping foliage dry, providing bright filtered light, avoiding cold glass, and inspecting new leaves for pests before damage spreads.
Sources
- Monstera deliciosa, University of Connecticut Home Garden Education Center
- Edema of Indoor Plants, University of Maryland Extension
- Managing Plant Diseases in the Home Garden, University of Minnesota Extension
- Care of Houseplants, Clemson Cooperative Extension
- Managing Houseplant Pests, Colorado State University Extension