
Why Bromeliad Leaf Tips Turn Brown and Stay Dry
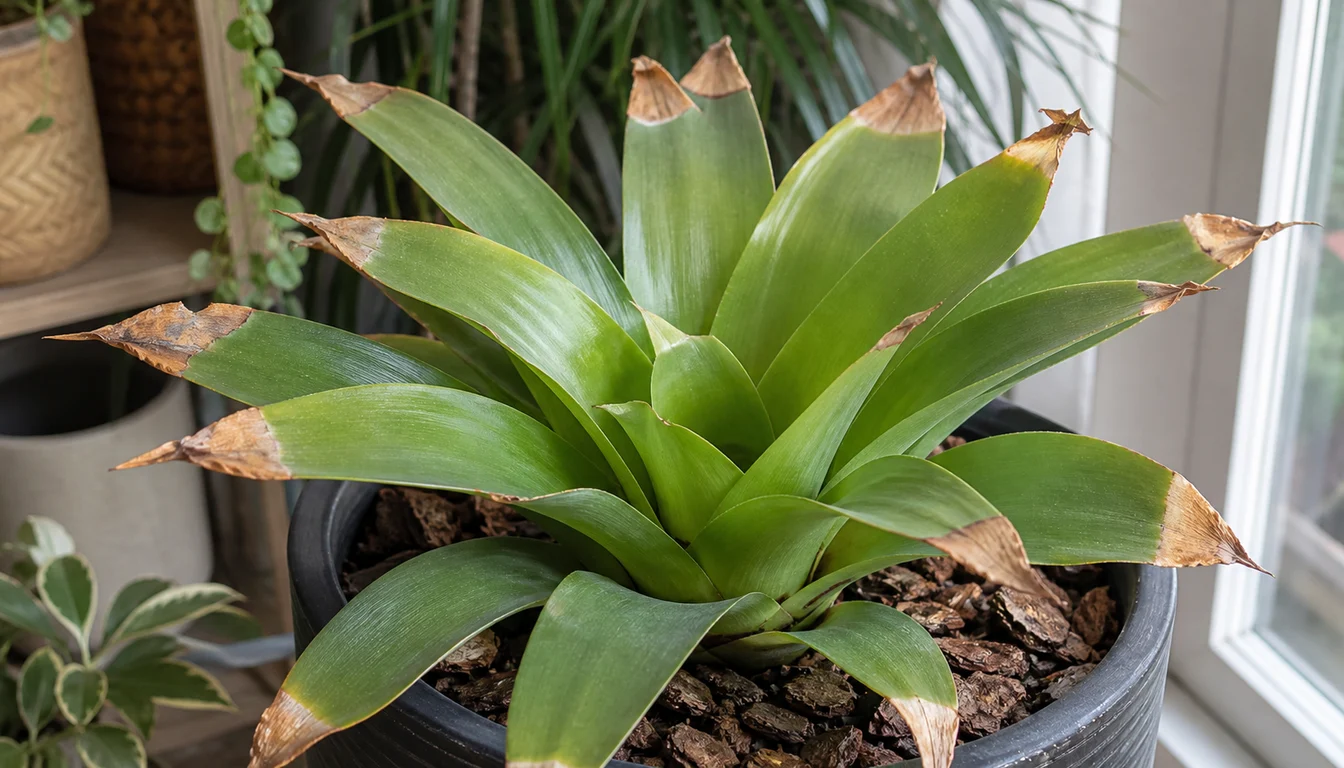
Dry brown tips on a bromeliad usually point to moisture loss, accumulated salts, or an exposure problem while the center of the rosette remains firm. Check the cup type, potting mix, recent water and fertilizer use, light, and temperature before changing care.
Quick diagnosis
Moisture loss or salt accumulation at the leaf ends
Touch the damaged tissue and then inspect the center.
A dry papery tip with firm green leaf bases fits tip burn, while a soft dark center, loose inner leaves, or a sour smell points to center rot and needs a different response.
Next map the pattern.
Tips across the whole rosette favor dry air, repeated drying, or accumulated salts. Damage on the window side favors sun or cold exposure, while limp leaves above a wet heavy mix move root stress higher on the list.
Open the full diagnosisWhat You Are Seeing
The word bromeliad covers tank-forming plants such as Aechmea, Guzmania, and many Neoregelia as well as species that do not hold water in a central well. Identify how your bromeliad is built before filling its center because one watering rule does not fit the whole family.
A dead leaf tip cannot become green again. The useful recovery signs are a sharp boundary that stops moving, a firm center, and new leaves that emerge without the same damage after the cause is corrected.
Do not respond to every brown tip by soaking the pot. A bromeliad can lose moisture from its leaves while roots are already sitting in wet compact mix, and adding more water then makes the below-ground problem worse.
Use recent history to choose the first test. A heater starting, a move to direct sun, a cold night against glass, a strong feeding, or weeks of topping up with hard water each leaves a different pattern.
Common Causes
01 High likelihood during heating season
Dry room air or a hot draft speeds water loss
Leaf ends have little surrounding tissue to buffer water loss, so they can dry before the broad middle of the leaf. Heated indoor air, an HVAC vent, or a hot window can make tips on many leaves turn tan and papery while the center stays sound.
This pattern often appears across the rosette rather than on one old leaf. The potting mix may still be slightly moist, which is why adding frequent root watering is a poor first response.
How to identify it
- Several leaves have dry brown ends with no soft tissue at their bases.
- Damage appeared after indoor heating began or after the plant moved near an air vent.
- Leaf ends facing a hot current are worse than sheltered leaves.
- The center remains firm and the potting mix is not consistently dry.
- No white deposit, recent heavy feeding, or obvious sun-bleached patch explains the timing.
What to do
- Move the plant beyond the direct path of heating or cooling vents.
- Group plants or run a room humidifier when the air stays dry, while preserving airflow around the rosette.
- Keep a pebble tray below the pot only if the pot remains above the water rather than standing in it.
- Judge improvement from stable old damage and clean new growth instead of watering the pot more often.
02 High likelihood when the plant feels light and limp
The cup or root zone repeatedly dries too far
A tank bromeliad may develop dry ends when its central well remains empty for long periods during active growth. A non-tank or terrestrial bromeliad depends more on moisture in its mix, so a very light pot and mix pulled from the container edge matter more than an empty center.
The distinction prevents two opposite mistakes. Filling a center that is not designed as a tank can wet the growth point, while keeping a tank plant's pot saturated can damage its compact roots.
How to identify it
- The barky mix is dry through the root zone and the pot feels much lighter than after watering.
- Leaves have lost firmness or curled slightly before their ends browned.
- A tank-forming rosette has remained empty through warm active growth.
- Damage progressed during a long absence or after watering intervals increased.
- The leaves regain some firmness after correct watering even though the brown tissue remains.
What to do
- For a tank-forming bromeliad, rinse the well and add fresh rainwater or distilled water rather than merely topping up old water.
- Moisten an airy root mix thoroughly enough for excess water to drain, then empty the saucer or cachepot.
- For non-tank types, water the mix according to its actual moisture and do not pour water into a center that does not hold it naturally.
- Use the pot's weight and moisture below the surface instead of a fixed calendar.
03 High likelihood with visible deposits or recent feeding
Minerals or fertilizer salts accumulated as water evaporated
Water leaves dissolved minerals behind as it evaporates, and fertilizer adds more salts. Repeatedly topping up a tank or feeding a slow-growing bromeliad can concentrate them around leaf bases or roots until the vulnerable tips burn.
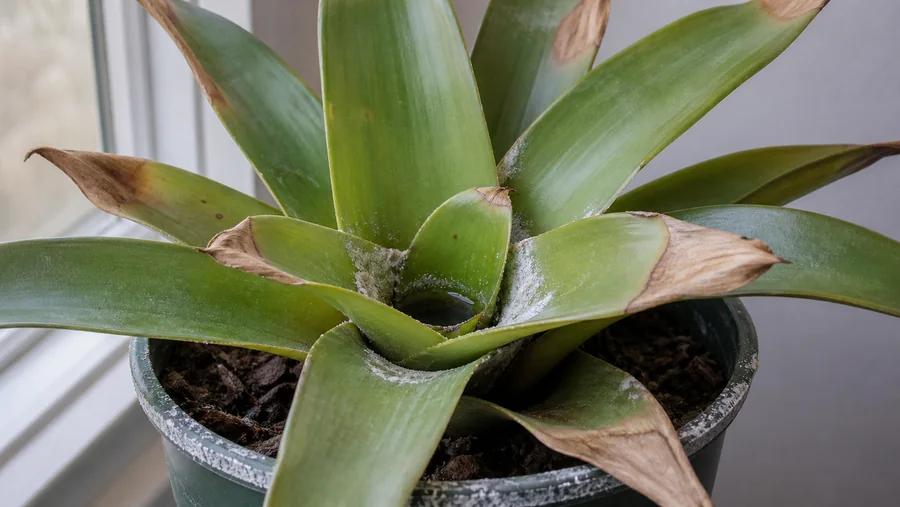
A white or tan deposit on the cup, mix, or pot rim strengthens this diagnosis. Clean new growth after the water source and feeding change is better confirmation than the color of an old damaged tip.
How to identify it
- A pale crust appears on the pot rim, mix surface, or inside the central well.
- Tip browning worsened after fertilizer was added or its strength increased.
- Old cup water has been topped up repeatedly rather than emptied and replaced.
- The roots and center are firm, which makes active rot less likely.
- Damage slows after the accumulated residue is flushed away.
What to do
- Stop fertilizer while the plant is stressed and remove any solid feed from the cup.
- Empty and rinse a tank-forming well, then refill it with rainwater or distilled water.
- Flush the potting mix with low-mineral water and let all runoff leave the container.
- When healthy growth resumes, use only a light feeding appropriate for bromeliads and never exceed the product label.
- Replace old crusted mix with a free-draining bromeliad mix when flushing no longer clears the deposits.
04 Medium likelihood after a brighter move
Strong direct sun or hot glass scorched the exposed side
Bright indirect light suits many houseplant bromeliads, but sudden strong sun through glass can bleach exposed tissue and leave it tan or brown. The injury may catch the tips first, then form a broader patch across the sun-facing leaf surface.
Unlike whole-rosette moisture stress, this damage respects direction. Shaded leaves remain greener, and the change follows a move, a seasonal shift in sun angle, or loss of a curtain or outdoor shade cover.
How to identify it
- Damage is strongest on leaves facing the window or afternoon sun.
- Tan or pale areas extend beyond the very end of the leaf.
- Shaded inner leaves remain glossy and green.
- The problem began soon after the plant moved into stronger light.
- The damaged surface is dry rather than wet or foul-smelling.
What to do
- Move the plant back from harsh midday or afternoon sun while keeping bright filtered light.
- Increase light gradually when moving a bromeliad outdoors for warm weather.
- Keep leaves from touching glass that becomes hot in sun.
- Leave partly green leaves in place because their undamaged tissue still supports the plant.
05 Medium likelihood after a cold night
Cold glass or a temperature drop injured the leaves
Tropical bromeliads can develop brown tips or bands after chilling. A leaf pressed against cold glass may show a local patch, while water held in the rosette during a severe cold event can leave a line of injury near the former water level.
Cold injury appears after the exposure and stops spreading once the plant returns to stable warmth unless the center was also damaged.
How to identify it
- The affected leaves touched a cold pane or sat in a draft near an exterior door.
- Damage appeared soon after a cold night or unheated transport.
- A brown band crosses several leaves at a similar height.
- The remainder of each leaf stays green and firm after conditions stabilize.
- There is no soft dark center or continuing foul odor.
What to do
- Move the plant away from cold glass and exterior drafts.
- Keep the rosette dry before an unavoidable cold period rather than leaving chilled water in its center.
- Wait until the full boundary is visible before trimming cosmetic damage.
- Protect the plant during transport and return it to steady bright indirect light.
06 Medium likelihood when the pot stays heavy
Soggy compact mix damaged the roots
Roots need air even when the leaves benefit from humidity or cup water. Dense mix, a closed cachepot, or water left in a saucer can kill fine roots and reduce uptake, so the foliage loses firmness and develops brown ends despite a wet pot.
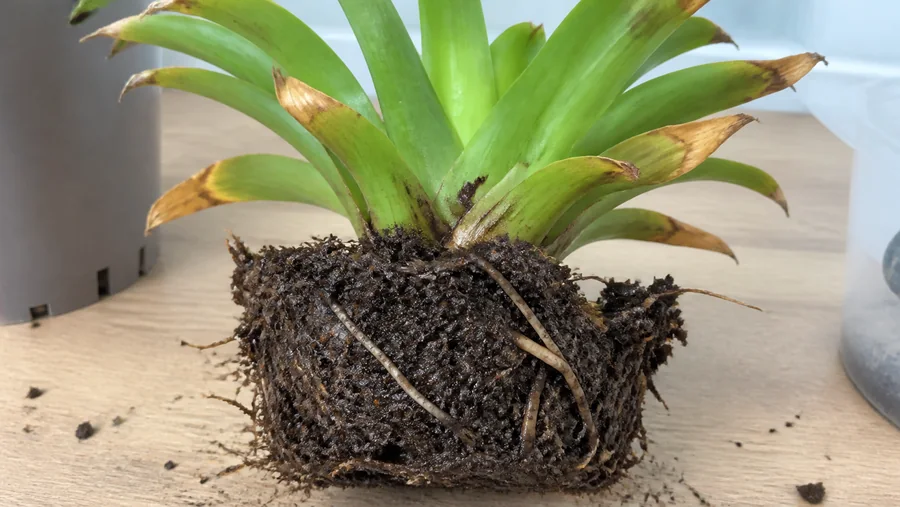
Root stress rarely stays cosmetic forever. A sour mix, dark soft roots, yellowing lower leaves, or a loose plant base means the correction belongs below the rosette and cannot be solved with misting.
How to identify it
- The pot remains heavy and the mix stays wet well after watering.
- Water collects inside a decorative outer pot or saucer.
- Healthy pale root tips are scarce while roots are dark and soft.
- Lower leaves yellow or the plant becomes loose at its base.
- The center may still be firm even though the root zone smells stale.
What to do
- Remove standing runoff and make sure the inner pot has an open drainage hole.
- Let an intact root zone approach its normal dry point before watering again.
- If roots are dark and soft, remove dead roots with clean tools and repot the houseplant in fresh free-draining mix.
- Keep the rosette above the same planting depth and do not bury the leaf bases.
- Do not compensate for root damage with fertilizer.
07 Medium likelihood after flowering
A flowered mother rosette is entering normal decline
Most rosette-forming bromeliads flower once from each mature rosette. That mother rosette then declines gradually while offsets develop at its base, so older outer leaves may brown from their ends even when the pups are healthy.
The key is direction and pace. Slow decline confined to the flowered rosette with firm growing offsets is expected, while sudden softness, odor, or collapse points to rot instead.
How to identify it
- The mature rosette has already flowered and its display is fading.
- Browning begins on older outer leaves and progresses slowly.
- One or more firm green offsets are growing around the base.
- The center and leaf bases remain firm without a sour smell.
- Neighboring unflowered offsets do not show the same tip damage.
What to do
- Continue normal light and measured watering while the mother rosette supports its offsets.
- Remove one fully dead outer leaf at a time when it releases easily or can be cut cleanly at the base.
- Wait until an offset reaches a useful fraction of the mother's size before separating it, or leave it attached to form a clump.
- Discard the mother rosette only after it has fully declined and the offsets are established.
The center tells you whether this is still a tip problem
Tip burn stays dry at the far end of an otherwise firm leaf, while center rot makes the newest leaf bases dark, soft, loose, or foul-smelling.
That boundary controls the response. Dry tips call for a check of water balance, salts, light, temperature, roots, and life stage, but a failing center needs immediate rot assessment rather than more humidity or cup water.
Pests also need direct signs. Cottony mealybugs, fixed scale shells, sticky residue, or insects deep between leaf bases justify a pest inspection, while clean papery ends alone do not.
Recovery Plan
Preserve the pattern long enough to diagnose it
Check the center, roots, cup, mix, deposits, light direction, and recent temperature before trimming. Correct the strongest match and avoid changing every part of care at once.
Trim only for appearance
Use clean scissors to follow the natural point of the leaf while leaving a narrow brown margin instead of cutting into green tissue. Keep partly green leaves because they still photosynthesize.
Use fresh growth as the test
Old tips remain brown, but the boundary should stop advancing and the next leaf should emerge firm and cleaner. Continued damage means the first diagnosis was incomplete or the correction has not removed the exposure.
Separate recovery from normal life-cycle decline
A flowered mother may continue to fade even under good care while its offsets grow normally. Judge the clump by firm healthy pups rather than expecting the old rosette to become young again.
Match water to the bromeliad type.
Keep the well of a tank-forming rosette supplied with fresh rainwater or distilled water during active warm growth, empty and rinse it periodically, and water the free-draining mix without leaving the pot in runoff.
For non-tank types, manage moisture through the mix and leaves instead of forcing water into the center.
The plant's structure determines where water belongs.
Provide bright filtered light, steady warmth, and room humidity without a direct hot or cold draft. Keep leaves off window glass, reduce water and feeding as growth slows, and inspect the pot by weight and moisture rather than using a fixed weekday.
Feed lightly only while the plant is growing and never let fertilizer concentrate in the cup. If deposits keep returning, use lower-mineral water and replace crusted mix rather than increasing fertilizer to compensate for damaged growth.
Watch the newest leaf and the center at each watering.
A clean firm center and undamaged new leaf show that the routine fits, while softness, odor, loose inner leaves, or a wet collapsing base require a different diagnosis.