
Tomato Blossom-End Rot Starts Before the Black Spot Appears
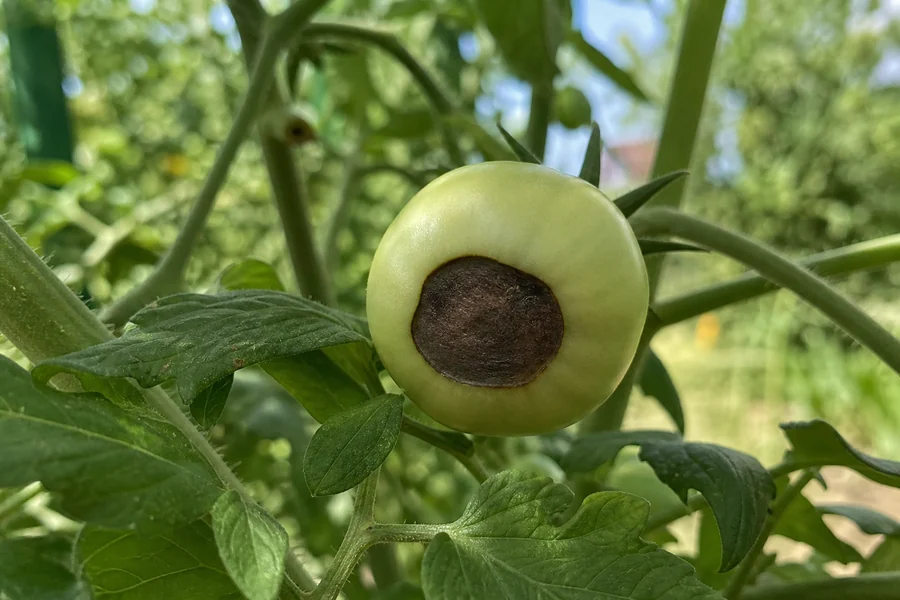
A flat or sunken leathery patch centered opposite the stem on a green tomato fits blossom-end rot. The fruit ran short of calcium while its cells were expanding, usually because roots could not deliver water steadily several days before the mark became visible, so the repair must protect the next fruit rather than treat the scar.
Quick diagnosis
Confirm the lesion position before changing water or calcium
Turn the fruit without pulling it from the cluster.
Blossom-end rot starts exactly opposite the stem as a pale water-soaked or tan area, then becomes brown to black, leathery, and often sunken while the rest of the fruit stays firm. A puckered corky cavity suggests catfacing, a side or shoulder lesion suggests another injury, and fuzzy or weeping tissue means secondary decay may now be involved.
Open the full diagnosisWhat You Are Seeing
The disorder is a shortage of calcium inside rapidly developing fruit tissue, but that does not automatically mean the soil lacks calcium. Roots must absorb calcium with water, and the plant must keep that supply moving during the short period when cells at the blossom end are expanding.
Tomato leaves pull most daytime water toward themselves through transpiration, while fruit loses little water. A plant that enters the night with a dry, waterlogged, salty, or injured root zone may fail to push enough calcium into young fruit even though its leaves still look vigorous.
The first cluster and large plum or slicer fruit are often hit hardest, while cherry tomatoes and later clusters may stay clean. That pattern reflects fruit demand, cultivar sensitivity, and the conditions during early enlargement rather than spread from one tomato to another.
Because a mark visible today records earlier stress, check rainfall, irrigation, heat, fertilizer, cultivation, and container drying from the previous week instead of judging the cause from today's surface moisture alone.
Common Causes
01 High likelihood
Moisture swung while young fruit was expanding
Drought followed by a large irrigation or rain is the commonest pattern behind tomato blossom-end rot because dry roots stop uptake and saturated roots lose oxygen, so neither end of the swing can maintain calcium delivery.
How to identify it
- The affected tomatoes are on one early cluster or were one-third to one-half grown during a hot or erratic week.
- The bed became dry below the surface before a storm or heavy catch-up watering.
- Container tomatoes wilted between waterings or sat in runoff after watering.
- Newer fruit formed after steadier moisture remains firm at the blossom end.
- Leaves may recover after watering even though the affected fruit continues to darken.
What to do
- Check moisture below mulch and several inches into the active root zone before each irrigation decision.
- Use a watering schedule that responds to season and soil, wetting the root zone evenly and then waiting until it begins to dry rather than adding shallow daily sprinkles.
- Keep a two- to three-inch organic mulch layer over the bed while leaving space around the stem.
- Split irrigation on compacted or sloped soil so water enters instead of running away.
- Increase container checks during heat and move an undersized pot out of reflected afternoon heat when practical.
02 Common contributor
Rapid growth or excess salts increased the shortage
Heavy nitrogen can drive lush leaves and fast fruit growth at the same time the root system is under stress. High ammonium, potassium, magnesium, sodium, or accumulated fertilizer salts can also compete with calcium uptake, which is why adding another product without evidence may deepen the imbalance.
How to identify it
- The vine became unusually dark green and leafy after a strong fertilizer or manure application.
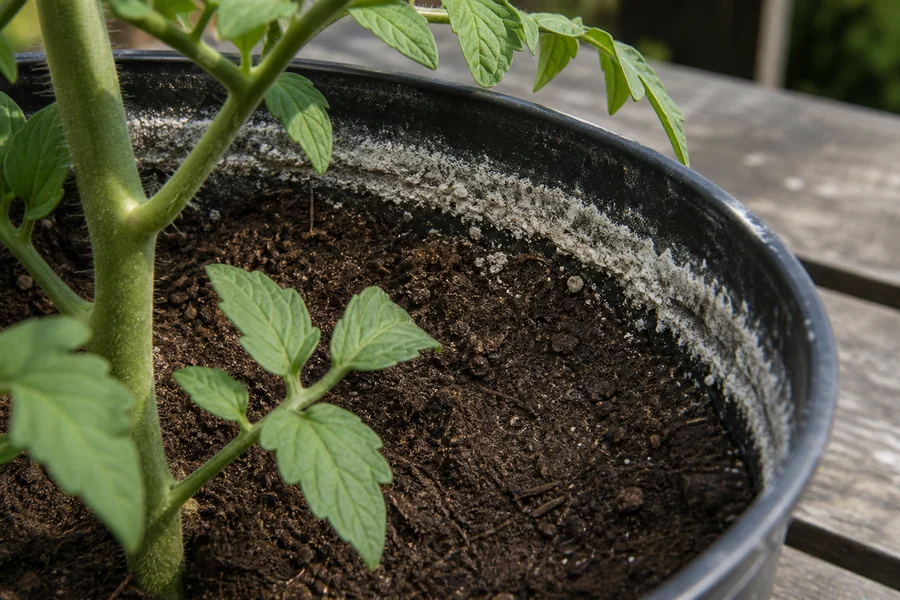
- A container has received frequent liquid feeding and shows crust on the mix or rim.
- Damage followed abundant rain, a fertilizer push, and rapid fruit enlargement.
- Several fruit on the same fast-growing cluster show similar lesions.
- A soil or substrate test shows elevated salts or an unsuitable nutrient balance.
What to do
- Stop unplanned fertilizer applications and review every product added to the root zone.
- Follow a soil-test-based vegetable feeding plan rather than trying to correct the fruit with multiple salts.
- Leach a draining container only when excess soluble salts are documented and the roots are otherwise healthy.
- Avoid Epsom salt because it supplies magnesium, not calcium, and extra magnesium can compete with calcium uptake.
- Resume modest feeding only when plant growth and test evidence show a need.
03 Possible
Roots were cut, waterlogged, diseased, or confined
A steady watering schedule cannot compensate for roots that lack oxygen, were severed by cultivation, or have filled a small container, and the fruit symptom may appear before the whole canopy declines because developing tissue loses access to calcium first.
How to identify it
- Wilting persists while the soil remains wet or one plant lags behind neighbors in the same bed.
- Recent hoeing, trenching, staking, or weed removal disturbed soil close to the stem.
- Water stands in the bed or remains trapped in a saucer or decorative outer pot.
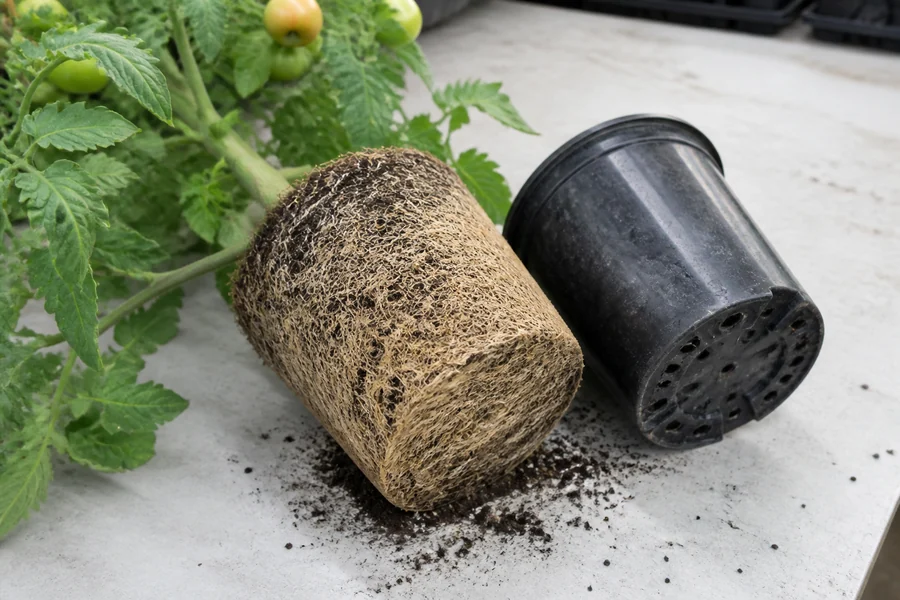
- Roots circle a container densely and water passes through without wetting the whole mix.
- Root browning, odor, or poor new growth accompanies repeated damaged clusters.
What to do
- Stop cultivating near the plant and pull nearby weeds by hand without tearing through feeder roots.
- Correct drainage or standing water before adding more irrigation, and repair compacted soil between crops when water cannot enter the bed evenly.
- Verify that container mix accepts water throughout its volume and follow the drainage-hole checks when runoff stays trapped.
- Do not aggressively repot a fruiting plant unless the restricted or failing root system makes continued growth impossible.
- Protect recovering roots with stable moisture and moderate canopy demand rather than heavy feeding.
04 Less common
The soil test shows low calcium or unsuitable pH
Although some soils truly lack available calcium or sit outside the useful pH range, only a soil test can separate that shortage from the much more common transport problem before lime or gypsum enters the plan.
How to identify it
- A current soil test reports low calcium rather than merely showing blossom-end rot on fruit.
- The test reports acidic soil where lime is also needed to raise pH.
- The bed has repeated symptoms across susceptible crops despite stable moisture and healthy roots.
- No recent amendment history explains unexpectedly high pH or salt levels.
- Later clusters remain affected after irrigation and root problems have been corrected.
What to do
- Apply agricultural lime only when the soil test calls for both calcium and a pH increase.
- Use gypsum only when calcium is needed without raising pH and local test guidance supports it.
- Mix amendments into soil before a future planting when possible because surface applications do not repair current fruit.
- Keep moisture stable after correction because calcium in soil still needs healthy water movement to reach fruit.
- Retest on the interval recommended by the laboratory instead of stacking amendments.
Read the Fruit, Cluster, and Root Zone Together
Location carries the most diagnostic weight. Blossom-end rot stays centered at the end opposite the stem, while anthracnose commonly marks ripe fruit with round sunken spots elsewhere and sunscald bleaches the exposed shoulder or side.
Catfacing also affects the blossom end, but it forms folds, holes, and corky seams after cold conditions disrupt the flower. Buckeye rot begins where fruit contacts wet soil and develops broad rings, so a centered dry leathery lesion on attached green fruit does not fit it.
Fuzz, leaking fluid, odor, or broad softness shows that fungi or bacteria have invaded the damaged tissue, not that the original disorder was contagious.
Use the cluster as a timeline. Several affected fruit of similar age point to one shared stress window, while clean pea- and marble-size fruit above them show that transport has already improved.
Stabilize the Root Zone That Feeds New Fruit
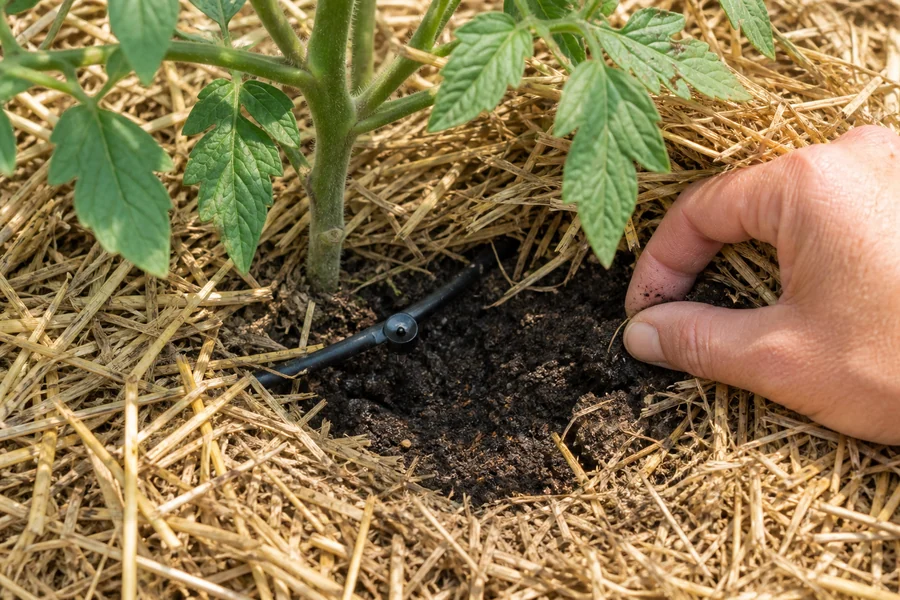
Because the marked fruit records an earlier failure, reconstruct the previous week and use current root-zone moisture to build a steadier pattern for fruit that is still small.
Probe outside the stem base where feeder roots are active, keeping the check shallow enough to avoid cutting them. Compare two locations because drip emitters, pot edges, slopes, and rain shadows can leave one root zone wet and another dry.
Rainfall and soil texture determine how long one thorough irrigation lasts in a bed, while limited volume and hot walls can make a container complete a wet-to-dry swing within one day without justifying continuous saturation.
- Remove a small mulch patch several inches from the stem and feel or probe the soil below it.
- Water slowly across the root area only when that layer is beginning to dry.
- Confirm that water entered the soil or container mix instead of running off or down one channel.
- Restore mulch while keeping it away from direct stem contact.
- Check after the next hot day or heavy rain and adjust from the measured response.
- Judge success on newly enlarging fruit, not on the old black lesion.
Stable does not mean constantly wet. Tomato roots need oxygen, so drainage and drying between complete irrigations remain part of the same calcium-delivery repair.
Test Before Adding Calcium
Low calcium in fruit tissue does not prove low calcium in soil because most blossom-end rot occurs when environmental stress prevents existing calcium from reaching expanding fruit.
A laboratory soil test should guide amendments because lime changes pH, gypsum adds calcium without the same pH effect, and Epsom salt adds magnesium rather than calcium. Foliar calcium may have limited preventive value under some production guidance, but it cannot heal a lesion and cannot overcome unstable roots.
Test recurring beds before the next crop and use the laboratory's rate. For a current crop, stabilize water and roots first unless existing results already document a shortage.
- Agricultural lime
- Use when a soil test calls for calcium and a higher pH.
- Gypsum
- Consider only when calcium is low but raising pH is undesirable.
- Foliar calcium
- Do not expect it to heal fruit or replace root-zone management.
- Epsom salt
- Skip it for blossom-end rot because it supplies magnesium, not calcium.
Decide What to Do With Damaged Fruit
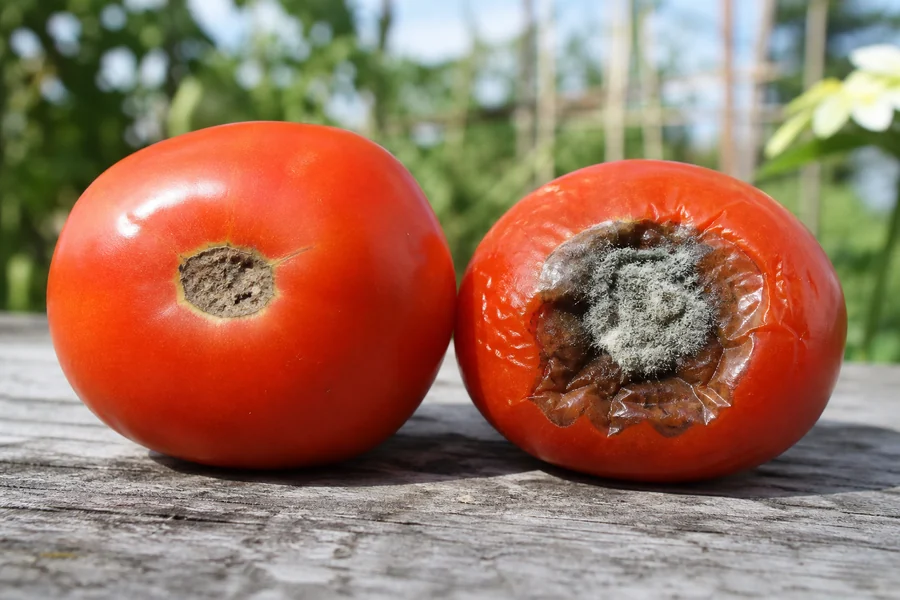
Because a blossom-end lesion never fills back in, remove badly affected fruit when it is still consuming plant resources or when decay is moving beyond the dry scar rather than leaving it as a test of the repair.
A ripe tomato with a small dry localized lesion may still have sound flesh that can be cut away generously and used promptly. Quality declines as the lesion enlarges, and immature badly damaged fruit rarely becomes worth keeping.
Discard fruit that is moldy, leaking, foul-smelling, broadly soft, or internally discolored beyond the lesion. These signs show secondary spoilage and no trimming rule can make uncertain fruit a good choice.
Recovery Plan
Remove severe fruit and reconstruct the stress window
Check lesion position, inspect the cluster, and note irrigation, rain, heat, feeding, or root disturbance from the prior week. Stabilize moisture without flooding the bed and stop untested amendments.
Watch pea- and marble-size tomatoes
New fruit should remain firm and evenly green at the blossom end while it expands. Continue measuring moisture below mulch and inspect container tomatoes after hot days because one missed dry-down can affect the next cluster.
Separate recovery from recurring soil or root trouble
Clean later clusters show that calcium delivery recovered even though old fruit remains scarred. Continued damage after stable moisture calls for a soil test, drainage check, root assessment, and comparison of cultivar or container sensitivity.
Protect the fruit-development window by keeping tomato roots evenly supplied with water and oxygen, mulching after soil warms, avoiding cultivation near stems, and feeding from soil-test evidence. Check containers more often during heat, choose a larger root volume for vigorous slicers, and record which cultivars repeatedly suffer because large plum and slicer types are often more susceptible than cherry tomatoes.
Sources
- Tomato disorders, University of Minnesota Extension
- Blossom End Rot, Utah State University Extension
- Blossom End Rot, Internal Whitening, and Rain Check of Tomatoes, Penn State Extension
- Blossom End Rot on Vegetables, University of Maryland Extension
- How to Grow Tomatoes in Your Garden, Utah State University Extension