
Why Do Rhododendron Leaves Turn Brown at the Edges?
Brown, crisp edges on Rhododendron leaves mean the leaf lost more water than the roots could replace, and eight different situations produce that. Look at where the brown stops on a single leaf first, because that one observation removes most of the list before you check anything else.
Quick diagnosis
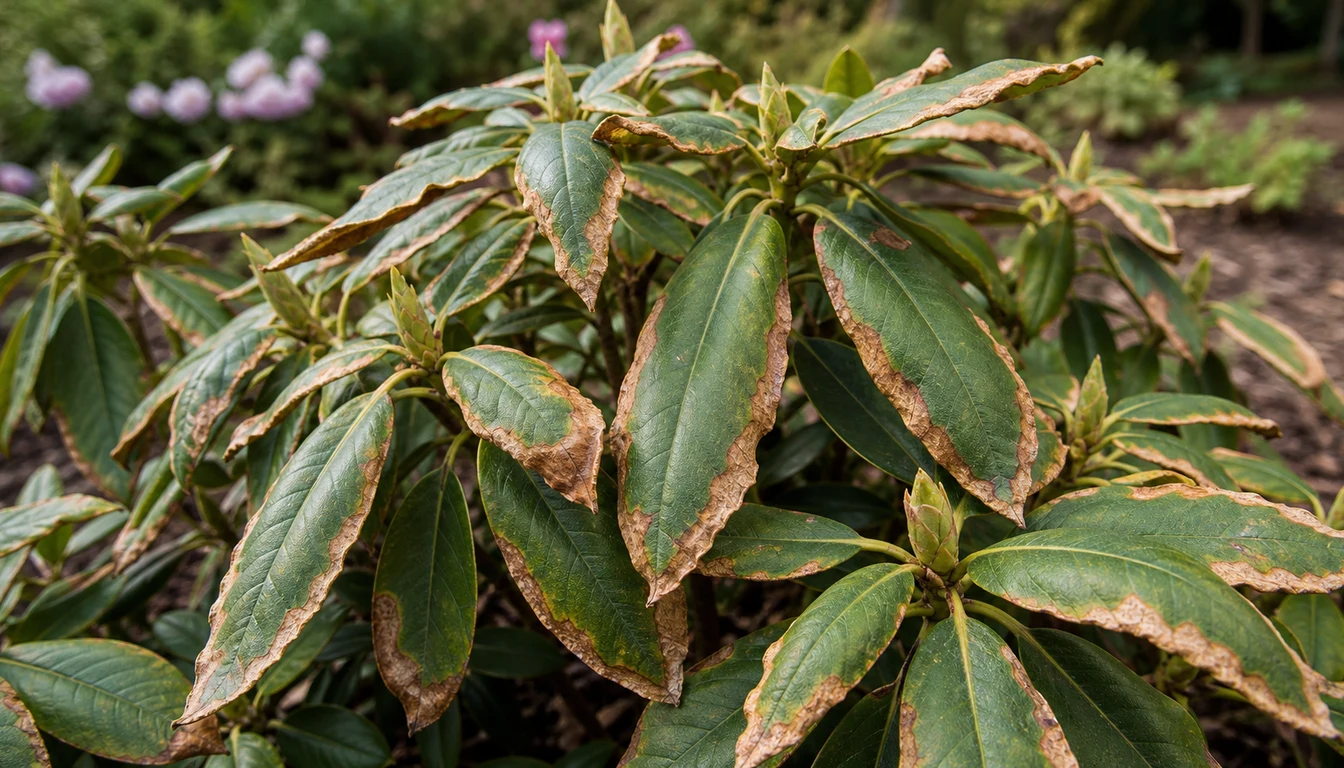
Brown runs in from the tip and margins while the midrib stays green
That pattern is scorch, and every one of these causes produces it. The dead area may be a narrow rim or half the blade, but it always starts at the edge and works inward, and there is a reasonably sharp line between dead tissue and live.
Three other patterns are not scorch and belong somewhere else. Fine pale stippling spread evenly across the whole blade, with black varnish-like specks on the underside, is lace bug feeding rather than a water problem.
Round or angular spots with defined borders, sitting anywhere on the blade including the middle, are a leaf spot fungus. Crescent notches chewed out of the edge, where tissue is missing rather than dead and the cut edge stays green, are adult black vine weevils.
One branch whose leaves all roll, dull, and hang down together is a root or stem failure instead. Check the bark at the base of that branch and the roots below it before anything else, and start with rhododendron root rot if the soil there stays wet.
Open the full diagnosisWhat You Are Seeing
Leaf scorch is not an organism. It is what a leaf looks like after it has lost more water than the roots delivered, so the tissue farthest from the water supply dies first, and that means the tip and the two margins.
Rhododendron scorches in situations that leave a deciduous shrub alone, because it holds its leaves through winter and roots in a shallow fibrous mat instead of sending anchors down. Those two traits are why the same shrub can burn in February with the soil soaked and again in July with the soil dry.
That mat sits in the top four to six inches of soil, close enough to the surface that it can dry out while a probe pushed a spade deep still comes up damp.
Before matching your plant to a cause, note four things. Those are the month the browning appeared, which face of the shrub carries it, whether the worst leaves are this year's or last year's, and what changed near the plant during the previous twelve months.
Those four notes do most of the sorting. Timing separates the winter causes from the summer ones, and the compass direction separates an exposure problem from something in the soil, which reaches every leaf equally.
Common Causes
01 High likelihood
Winter drying while the roots were frozen
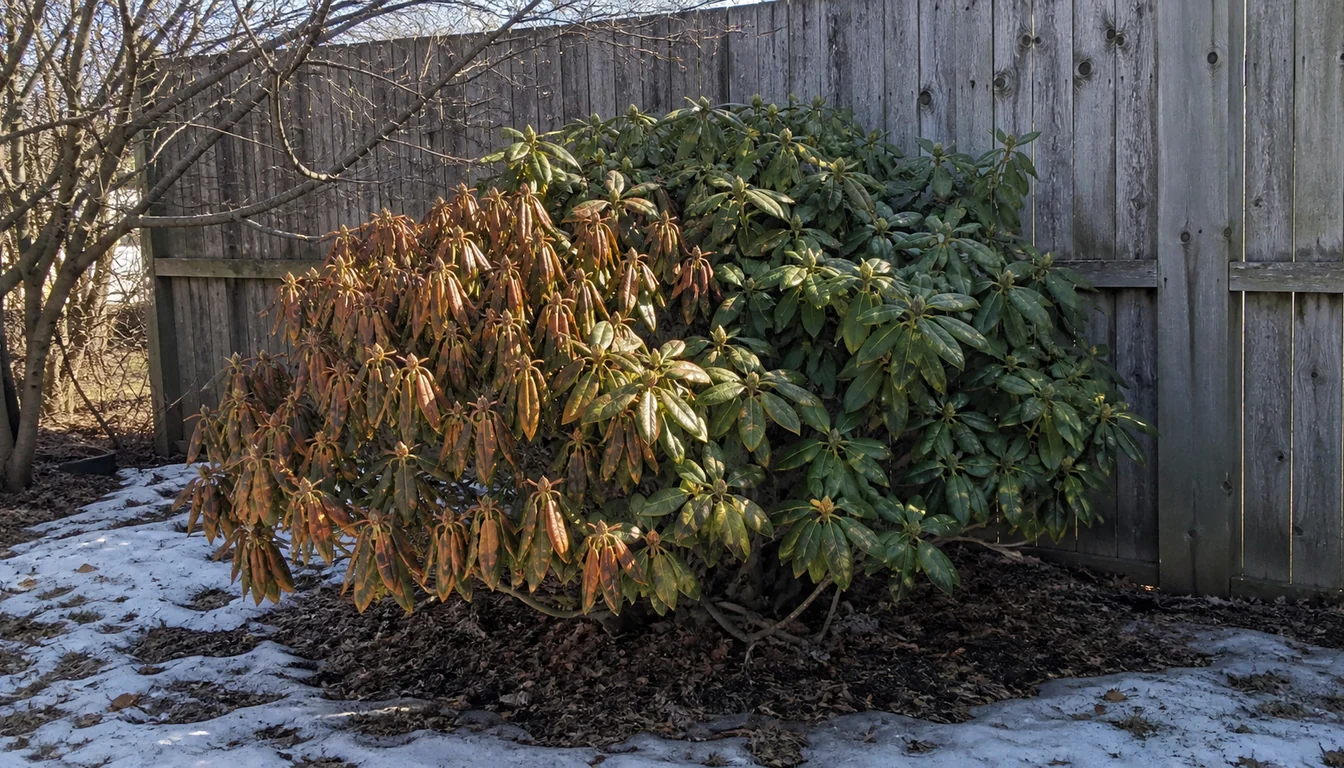
Through winter the leaves keep releasing water, and on a bright cold day an evergreen leaf on the sunny side of the shrub loses it quickly. If the ground is frozen, or the soil went into winter already dry, the roots return nothing, and the leaf runs a deficit for weeks that it cannot close.
The damage happens in January and shows in March, which is why most people find it after the weather has already improved.
How to identify it
- The browning was not there in autumn and appeared somewhere between late February and April.
- Damage maps onto the open south and west faces and stops where a fence, wall, or evergreen neighbor shelters the plant.
- Last year's leaves are scorched while the stems and flower buds still look normal.
- The previous autumn was dry, or the plant went into winter without a deep watering.
What to do
- Soak the root zone deeply in late autumn before the ground freezes, especially after a dry month.
- Spread 2-3 inches of bark mulch over the root zone in autumn and keep it a hand's width off the stem, which steadies soil temperature and slows freezing.
- Screen the exposed face with burlap on stakes for the first two or three winters after planting, leaving the top open so heat cannot build behind it.
- Stop pruning after midsummer so the plant does not carry soft late growth into the cold.
- Treat an anti-desiccant spray as a small extra rather than a fix, because it slows water loss for a few weeks and does nothing about a dry root zone.
02 High likelihood
A root zone that dried out in the heat
The fibrous mat this plant roots into is only four to six inches deep, and it dries from the top down. Soil a spade deep can still be damp while the layer holding every working root has gone dry, which is how a shrub scorches a week after what felt like a decent watering.
Under a house eave, tight against a foundation, or beneath a shallow-rooted maple, the plant gets almost no rain at all and lives on what you give it even during a wet month.
How to identify it
- Scratch the mulch back and push a finger four inches into the soil, and it comes out dry and dusty.
- The browning followed a hot dry spell by a week or two rather than appearing during it.
- The shrub sits under an eave, against a foundation wall, or under a tree that takes the rain first.
- Leaves drooped in the afternoon during the hot weather and lifted again overnight.
What to do
- Test at four inches rather than at a spade depth, because that is the layer the roots are actually in.
- Water slowly enough that it soaks in instead of running off, and apply enough to wet the full width of the canopy, which is roughly where the roots reach.
- Water in the early morning during heat, which is the best time to water because the root zone is charged before the day's demand starts.
- Lay a soaker hose in a ring under the canopy edge on an established plant, and follow how to use a soaker hose for even coverage.
- Keep 2-3 inches of bark mulch over the root zone and pull it back a hand's width from the stem.
03 High likelihood
More sun and reflected heat than it was grown under
Nursery stock is raised under shade cloth, so a plant that looked perfect in the pot can burn in its first summer in an open bed. Reflected heat does as much of the damage as direct sun, and a south-facing brick wall or a pale patio pushes leaf temperature well above the air temperature beside it.
Exposure also changes without anybody deciding to change it. A storm takes down the tree that shaded the bed, a neighbor thins a hedge, or a summer prune opens the interior of the shrub itself, and leaves that spent years in shade meet full afternoon sun.
How to identify it
- Browning is worst on the side that takes afternoon sun rather than the side the wind comes from.
- The shrub sits within a few feet of paving, a light-colored wall, or a gravel bed that holds heat.
- Interior and lower leaves stay green while the outer and upper leaves are brown.
- Something changed the light in the last year or two, such as a removed tree, a thinned hedge, or a hard prune.
What to do
- Stand beside the plant at 3pm in summer and count how much direct sun it takes, because morning sun is rarely the problem.
- Put temporary shade cloth or a light screen on the afternoon side through the worst two or three weeks of summer.
- Plant a taller deciduous shrub or a small tree on the afternoon side as the permanent answer, which also restores winter shelter.
- Move the plant in early autumn rather than late summer, so the roots re-establish while the soil is still warm.
- Aim for morning sun with afternoon shade when you choose the new position.
04 Medium likelihood
A root ball planted too deep or never opened up
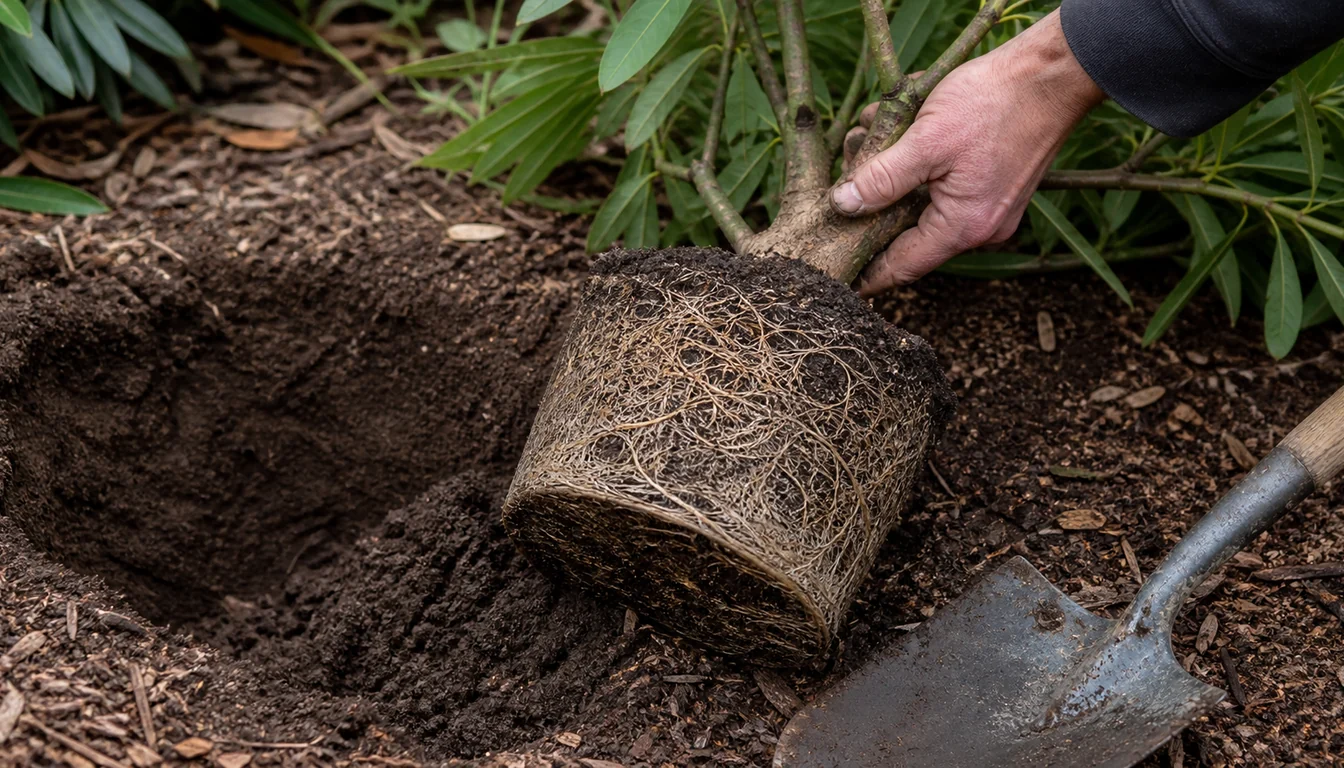
Two planting mistakes both end in scorched leaves, and both stay invisible until you dig. A stem flare buried under soil or heaped mulch suffocates the shallow root mat, and a container root ball dropped in without teasing the roots out stays a sealed unit inside the hole.
The second one catches people because the plant scorches while the ground around it is damp. Bark-based nursery mix repels water once it has dried, so rain and irrigation run around the ball rather than into it.
How to identify it
- Scrape the soil away at the base and the trunk goes down straight instead of widening into a flare at the soil line.
- A spade slid in beside the plant meets a firm distinct block rather than roots running out into garden soil.
- The plant went in during the last two or three seasons.
- Soil around the plant is damp while the ball itself stays dry when you press a finger into it.
What to do
- Pull mulch and soil back until you find the flare, and leave it sitting at or just above the finished soil line.
- Lift the plant in early autumn or early spring if the ball is still intact, since a summer lift adds heat stress to a plant already short of water.
- Tease the outer inch of roots free with your fingers, or slice four shallow cuts down the sides of the ball, before it goes back in.
- Set the replanted ball slightly proud of the surrounding grade and blend soil up to it instead of burying the top.
- Water directly over the ball itself for the first season, until roots have run out into the surrounding soil.
05 Medium likelihood
Wet soil and roots that stopped working
A shrub scorching in soaked ground looks like a contradiction and is not one. Roots sitting without oxygen stop moving water, so the leaves run the same deficit they would in a drought while the soil around them is wet.
Soil that stays saturated for a few days after heavy rain is a drainage problem you can fix, while roots that have already broken down are a different situation with a different ending.
How to identify it
- Water stands in the planting hole after rain, or the soil stays glossy and sticky for days.
- Leaves look dull and roll inward rather than staying flat with a crisp green center.
- One branch at a time wilts and browns instead of the whole exposed face going together.
- A root pulled up and rubbed between finger and thumb slips its skin and shows cinnamon brown inside instead of white to tan.
What to do
- Stop watering until the top four inches dry out, because more water in saturated soil deepens the oxygen shortage.
- Lift the plant onto a raised mound of coarse organic soil rather than piling topsoil over the same spot.
- Cut a shallow channel or run a drain to move surface water away where the bed collects runoff from a roof or paving.
- Check the roots before spending anything else, and work through rhododendron root rot if the skin slips and the inside is brown.
- Replace the plant instead of treating it once more than half the fine roots have gone, because no drainage work reaches a root system that has already collapsed.
06 Medium likelihood
Fertilizer burn and salt built up in the root zone
Because the roots sit in the top few inches, whatever goes on the surface reaches them at close to full strength. A normal shrub rate of quick-release fertilizer, a fresh manure mulch, or repeated feeding of a plant that wants very little will pull water back out of the roots and burn the leaf margins.
The pattern ignores exposure completely, so every leaf is affected about equally, shaded or sunny, north side or south.
How to identify it
- Margins browned within one to three weeks of feeding, mulching with fresh manure, or a lawn feed applied nearby.
- Damage is even across the whole shrub, with no sheltered side and no sunny side.
- A white or tan crust appears on the mulch or soil surface as it dries after watering.
- New growth is small and pale as well as burnt at the edge.
What to do
- Flush the root zone with slow water across the full canopy width, and repeat it two or three times over a fortnight.
- Rake off fresh manure or an unrotted mulch layer and replace it with aged bark.
- Skip feeding for the rest of the season and let the plant recover on flushed soil.
- Feed at most once a year, just after flowering, with a slow-release acid formulation at half the label rate.
- Keep lawn fertilizer and weed-and-feed products off the bed, because a spreader throws further than it looks.
07 Medium likelihood
De-icing salt from a road, drive, or walk
An evergreen catches winter salt on its leaves, which is a route a bare deciduous shrub does not offer. Traffic and ploughs throw a fine salt mist that carries roughly 30 to 60 feet from a treated road, and it settles on the foliage and burns it directly.
Salt washed into the soil is a separate path to the same result, and it is the one that reaches plants beside a salted walk or driveway where there is no spray at all.
How to identify it
- The burn is worst on the side facing a road, drive, or walk that gets salted.
- Damage sits at the height the spray reaches and fades toward the top of the shrub.
- Plants further from the same road show the same damage more faintly, in a clear gradient.
- The shrub sits at the low point where meltwater from a salted surface drains.
What to do
- Flush the root zone with plenty of fresh water in early spring once the ground has thawed, where the salt arrived as runoff.
- Rinse the foliage with plain water on a mild winter day after a heavy salting, which takes the spray off before it works in.
- Put a burlap or solid screen between the plant and the salted surface for the winter, since spray is easier to block than to wash off.
- Redirect meltwater away from the bed with a low berm or a channel where the drainage runs toward the plant.
- Move a repeatedly damaged plant back out of the spray zone, or put something salt-tolerant in the first row instead.
08 Low likelihood
Soil too alkaline for the plant to reach its iron
Rhododendron takes up iron only in acid soil, roughly pH 4.5 to 6.0. Above about 6.0 the iron is still in the ground but chemically locked, and the plant starves in the middle of plenty.
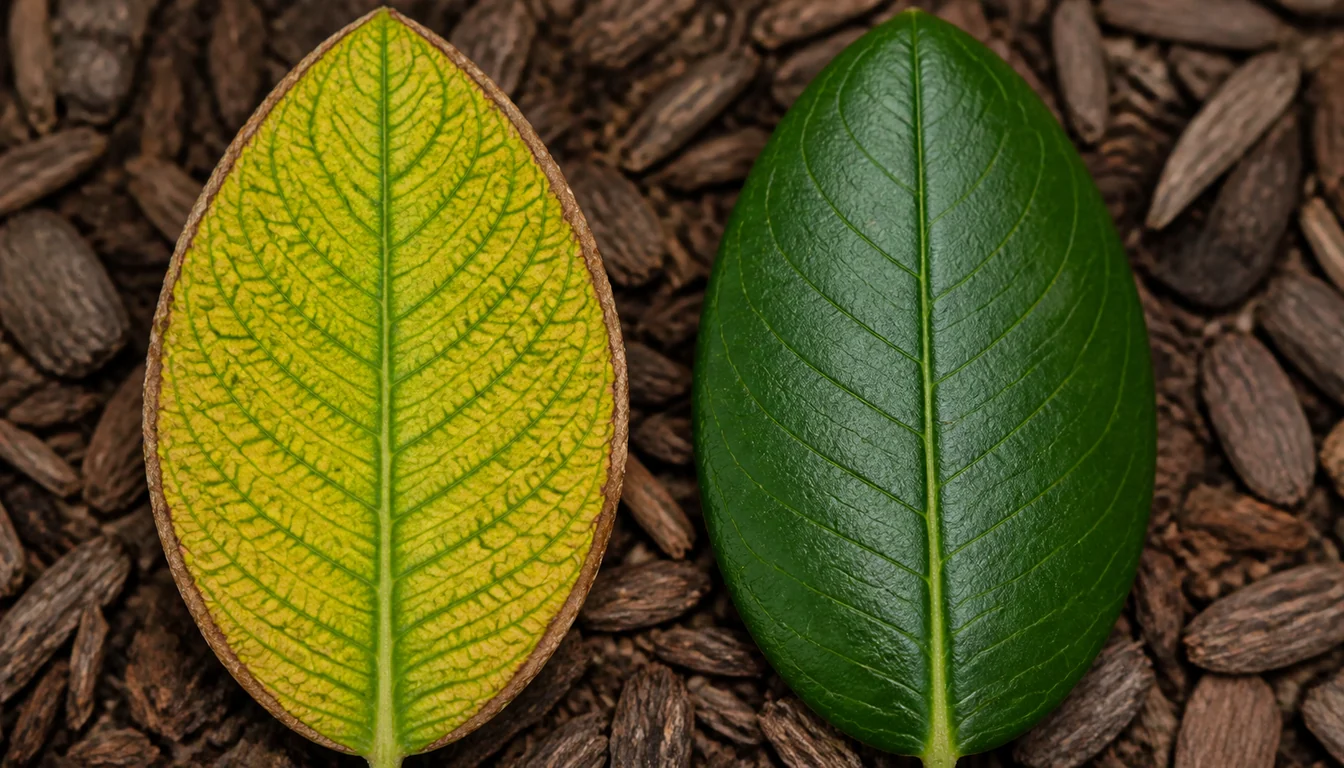
Newest leaves yellow between sharply green veins first, and only after that does the margin dry and brown, which is why watering more never helps this one.
How to identify it
- Yellowing appears between the veins while the veins themselves stay dark green.
- The newest leaves are worst and the oldest are least affected, which is the reverse of most problems here.
- The plant sits near new concrete, a mortared wall, rubble backfill, or a lawn on a liming program.
- A soil test taken at root depth reads above pH 6.0.
What to do
- Test the soil pH at root depth before doing anything, with a kit or a lab test through a local extension office.
- Spray chelated iron on the foliage for a recovery this season, understanding that it greens the leaf without changing the soil.
- Work elemental sulfur into the top few inches at the rate the test result calls for, then retest after six months, because pH moves slowly.
- Mulch with pine bark or pine needles, and keep wood ash and lime out of the bed.
- Move the plant to an acid bed or grow it in a container of ericaceous mix where mortar rubble or limestone keeps the soil permanently alkaline.
Does It Spread, and Will the Brown Ever Go Green Again?
None of these causes spreads. Every cause is a water-supply failure inside one plant's own roots and leaves, so neighbors that brown in the same week are sharing the weather, the soil, or the salted walk rather than passing anything between them.
Dead leaf tissue does not recover, so the brown margin in front of you is gone for good and no amount of watering, feeding, or spraying will bring color back into it.
The rest of that leaf keeps working. A leaf with a third of its area dead still photosynthesises with the two thirds that are alive, which is why stripping damaged leaves off costs the plant more than leaving them on.
Rhododendron holds each leaf for two to three years, so scorched leaves stay on the shrub and stay visible long after the cause is fixed. That delay is the part people misread as the treatment failing.
The plant gives its verdict at the next flush of growth. New shoots that come out full size with clean edges mean the problem is solved, and new shoots that scorch again as they harden mean it is not.
Should You Cut the Brown Leaves Off?
Wait for the spring flush before cutting anything. Damage that looks fatal in March very often turns out to be leaves only, and the branch pushes new growth from buds that were never harmed.
Cutting early costs you wood that would have leafed out. How far the damage runs is not visible until new growth breaks, so an early tidy-up usually takes live stems out along with the dead ones.
- Scrape a sliver of bark off a stem with a thumbnail, and green underneath means the wood is alive while tan or brown right through means it is dead.
- Squeeze a bud between finger and thumb, and a plump firm bud is alive while one that crumbles dry is not.
- Start at the shoot tip and work back toward the trunk, testing every few inches, until you reach the point where green wood begins.
Once new growth has broken, cut back to the first live bud below the dead section, which usually falls in late May or early June. Make the cut just above that bud rather than leaving a stub above it.
One case does not need the wait. A stem that is already brown right through at its base, with no green anywhere along its length, is dead and can come out whenever suits you.
Recovery Plan
Nothing visible changes, and that is correct
Fix the cause and stop there. Deep-soak the root zone if it was dry, uncover a buried flare, or flush the soil if salt turned out to be the answer, then leave the plant alone.
Do not feed a scorched plant. It cannot use the nitrogen while it is short of water, and a fresh application of fertilizer is one of the causes on this page.
Watch the newest shoots, not the brown leaves
The scorched leaves stay exactly as they are. Whatever growth emerges after the fix is the only thing that tells you whether the fix worked.
Keep the root zone evenly moist for the rest of the season, and check it at four inches once a week through dry weather.
The flush that gives the verdict
New leaves come out full size with clean margins on a plant that has recovered, and the shrub usually flowers normally that same year if the buds survived.
Cut back to live wood once that growth has broken, and expect the old scorched leaves to drop of their own accord over the following year or two.
When the answer was the wrong one
A plant that scorches again on new growth in its second season is telling you the cause was not the one you fixed. Work back through the causes above with the observations you now have, because a second round usually points at soil pH or roots rather than weather.
Most repeat scorch comes down to two habits.
Soak the root zone deeply in late autumn before the ground freezes, and keep 2-3 inches of bark mulch over the roots year round with a gap left around the stem.
After that, position matters more than care. Give a new plant morning sun with afternoon shade, keep it out of open wind and out of salt spray range, and test the soil pH before planting rather than after the leaves brown.
Sources
- Rhododendrons and azaleas, Clemson Cooperative Extension
- Growing rhododendrons and azaleas, University of Minnesota Extension
- University of Wisconsin Horticulture: Chlorosis
- Rhododendron growing guide, Royal Horticultural Society
- Azalea and Rhododendron Diseases, Penn State Extension
- Winter Damage on Landscape Plants, University of Maryland Extension
- Salt damage in landscape plants, Purdue University Extension
- Iron chlorosis in trees and shrubs, Utah State University Extension