yard
KnowTheYard

databasePlant Database

Browse by category

potted_plant

Houseplants

Indoor & tropical species

nutrition

Vegetables

Edible garden crops

spa

Herbs

Culinary & medicinal

local_florist

Flowers

Ornamental blooms

water_drop

Succulents

Drought-tolerant species

park

Trees

Arboreal species

forest

Shrubs

Bushes & hedges

nature

Perennials

Garden flowers

grass

Lawn Grasses

Turf varieties

local_dining

Fruits

Fruit-bearing plants

Best Indoor Plantsarrow_forwardBest Shade Plantsarrow_forward

menu_bookGarden Guides

Step-by-step guides by task type

grass

Lawn Care

Seasonal checklists and year-round maintenance guides for a championship lawn.

yard

Planting

When, where, and how to plant — from seed to transplant for every garden type.

water_drop

Watering

Deep-watering techniques, schedules by plant type, and drought management.

compost

Fertilizing

Feeding schedules, NPK ratios, and organic vs synthetic options by plant.

pest_control

Pest Control

Identify, prevent, and treat common garden pests without harming beneficial insects.

content_cut

Pruning

Pruning timing, techniques, and tools for trees, shrubs, and flowering plants.

Popular Guides

parkFall Lawn Carelocal_floristSpring Lawn Carecalendar_monthFull Calendar
All Guidesarrow_forwardLawn Care Hubarrow_forward
ToolsCompareRegional GuidesPlant ProblemsPet SafetyAbout
searchPlant Finder
yardKnowTheYard

Published plant profiles, practical care guides, problem diagnosis pages, and side-by-side comparisons for home gardeners.

chatphoto_camera

databaseBrowse Plants

  • arrow_forwardHouseplants
  • arrow_forwardVegetables
  • arrow_forwardHerbs
  • arrow_forwardFlowers
  • arrow_forwardTrees

menu_bookResources

  • arrow_forwardGarden Tools
  • arrow_forwardRegional Guides
  • arrow_forwardPlant Problems
  • arrow_forwardPet Safety
  • arrow_forwardCare Calendar
  • arrow_forwardPlant Finder

infoCompany

  • arrow_forwardAbout Us
  • arrow_forwardOur Team
  • arrow_forwardMethodology
  • arrow_forwardEditorial Policy
  • arrow_forwardContact Us

mailEmail Updates

Join the list for new guides, seasonal notes, and launch updates.

No spam. Request removal anytime.

fact_check

Reviewed Pages

77 pages currently attributed to public review lanes

public

USDA Zone Coverage

Zone-aware recommendations and regional growing context

database

230 Published Plant Profiles

555 public pages across profiles, guides, comparisons, and problem pages

© 2026 KnowTheYard. All rights reserved.

Privacy PolicyTerms of ServiceContactSitemap
Home/houseplants/Aloe Vera: Easy Succulent Houseplant Care/Brown Spots
scienceEditorial DiagnosisUpdated Feb 20, 2026

Aloe Vera Brown Spots

Brown spots on **Aloe vera** leaves are a common problem for indoor gardeners. They usually come from two distinct sources: sunscald when plants get a sudden blast of intense direct sun, or water-related stress such as overwatering and root rot. Less commonly, fungal or bacterial leaf spots will cause small, spreading lesions. This page helps you quickly identify the likely cause, apply targeted fixes, and set up simple prevention routines so your Aloe recovers and stays healthy.

Potted Aloe vera with tan sunscald patches and darker brown spots on blue-green leaves above gritty soil

Potted Aloe vera with tan sunscald patches and darker brown spots on blue-green leaves above gritty soil

lightbulb
bolt

Quick Diagnosis

Most Likely Cause: Sunscald or overwatering (root rot).

Start by touching the spot before you touch the watering can.

Jump to fix steps arrow_downward

On Aloe vera, the texture and location of a brown spot tell you more than the color alone. Young plants and recently moved pots are most prone to sunscald because thin new leaves can't buffer sudden bright light, while older plants with persistent wet soil are more likely to show brown, soft lesions from rot.

Sunscald (sunburn) looks like dry, tan-to-brown patches that are often isolated on one side of the plant where the light hits most directly; water-related spots are darker, soft or mushy, and often begin nearer the base of the leaf or spread inward from the leaf margins. Small round spots that enlarge over time suggest a fungal or bacterial leaf spot, especially where humidity is high and leaves remain wet.

Before you make changes, check three quick things: the recent light change (did you move it outdoors or to a sunnier window?), soil moisture (feel the top 2 inches or use a meter), and pot drainage (is the potting mix soggy and does the pot have reliable pot drainage holes?). These checks narrow your diagnosis quickly and guide the right fix.

pest_control
Plant Problem - See AlsoAloe Vera Drooping
chevron_right
psychology

How to tell sunburn from overwatering - simple checks

Sunburn is a surface injury: typically dry, papery, and unilateral on the plant where light hits hardest. Press the damaged area - if it’s firm, the tissue is mostly dead but the plant’s vascular system may be intact.

Overwatering affects internal tissues: spots are darker, soft, and leaves may collapse or feel waterlogged. Lift the pot-if it’s unusually heavy and the soil dries slowly, suspect poor drainage or overwatering.

Use a moisture meter or the finger test to confirm soil wetness: if the top 2 inches are still damp more than a week after watering, reduce frequency and consider repotting to a fast-draining mix. For detailed next steps, compare the pattern with yellowing aloe leaves. Use our overwatered plant rescue guide when the root zone is clearly staying too wet.

thermostat

Environmental Baseline

Before diagnosing specific failures, confirm your Aloe Vera: Easy Succulent Houseplant Care's environment matches its core care requirements.

forestAloe Vera: Easy Succulent Houseplant Care Care Needs

  • Light: Bright light, 4–6 hours direct sun indoors if possible
  • Water: Low; water deeply, then allow soil to dry at least halfway
  • Temp: Best at **55–85°F**; protect from frost

homeTypical Indoor Home

  • Humidity: 30-50% (Low)
  • Temp: 65-72°F variable
  • Light: Often too dim or direct
biotech

Possible Causes

Sorted by likelihood

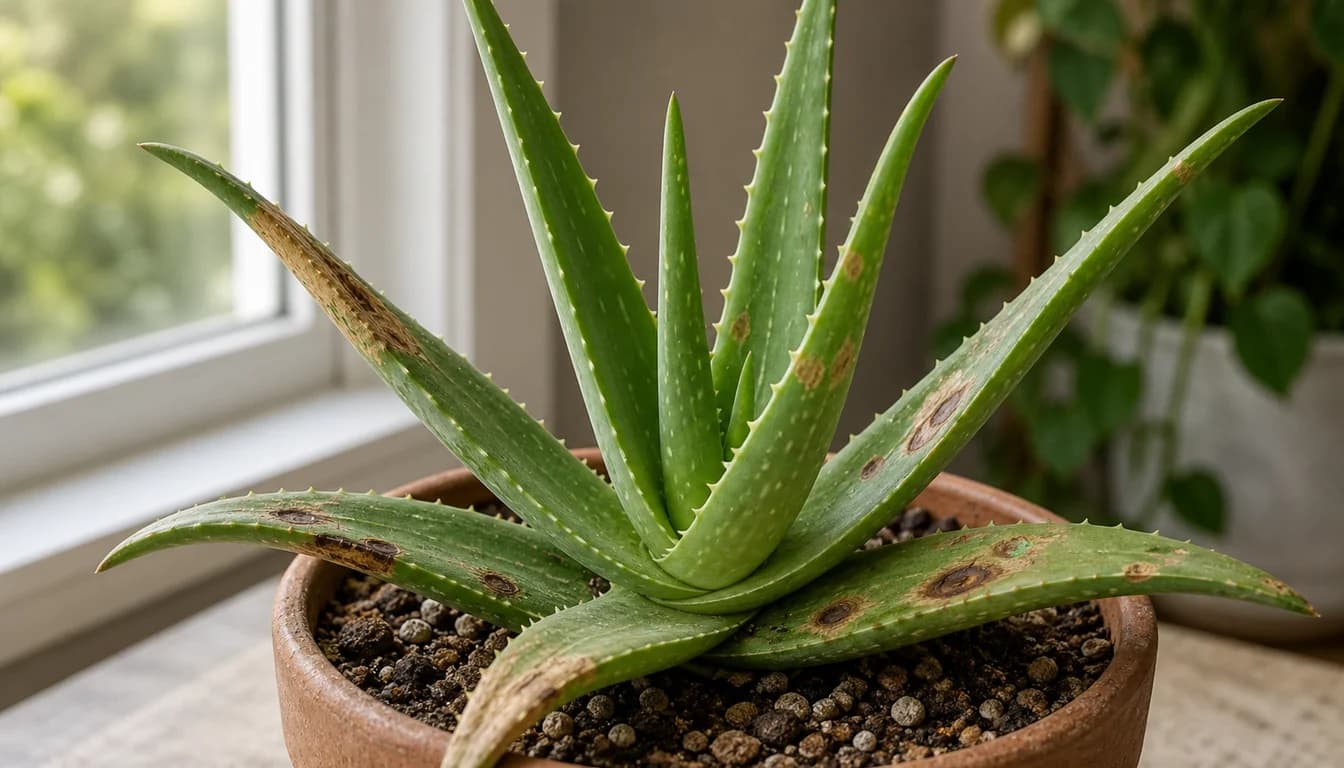
1. Sunburn / Sunscald

Likelihood: High

A sudden increase in direct, intense sun - for example moving an Aloe from a north window to a south-facing window, or placing it outside without acclimation - causes leaf cells to dry and die. Sunscald is common on young leaves and on one side of the plant that faces the light source.

Identification

  • remove_circle_outlineDry, tan-to-light-brown patches with crisp edges on the sun-facing side of leaves.
  • remove_circle_outlineDamage often limited to the top surface and does not make the leaf soft when pressed.
  • remove_circle_outlineRecent change in light exposure: new window placement, outdoor move, or seasonal stronger sun.
  • remove_circle_outlineYou can see localized bleaching where chlorophyll is lost, leaving irregular, papery patches.

The Fix

  1. 1Move the plant to bright, indirect light and out of harsh midday sun right away.
  2. 2If you want more sun, acclimate for 1-2 weeks by increasing exposure gradually by an hour a day.
  3. 3Trim only fully dead tissue with clean scissors; let partially sunburned leaves stay if they still feel firm so the plant can recover energy.
  4. 4Place the pot behind a sheer curtain or use morning sun and afternoon shade to reduce intensity.
  5. 5Record the window orientation and avoid abrupt moves; labeled placement helps prevent repeat mistakes.

2. Overwatering leading to Root Rot

Likelihood: High

Aloe prefers a fast-draining mix and infrequent water. Saturated soil and poor drainage allow fungal pathogens to attack roots, causing brown, soft spots on leaves and a collapsed base. Root rot is the more serious water-related problem and becomes likely when the pot lacks drainage or when you water on a strict schedule without checking soil moisture.

Identification

  • remove_circle_outlineLeaves with dark brown or black patches that are soft, mushy, and may emit a sour smell.
  • remove_circle_outlineSoil that stays wet for several days after watering and a pot that feels heavy when lifted.
  • remove_circle_outlineWhen repotted, roots appear brown and slimy instead of firm and white.
  • remove_circle_outlinePlant decline accelerates from the base upward; new leaves are slow or failing to emerge.

The Fix

  1. 1Stop watering immediately and let the soil dry out until the top 2 inches are dry (or use a meter reading below 20-30% moisture).
  2. 2Gently remove the plant from its pot and inspect roots; trim away soft, dark roots with sterile scissors until only healthy white roots remain.
  3. 3Repot in fresh, fast-draining mix-1 part potting soil to 1 part coarse sand or perlite-and choose a pot with drainage holes.
  4. 4If rot was advanced, allow trimmed sections to callus 24-48 hours before repotting; use a slightly larger pot only if necessary.
  5. 5Review watering routine after repotting: water deeply but infrequently, then allow the mix to dry between waterings.

3. Fungal or Bacterial Leaf Spot (less common)

Likelihood: Low

High humidity, overhead watering, or contaminated tools can introduce pathogens causing small, round, dark spots that may have a yellow halo. These spots can spread across leaves and sometimes produce a slimy or powdery surface depending on the organism.

Identification

  • remove_circle_outlineMultiple small, circular spots that expand over days to weeks and may have a yellow ring.
  • remove_circle_outlineSpots appear across both sun-exposed and shaded surfaces, often after long leaf wetness periods.
  • remove_circle_outlinePast history of nearby infected plants or poor air circulation increases likelihood.
  • remove_circle_outlineVisible fungal growth (mold or powder) or an advancing ring pattern suggests fungal disease rather than sun or water stress.

The Fix

  1. 1Improve air circulation and stop overhead watering; water the soil, not the leaves, and water in the morning to allow leaves to dry.
  2. 2Remove and dispose of heavily infected leaves; sanitize tools with diluted bleach or alcohol between cuts.
  3. 3For persistent fungal issues, apply a labeled fungicide or neem oil following product instructions and using the link for mixing guidance.
  4. 4Quarantine the plant from others until spots stop appearing to avoid spread.
  5. 5Avoid composting infected clippings; discard in trash instead.
compare_arrows
Comparison - See AlsoSnake Plant vs Aloe Vera
chevron_right
potted_plant

Root Health Examination

A direct inspection of the root system distinguishes root rot from drought stress - saving weeks of guesswork.

check_circleHealthy Roots

  • Firm to the touch
  • White or light tan color
  • Earthy, pleasant smell

cancelCompromised Roots

  • Mushy or slimy texture
  • Dark brown or black color
  • Sour, rotting odor

Inspection Step: Gently slide the pot off while supporting the base of the stems. The outer root ball gives sufficient clues without disturbing all the soil.

gpp_bad
warning

When to Worry

A few yellow leaves are normal. If more than 20% of foliage turns yellow within a week, or new growth is affected, act immediately - check the roots first.

timeline

Recovery Protocols

Recovery takes time. Once the root cause is corrected, implement a 30-day stabilization window.

1-2 weeksImmediate stabilization

After you stop watering and move the plant to appropriate light, expect the spread of new spots to halt within a few days to two weeks. Sunburned tissue will not return to green; it will dry and become papery. Monitor for new soft spots which indicate remaining rot.

3-8 weeksActive recovery

If you trimmed rot and repotted into a well-draining mix, new leaf growth should resume within 3-8 weeks under warm, bright, indirect light. Root recovery is gradual-look for firm, light-colored new roots when repotting again or if you inspect the root ball.

8-16 weeksRebuilding vigor

Over the next 2-4 months the plant should regain fullness and produce several healthy leaves if watering and light are correct. If decline continues, re-check roots for hidden rot or reevaluate light and pests.

menu_book
Guide - See AlsoAir Purifying Plants for Cleaner Indoor Air
chevron_right
shield

Preventing Future Issues

Prevent brown spots by giving Aloe vera bright, indirect light with limited afternoon sun, using a fast-draining potting mix in a pot with drainage holes, and watering only when the top 2 inches of soil are dry. Use a moisture meter for consistent checks, acclimate plants slowly to brighter light, avoid overhead watering to reduce fungal risk, and follow common succulent care routines to keep watering and soil choices in the right range. Quick check: If you see mushy, water-soaked edges with soft tissue, suspect overwatering or rot. If spots are dry, sun-exposed, or near the plant’s top, sunburn is likely.

menu_book

Related Reads

pest_control
Plant ProblemAloe Vera Drooping
chevron_right
compare_arrows
ComparisonSnake Plant vs Aloe Vera
chevron_right
menu_book
GuideAir Purifying Plants for Cleaner Indoor Air
chevron_right
menu_book
GuideBest Herbs to Grow Indoors for Real Harvests, Not Spindly Pots
chevron_right
menu_book
GuideBest Indoor Plants for Every Room and Light Level
chevron_right
Aloe Vera: Easy Succulent Houseplant Care (Aloe barbadensis miller) - full care guideAloe barbadensis miller

Aloe Vera: Easy Succulent Houseplant Care

Asphodelaceae Family

wb_sunny

Light

Bright light, 4–6 hours direct sun indoors if possible

water_drop

Water

Low; water deeply, then allow soil to dry at least halfway

thermostat

Temp

Best at **55–85°F**; protect from frost

yardFull Care Guide

On This Page

boltQuick DiagnosispsychologyUnderstandingthermostatEnvironment CheckbiotechPossible Causespotted_plantRoot ExamwarningWhen to WorrytimelineRecovery PlanshieldPreventionmenu_bookRelated Reads