
Rose Black Spot Is Spreading? Protect the Leaves Still Growing
Rose black spot makes dark lesions with feathery edges, yellow tissue, and premature leaf drop. Confirm the pattern, preserve useful foliage, interrupt splash, and protect the leaves that open after control begins.
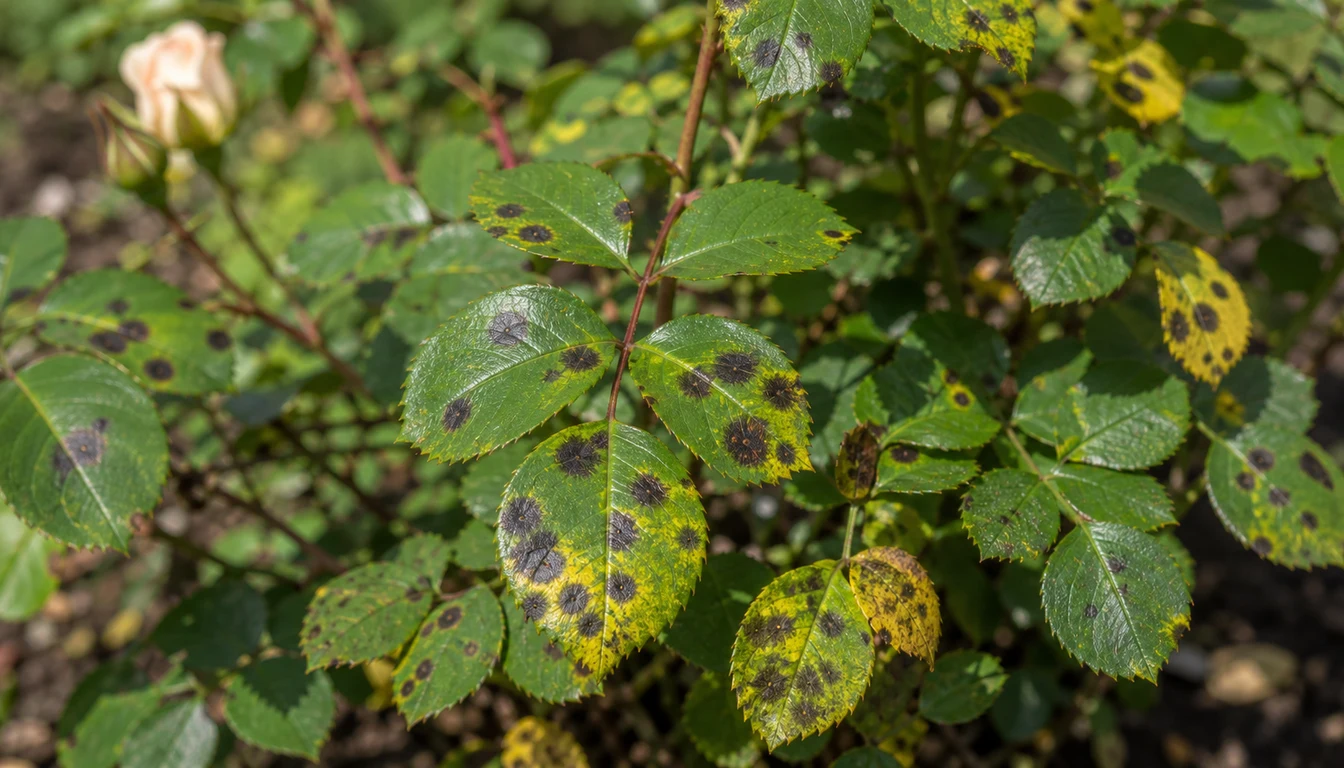
Quick diagnosis
Black spot when dark feathery lesions are followed by yellowing and leaf drop
Inspect the upper surface of several rose leaflets.
Black spot lesions are round to irregular, usually dark brown to black, and they send fine radiating strands into the surrounding tissue rather than ending in a smooth hard circle.
Turn the same leaves over and look at the rest of the plant. Yellow tissue around the spots, lower leaves dropping before upper ones, and fresh lesions after long wet periods all support black spot, while orange pustules, gray underside growth, pale-centered holes, or removable surface residue point elsewhere.
Open the full diagnosisWhat You Are Seeing
Rose black spot is caused by Diplocarpon rosae. The pathogen survives on infected living or dead leaves and on affected stems, then releases spores that reach other leaves in splashing water.
A spotted leaf will never become unspotted.
The practical goal is to slow new infection, keep enough working foliage on the rose, and let the next flush expand without the same lesion pattern.
Severity matters far more than the presence of one spot. A vigorous shrub with a few marked leaves needs observation and cleanup, while a susceptible rose losing foliage from the bottom upward through repeated wet weather needs a broader protection plan.
Common Causes
01 High likelihood when margins are feathery and leaves yellow around spots
Active black spot lesions are producing the classic pattern
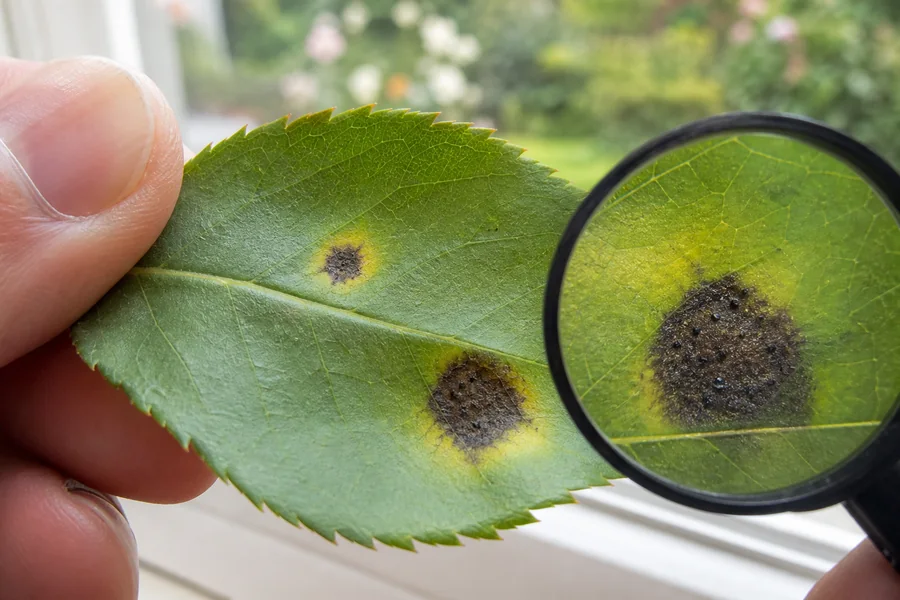
Diplocarpon rosae infects rose tissue and forms dark lesions that can carry tiny black fruiting structures.
Spots are usually clearest on upper leaf surfaces, though susceptible green stems develop dark or purplish lesions too.
Color alone is not enough, because several rose diseases make dark marks. The stronger combination is a fibrous lesion edge, yellowing that develops around the spot, premature drop, and the same pattern spreading to more leaves after wet weather.
How to identify it
- Dark round to irregular spots have uneven feathery or radiating margins.
- Yellow tissue expands around established lesions before the leaflet drops.
- Lower or inner foliage often shows the pattern before the upper canopy.
- A hand lens may reveal tiny black dots embedded in mature lesions.
What to do
- Photograph and mark several affected leaves so new lesions can be separated from old damage.
- Pick up fallen infected leaves and remove loose severely yellowed foliage without stripping the shrub bare.
- Keep water off the canopy when irrigation is needed and shorten the time rain-wet foliage stays damp.
- Protect new foliage when disease is severe and cultural changes alone do not stop continued spread.
02 High likelihood after rain, evening sprinklers, or slow canopy drying
Splash and long leaf wetness are driving new infections
Black spot spores move in splashing water, so repeated overhead irrigation connects infected material near the soil with the low foliage.
Rain drives the same spread, especially where dense canes, shade, or still air keep leaf surfaces wet for hours.
Water at the roots is not the same thing as prolonged water on a leaf. A rose still needs adequate soil moisture, and withholding it during a dry spell adds stress without changing a humid or rain-driven infection cycle.
How to identify it
- New spots follow a rainy stretch or repeated sprinkler use that wets the shrub.
- Inner and lower leaves remain wet after exposed upper leaves have dried.
- Crowded neighboring growth blocks light and air through the canopy.
- Mud or mulch splash marks reach the same low leaves where lesions begin.
What to do
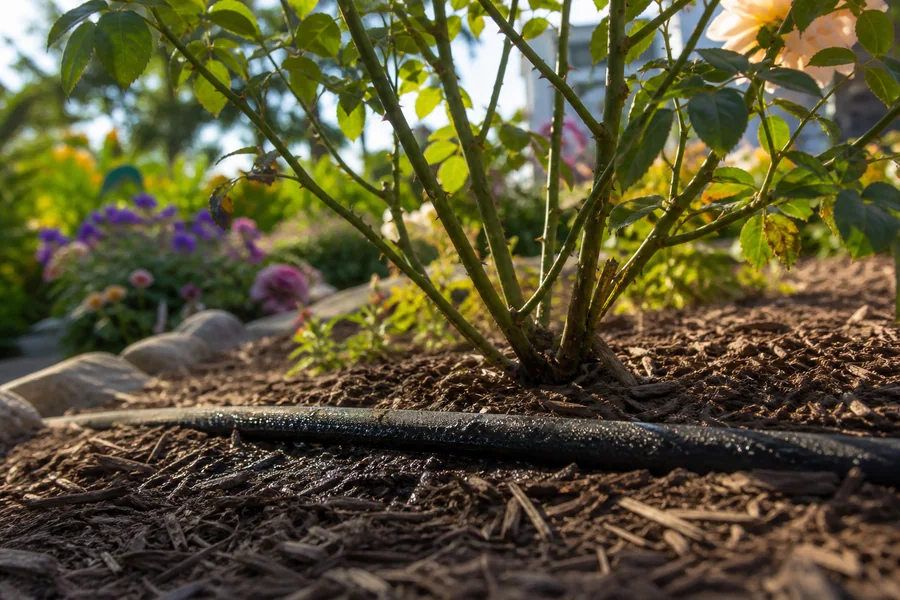
- Deliver irrigation at soil level with a soaker hose, drip line, or carefully placed wand.
- Use morning watering so accidentally wet foliage dries before the cooler night period.
- Thin crossing or congested canes at the normal pruning time without opening the plant to harsh sudden exposure.
- Maintain a clean mulch surface that reduces soil splash while keeping mulch away from the cane bases.
03 Medium likelihood when disease returns from the lower canopy each season
Infected debris or cane lesions are carrying the cycle forward
The pathogen persists on infected leaves still hanging on the plant, on fallen material beneath it, and on affected stems. Fresh rain or irrigation then supplies both the moisture and the splash that carry spores to susceptible foliage.
Sanitation cuts this local source, but it cannot stop spores arriving from every nearby rose.
Treat cleanup as one part of control, most valuable before spring growth and after heavy leaf drop, rather than as proof that no future spot can appear.
How to identify it
- Last season's spotted leaves remain lodged in mulch or around the crown.
- The first recurring lesions appear on foliage closest to old debris.
- Dormant canes show persistent purple-black spots or shallow lesions.
- A nearby rose with the same disease continues shedding infected leaves into the bed.
What to do
- Collect fallen rose leaves during the season and again after final leaf drop.
- Inspect dormant canes and prune clearly infected portions according to the rose's normal pruning method.
- Use a disposal route accepted locally for diseased garden material and avoid casual cold composting when the process is uncertain.
- Replace contaminated surface debris or cover the cleaned soil with fresh mulch before spring splash begins.
04 Medium likelihood after the same rose defoliates in several wet seasons
A susceptible cultivar is repeatedly losing foliage in this site
Rose cultivars differ in how they respond to black spot, and resistance shifts with the strain of the pathogen and with local conditions.
A plant that stays leafy in one garden can still struggle where its canopy dries slowly or disease pressure runs high.
One mild outbreak does not prove a cultivar is a poor fit. Repeated early defoliation, weak new canes, and reduced flowering despite better watering, spacing, and sanitation make a much stronger replacement case.
How to identify it
- One cultivar loses far more foliage than neighboring roses under the same weather.
- The same plant becomes nearly bare early in more than one growing season.
- Clean new flushes develop lesions soon after each wet period despite cultural changes.
- Cane growth and flowering decline after repeated severe defoliation.
What to do
- Record when leaf drop begins and how much canopy remains after major wet periods.
- Compare performance with locally recommended resistant roses rather than relying on a broad marketing claim.
- Support the current plant with steady soil moisture and moderate feeding without pushing excessive soft growth.
- Replace the rose when repeated severe loss makes ongoing spraying or weak performance unacceptable for the site.
05 Possible when lesion centers, veins, or leaf undersides disagree
Anthracnose, downy mildew, or rust is making a different leaf pattern
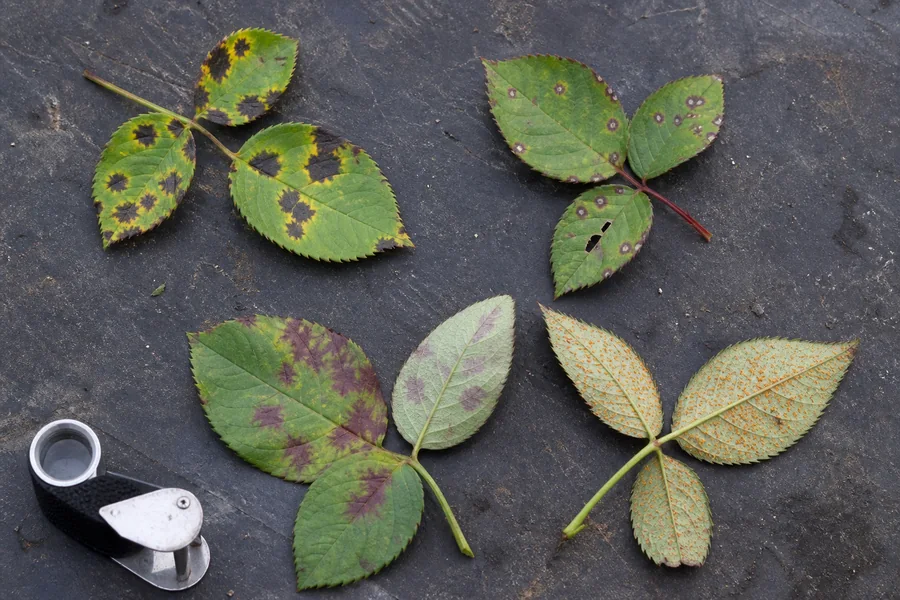
Rose anthracnose starts with red, brown, or purple spots whose centers turn pale gray or white and sometimes fall away. Downy mildew makes angular purple to brown patches held between the major veins, with sparse gray growth beneath affected leaves in humid conditions.
Rust is the easiest of the three to confirm.
Turn the leaf over, and orange powdery pustules on the underside identify a different pathogen even when the upper surface is discolored and the foliage is dropping.
How to identify it
- Pale centers with dark red or purple rims and shot holes support anthracnose.
- Angular patches that stop at major veins support downy mildew.
- Sparse gray growth beneath a purple patch strengthens the downy mildew diagnosis.
- Raised orange pustules or loose orange powder beneath leaves support rust.
What to do
- Compare several young and old lesions because one damaged leaf can show an incomplete pattern.
- Inspect upper and lower surfaces in bright natural light with a hand lens.
- Photograph the whole plant and a close lesion before removing diagnostic samples.
- Use management for the confirmed disease instead of repeating a black spot product by habit.
06 Lower when marks track exposure rather than wet-weather spread
Spray injury, scorch, or nutrition stress is being mistaken for disease
Hot sun after a badly timed spray scorches exposed tissue, while fertilizer salts or root stress yellow and burn leaves without producing a living lesion.
Those problems follow a known application, a heat event, or a watering failure, and they often hit one side or one age of foliage.
Sooty residue from honeydew also differs from black spot, because it sits on the surface instead of killing a round patch of leaf tissue. Check whether the dark material rubs away and look for sap-feeding insects before calling it an internal lesion.
How to identify it
- Damage appears soon after a spray, fertilizer spill, heat event, or irrigation failure.
- Exposed leaf edges or one side of the plant are affected more than sheltered foliage.
- Yellowing follows veins, margins, or a whole-leaf pattern without feathery black spots.
- Dark surface residue smears while the leaf tissue beneath remains intact.
What to do
- Stop the suspected exposure and preserve enough foliage to watch the next clean growth.
- Rinse a removable residue with plain water only when leaves can dry promptly.
- Correct root-zone moisture or fertilizer use from measured conditions rather than adding a second product.
- Reset the diagnosis if new feathery lesions appear after wet weather despite removing the exposure.
Old spots record infection while new leaves show whether control is working
A black spot lesion is dead or damaged tissue, and it stays visible for the life of that leaflet.
Yellowed leaves keep falling after conditions improve, because the infection happened earlier.
The useful measurement is what happens next. Mark a few clean expanding leaves and check them again after irrigation, rain, and enough drying time to show whether the cycle has slowed.
Removing every marked leaf can leave a rose with too little foliage, especially once heavy defoliation has begun.
Take out fallen material and badly yellowed loose leaves first, then weigh any further removal against the green leaf area the plant still needs.
Fungicides sold for home-garden black spot are protective rather than restorative. Their job is to shield susceptible tissue according to the current label, not to erase old lesions or replace sanitation and dry-leaf practice.
Black Spot, Anthracnose, Downy Mildew, or Rust?
Start at the lesion edge, then turn the leaf over. Black spot combines a feathery dark margin with yellowing and drop, while the closest lookalikes reveal a pale center, a vein boundary, or spores on the underside.
- Black spot
- Dark round to irregular lesions with radiating edges, often on upper surfaces. Yellow tissue expands around spots and affected leaves drop.
- Anthracnose or another leaf spot
- Red to purple rims surround centers that become pale gray or white. Old centers may fall out and leave shot holes.
- Downy mildew
- Purple to brown angular patches often stop at major veins. Sparse gray growth may be visible beneath a lesion during humid weather.
- Rust
- Orange raised pustules or loose orange powder form mainly beneath leaves. Upper surfaces may discolor before leaves fall.
- Spray or environmental injury
- Damage follows an exposure pattern, leaf edge, or one side of the plant. It lacks repeated feathery lesions that spread after splash events.
A white or gray coating across leaf and shoot surfaces belongs to the separate powdery mildew diagnosis. Live insects, cast skins, and sticky honeydew on buds lead instead to the rose aphid diagnosis.
Keep Useful Leaves While You Stop New Splash
Choose removal from the amount of working foliage left on the shrub. Cleanup that makes a nearly bare rose completely bare trades disease reduction for an immediate loss of photosynthetic leaf area.
- A few isolated spots and no active drop
- Mark the leaves, collect anything already fallen, and change splash or drying conditions. Keep useful foliage while checking the next wet period.
- New yellow leaves and spots moving upward
- Remove loose badly affected leaves in stages, clear the bed surface, and protect clean new foliage if weather and cultivar history support escalation.
- Canes already nearly bare
- Do not chase every last spot by stripping the plant. Preserve remaining green tissue, maintain root-zone moisture, and focus on sanitation plus protection of the next flush.
Move irrigation to the soil and use morning timing when foliage might be wetted accidentally. Open normal cane spacing and nearby congestion enough for inner leaves to dry, but avoid severe in-season pruning that forces a stressed plant to replace both canes and leaves.
Remove Inoculum Without Turning Cleanup Into Damage
Infected leaves and stems can carry the pathogen between favorable wet periods. Work from loose material toward attached tissue so cleanup removes a disease source without creating unnecessary wounds or sudden total defoliation.
- Pick up fallen spotted leaves during active disease and again after seasonal leaf drop.
- Remove badly yellowed leaves that release with little force, but leave enough green foliage to support the shrub.
- Inspect dormant canes for persistent dark lesions and prune confirmed infected portions with the rose's normal dormant cuts.
- Use an accepted local disposal route, then restore a clean mulch surface that reduces splash toward the lowest leaves.
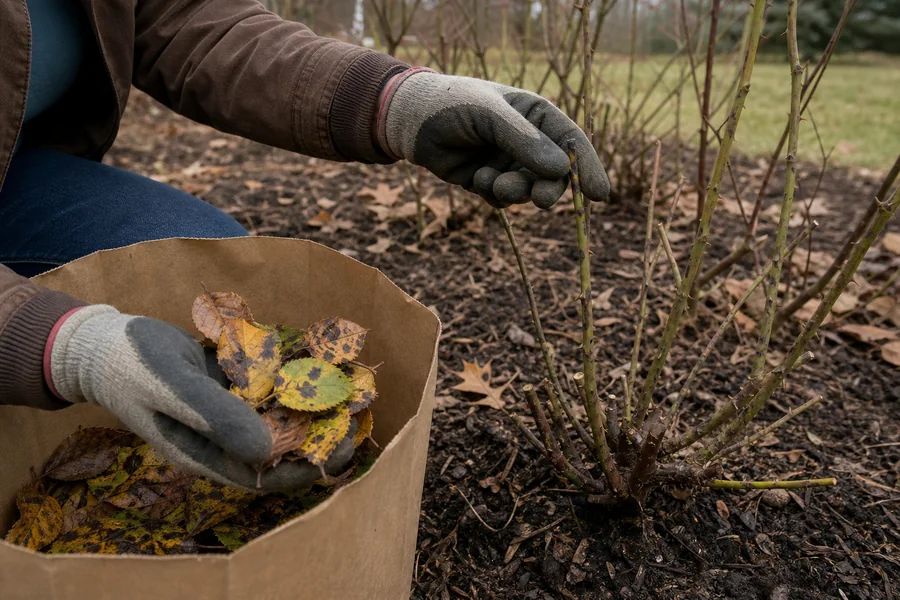
Do not assume every compost pile reaches conditions that reliably handle diseased material, and do not assume every municipality wants it in the trash. Local disposal rules and the actual compost process decide the destination.
A Fungicide Protects New Tissue, Not Old Spots
Cultural controls may be enough for light disease on a vigorous or resistant rose. A repeatedly defoliating susceptible plant under continuing wet weather is the stronger case for adding a fungicide labeled for black spot on roses.
Read the current label before choosing or mixing anything. The label controls the rose use, application interval, coverage, temperature limits, protective equipment, and whether the product can be used around opening flowers.
Thorough coverage of susceptible new tissue matters because rain and growth can leave fresh surfaces unprotected. Follow the label rather than a universal weekly calendar, and stop adding products when the diagnosis or plant response no longer supports them.
Recovery Plan
Old yellow leaves may still fall
Do not read the continued loss of already yellow leaves as instant failure.
Photograph the remaining canopy and mark clean expanding leaves so later checks compare the same tissue.
Check clean leaves for first lesions
Inspect the marked foliage from the lower canopy upward. Fewer new feathery spots and slower yellowing show that splash reduction, drying, sanitation, or protection is changing the cycle.
Measure leaf retention and cane vigor
Healthy expanding leaves, stable green canes, and buds that keep developing are stronger recovery signs than the look of old scarred foliage.
Keep root-zone moisture even while the rose rebuilds its canopy.
Decide whether the cultivar fits the site
A rose that keeps useful foliage after wet spells is manageable. Repeated early defoliation and weaker growth despite sound cultural care support a locally resistant replacement rather than committing to an unwanted spray program.
Begin with a rose whose documented resistance fits local black spot pressure, then place it where sun and air movement help wet leaves dry. Resistance lowers risk but does not make every cultivar immune to every strain.
Water the root zone and keep sprinkler patterns off rose foliage when practical. Where rain supplies the wetness, maintain open spacing and a clean mulched surface so lower leaves dry faster and receive less splash.
Remove fallen rose leaves through the season and after final drop. Inspect canes during dormant pruning, when infected stem tissue can be removed without repeatedly cutting an actively growing shrub.
Record severe defoliation, wet-weather timing, and the response of new leaves. Those observations show whether sanitation and drying are enough, whether preventive protection is justified, or whether a different cultivar is the more durable choice.