
Why Are My Daylily Leaves Turning Yellow?
Yellow older leaves around a firm green center often mark normal daylily turnover, while yellow new fans, patterned spots, orange powder, or a soft crown point to a problem that needs attention.
Start with the location of the yellowing, then check the leaf surface and soil before you water, feed, or spray.
Quick diagnosis
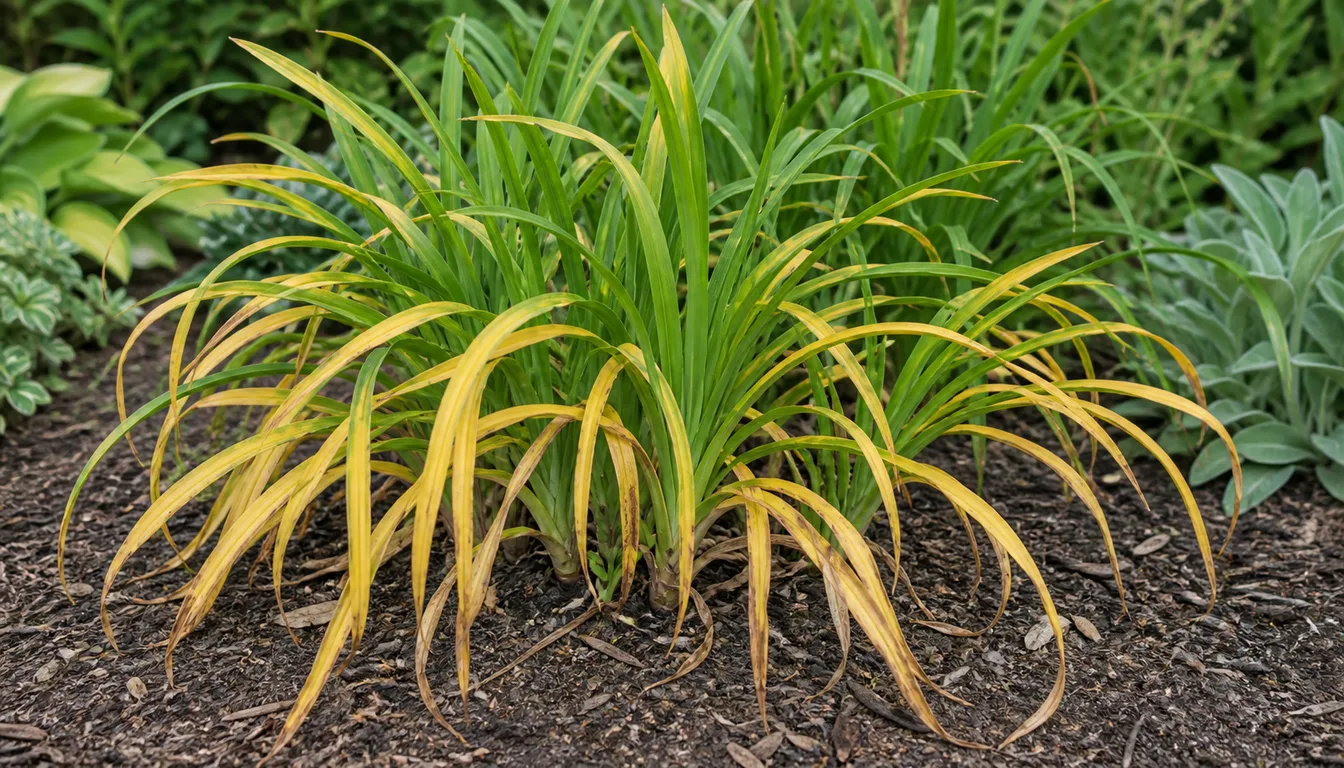
Normal turnover when only old outer leaves yellow
Look into the center of one fan.
A firm green center with a few yellow outer leaves usually needs only cleanup, but yellow center growth calls for a soil check and yellow spots or streaks call for a close look at both sides of the leaf.
Open the full diagnosisWhat You Are Seeing
A daylily fan grows from a crown at soil level, with the newest leaves in the center and the oldest leaves on the outside. That arrangement makes the starting point of the yellowing more useful than the shade of yellow itself.
Check the plant before removing foliage. Note whether the yellowing affects one fan or the whole bed, whether the soil is dry or saturated below the mulch, and whether the leaves carry spots, powder, webbing, or sticky residue.
Timing narrows the diagnosis further. A slow change after flowering or near dormancy fits leaf turnover, while a sudden change after prolonged rain, a fertilizer application, or a run of dry weather points toward a specific stress that should be checked before routine care is changed.
This problem is separate from a daylily that stays green but makes no flower stalks. Leaf color can affect flowering later, but the immediate job here is to find out why the foliage is losing color and whether the crown is still healthy.
Common Causes
01 High likelihood
Normal post-bloom or late-season leaf turnover
Older daylily leaves naturally finish their work and die back. This is most noticeable after a heavy bloom period or as dormant cultivars prepare for winter, although semi-evergreen and evergreen cultivars may keep foliage longer in mild climates.
Distribution makes this diagnosis safer than timing alone. Normal turnover removes scattered outside leaves from otherwise firm fans, so yellowing that advances through the center or concentrates in one collapsing fan needs a soil, crown, or disease check even when the season seems right.
Compare several fans, not one old blade.
A clump that still produces firm green centers while different outer leaves finish at different times is behaving normally. Synchronized yellowing through whole fans, loss of center firmness, or a patch that expands independently of season moves the case out of routine cleanup.
How to identify it
- Yellowing starts on the oldest outside leaves while the center of each fan remains firm and green.
- The change is gradual and follows flowering, heat, or the normal end of the growing season.
- The crown is firm, the soil does not smell sour, and new leaves are not collapsing.
- There are no yellow-bordered lesions, orange pustules, sticky insect residue, or fine webbing.
What to do
- Pull away leaves that are completely yellow or brown and release easily from the crown.
- Leave partly green foliage in place because it still supplies energy to the crown.
- Remove spent foliage from the bed instead of leaving a damp mat around the fans.
- Make no change to watering or fertilizer when the soil and center growth look healthy.
02 High likelihood
Prolonged drought or a dry root zone
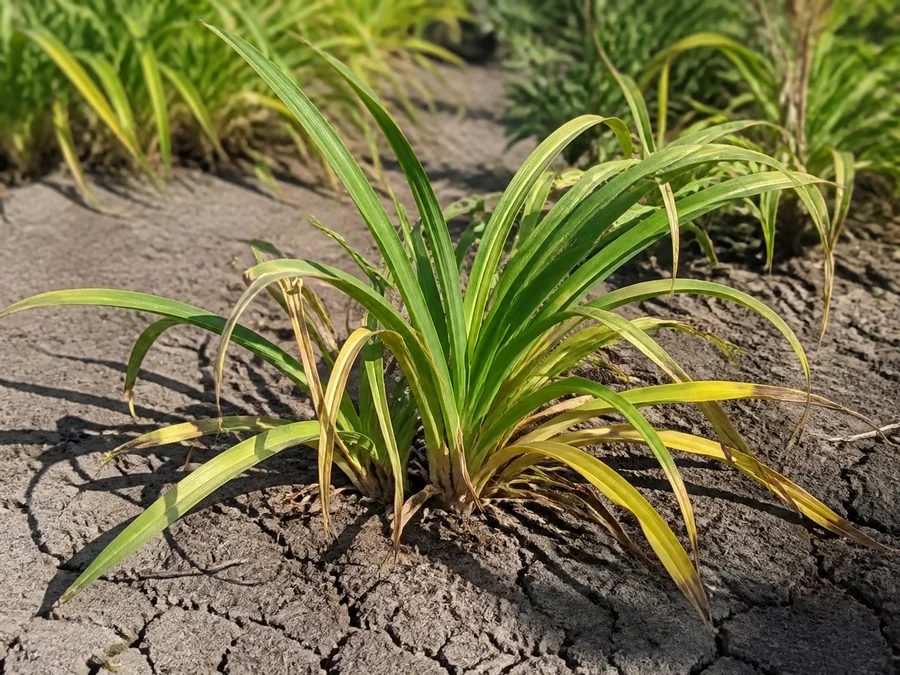
Established daylilies tolerate short dry spells, but prolonged drought reduces their vigor. Leaves often lose color from the tips and margins first because the plant cannot replace water as quickly as the foliage loses it.
A dry mulch surface does not prove the roots are dry, and a quick daily sprinkle may wet only the top layer. Check several inches down in the active root zone and compare exposed plants with clumps in the same bed before deciding that drought, rather than disease or saturated soil, is driving the color change.
Look at the damage after a slow watering.
Foliage may regain firmness, but dead tips remain brown and yellow portions do not repaint themselves. Recovery appears as steadier new center leaves and a root zone that stays moist below the surface without remaining waterlogged.
How to identify it
- Leaf tips turn yellow and then tan or crisp, especially on exposed plants and recent divisions.
- The soil is dry several inches below the mulch rather than only dry on the surface.
- Leaves may fold or feel less firm during the hottest part of the day, but the crown stays solid.
- Several plants in the same dry part of the bed show a similar pattern without spots or spores.
What to do
- Use deep watering to soak the root zone slowly, then wait until the upper soil begins to dry before watering again.
- Use a trowel or finger check below the mulch to confirm that water reached the roots.
- Maintain a light mulch layer to slow evaporation, but keep it away from the crown.
- Judge improvement by firm new leaves because tissue that has already turned yellow will not become green again.
03 Medium likelihood
Waterlogged soil and poor drainage
Daylilies grow in many soils, but a waterlogged site deprives roots of oxygen and can begin a slow decline. New fans may yellow and soften even while the surface looks merely damp, especially in compacted clay or a low spot that collects runoff.
The useful evidence is how long the root zone stays wet and whether young leaves lose firmness. One rainy day is not enough to diagnose poor drainage, but soil that remains saturated for days while nearby higher clumps recover shows that the site, rather than the watering calendar, owns the problem.
Probe uphill, within the affected patch, and just outside it after rain.
A wet boundary that matches runoff or compacted traffic points to site drainage. Soft crowns, missing roots, or odor within that wet sector show that poor aeration has progressed into decay and needs more than a shorter watering schedule.
How to identify it
- Yellowing reaches younger center leaves instead of staying on old outer foliage.
- Soil below the mulch remains wet for days after rain or irrigation and may have a stale odor.
- Affected leaves feel soft or limp rather than dry and crisp.
- Roots on a test division are sparse or brown, but the crown may still be firm before rot develops.
What to do
- Stop automatic irrigation and begin overwatered plant recovery only after the root zone has drained.
- Pull mulch away from the crown and divert runoff that enters the bed.
- Lift a salvageable clump during suitable planting weather and reset it in a raised, well-drained position.
- Discard sections with a soft, foul-smelling crown rather than planting them in fresh soil.
04 Medium likelihood
Daylily leaf streak
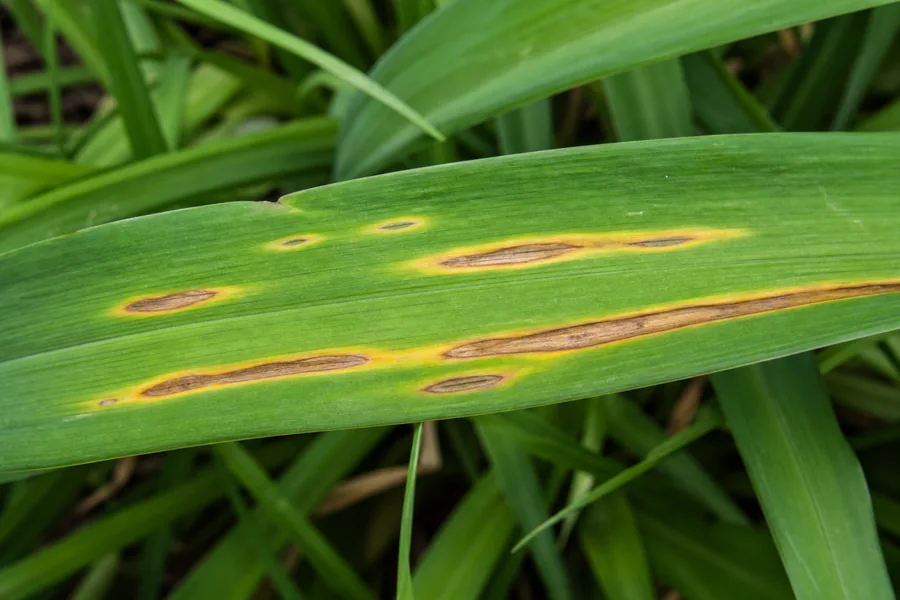
Leaf streak is a fungal disease that creates a pattern rather than an even fade. Small tan or brown lesions develop yellow borders, then lengthen along the leaf and can cause badly affected foliage to die early.
Follow one lesion instead of judging the whole clump from a distance. A defined dead center with a widening yellow margin that extends along the blade supports leaf streak, while an evenly pale leaf without lesions sends the diagnosis back toward roots, moisture, nutrition, or normal aging.
Mark the end of an active streak and inspect the next leaves after wet weather.
Fresh lengthening lesions support ongoing disease. Bag badly affected foliage and avoid carrying wet leaves through clean clumps; old fixed scars alone do not justify repeated treatment when new growth stays clean.
How to identify it
- Tan to brown oval spots appear with a clear yellow halo.
- Lesions lengthen into brown streaks, often along the midvein, with broad yellow margins.
- Damage begins on individual leaves and spreads after wet weather or repeated overhead watering.
- The underside lacks the raised orange powder that identifies daylily rust.
What to do
- Remove clearly infected leaves and collect dead foliage at the end of the season.
- Put diseased leaves in household waste instead of using them as mulch around daylilies.
- Water at soil level and allow leaves to dry quickly when overhead watering cannot be avoided.
- Ask a local extension office about a labeled preventive fungicide only when leaf streak returns severely, since existing lesions will not heal.
05 Medium likelihood
Daylily rust
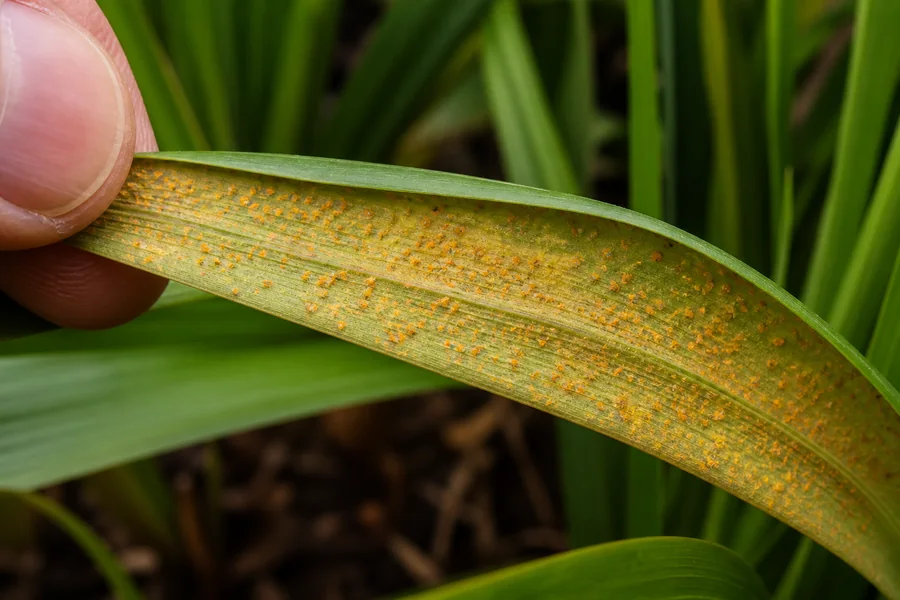
Daylily rust can resemble leaf streak from above because it produces bright yellow spots and yellow-to-brown streaks. The deciding feature is a crop of raised orange-yellow pustules on the underside of the leaf.
That underside check should happen before leaves are carried through the bed or any spray is chosen. Orange powder confirms a spore-producing disease that can move on hands, tools, and foliage, whereas a clean underside means the yellow marks need another explanation.
Inspect more than one leaf and wipe a pustule over white paper.
A repeatable orange deposit is stronger evidence than color seen through the blade. Isolate new plants with suspicious spots and clean tools before moving to another clump so the inspection itself does not distribute spores.
How to identify it
- Small bright yellow spots or streaks appear on the upper leaf surface.
- Raised orange or yellow-orange pustules form directly beneath the spots.
- A gentle wipe with white tissue picks up a powdery orange stain.
- Heavily affected foliage turns yellow, dries, and may spread spores when plants are handled.
What to do
- Bag infected leaves as soon as you remove them so loose spores do not scatter through the bed.
- Work with healthy clumps before infected ones and clean tools and hands afterward.
- Avoid removing more than about one-third of the green foliage at one time when infection is light.
- Choose resistant cultivars for repeat outbreaks and ask local extension staff whether a preventive fungicide is warranted in your area.
06 Low likelihood
Soft rot, crown rot, or southern blight
A rotting crown interrupts water movement to the entire fan, so leaves can yellow, wilt, and then brown quickly. Warm wet conditions, poor drainage, damaged crowns, and excess fertilizer can increase the risk of some crown and soft rots.
The crown is the decision point because yellow foliage alone cannot separate rot from drought or ordinary decline. Lift one failing fan when the center collapses, the base smells unpleasant, or the leaves release from soft tissue, then compare the damaged crown with a firm neighboring fan before discarding the clump.
Map affected crowns before digging.
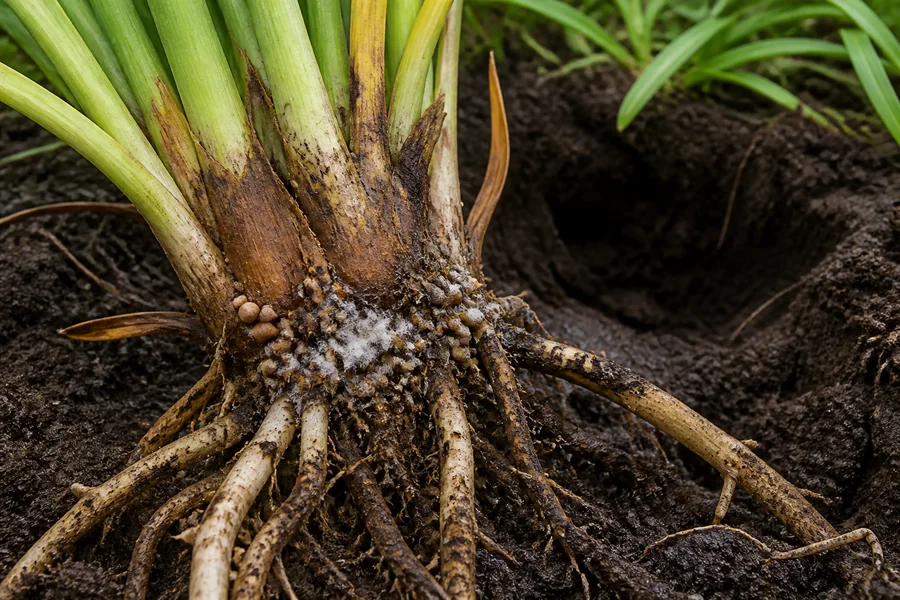
One damaged fan after an injury may be removable, while several soft crowns in the same wet pocket point back to the site. White fanlike growth or sclerotia around the crown changes the sanitation decision and deserves a fresh diagnostic sample rather than routine division.
How to identify it
- Several leaves in one fan yellow and wilt together instead of aging one outer leaf at a time.
- The base of the fan is brown, water-soaked, soft, or easy to pull apart.
- Bacterial soft rot may produce a strong unpleasant odor at the crown.
- Southern blight may leave white cottony growth and tiny tan to reddish-brown round bodies at the soil line after warm wet weather.
What to do
- Lift the affected fan and inspect the crown and upper roots before adding water or fertilizer.
- Discard soft or badly discolored crowns and the soil clinging closely to them.
- Do not compost infected material and do not replant a susceptible daylily in the same spot immediately.
- Correct drainage, keep mulch off crowns, and allow cut or divided crowns to heal before planting.
07 Low likelihood
Excess nitrogen or recent fertilizer injury
More fertilizer does not always make a greener daylily. Excess nitrogen can produce yellowish foliage in early spring, and concentrated fertilizer placed against leaves or crowns can injure tissue and roots.
Use the application history to keep this cause low on the list. A recent spill, granules lodged against leaf bases, or a shared pattern along the fertilizer path supports injury, while yellowing that began before feeding should not be reclassified as fertilizer damage simply because a product was used later.
Compare the damaged strip with unfed clumps and look for granules or scorched tissue at the leaf bases.
Stop further feeding and water normally when the soil is dry enough to accept it; repeated flushing in already wet soil trades salt stress for poor aeration. New center growth, not the burned leaves, shows whether roots recovered.
How to identify it
- Yellowing begins soon after a heavy feeding or a spill in one part of the bed.
- Several nearby fans show similar symptoms without disease lesions or wet crowns.
- Leaf tips or tissue touched by granules may yellow and then brown.
- The plant may have coarse foliage and fewer flowers after repeated high-nitrogen feeding.
What to do
- Stop feeding and brush any remaining granules away from leaves and crowns.
- If drainage is good, water the soil thoroughly once to move soluble salts away from the immediate root zone.
- Wait for new growth before deciding whether the plant is recovering.
- Use a soil test before the next fertilizer application instead of treating yellow color as proof of a deficiency.
08 Low likelihood
Mites, aphids, or thrips
Sap-feeding pests can make daylily foliage look pale or yellow, but they leave additional evidence. Spider mites cause fine stippling and sometimes webbing, aphids form visible colonies with sticky honeydew, and thrips leave silvery feeding scars.
Each pest changes the leaf in a different way, so a general yellow cast is not enough reason to treat. Inspect folded leaf bases and both surfaces with a hand lens or white-paper tap test, then match the response to the insect that is actually present instead of applying a broad spray to a moisture problem.
Choose leaves at the symptom boundary, not only tissue that is already dead.
Tap stippled blades over white paper for moving mites, open folded young leaves for thrips, and follow honeydew to aphid colonies. When none of those signs repeat across several leaves, return to crown and root-zone evidence before spraying.
How to identify it
- Fine pale dots merge into a dull yellow cast and delicate webbing appears between leaves during hot dry weather.
- Aphids cluster on tender leaves or flower stalks and leave a sticky surface that may attract ants.
- Thrips leave silvery streaks or scars, often low in the folded base of the leaf.
- A tap over white paper dislodges moving mites or narrow insects from affected foliage.
What to do
- Rinse a light aphid or mite population from sturdy foliage with water directed away from other daylilies.
- Remove badly infested leaves and clear dead material that shelters pests.
- Use insecticidal soap or horticultural oil only after identifying the pest and follow the product label closely.
- Avoid broad preventive sprays because they can kill beneficial insects without correcting water or crown problems.
Read the pattern before choosing a fix
Start with position because a daylily fan records leaf age from the center outward.
Old outer leaves point toward seasonal turnover, dry yellow tips point toward drought, and yellow new center leaves make the root zone or crown more important than the calendar.
Next, use texture and recent weather together. Crisp margins after a dry spell fit moisture shortage, soft leaves in soil that stays wet fit poor root aeration, and a soft crown with odor or fungal growth justifies lifting the affected fan instead of adjusting irrigation from above.
The leaf surface separates patterned disease from an even physiological fade. Yellow-bordered brown streaks suggest leaf streak, raised orange powder on the underside confirms rust, and stippling, webbing, honeydew, or silvery scars provide the extra evidence needed for a pest diagnosis.
A useful diagnosis should explain both the damaged tissue and the unaffected tissue beside it. When the proposed cause cannot explain why center leaves remain green, why only one low spot is affected, or why lesions occur on individual blades, keep checking before choosing a treatment.
Map scale as well as symptom.
One old outer leaf is a leaf-level event, one collapsing fan is a crown-level event, a low sector is a site-level event, and orange pustules scattered among clumps are a disease-spread event. That scale determines whether the useful action is cleanup, lifting one crown, correcting drainage, or protecting the rest of the bed.
Change one major condition, then mark the evidence.
Opposite mistakes can look similar from a distance: drought and damaged wet roots both reduce water delivery, while leaf streak and rust both create yellow-brown marks. Soil moisture, crown texture, and the underside of the lesion settle those forks more reliably than adding water or fertilizer on sight.
Remove only fully dead or clearly infected foliage because partly green leaves still feed the crown. Healthy new fans are the best measure of recovery, since old yellow tissue will not regain its color and may continue to brown after the original stress has stopped.
Match the Yellow Pattern Before You Treat the Clump
A clump with firm upright center leaves and only a few yellow outer blades after bloom can usually be watched rather than treated. The useful baseline is the contrast between aging leaves on the outside and active green growth emerging from the crown.
When yellowing crosses several fans without spots, check the soil below the mulch before changing the watering schedule. Dry soil several inches down supports drought, while cool wet soil that stays saturated shifts attention to drainage and root oxygen.
Marked tissue belongs in a different branch of the diagnosis. Elongated brown lesions, raised orange powder, a soft crown, or visible insect evidence gives the yellowing a specific owner and calls for a targeted response.
Outer leaves only
- Center fans remain green and firm
- Yellowing follows bloom or late-season decline
- Watch new growth before treating
Several fans fade
- Probe below the mulch
- Compare leaf tension and crown firmness
- Correct either drought or saturation
Tissue carries marks
- Inspect both leaf surfaces
- Separate streaks from raised pustules
- Check the crown before removing a fan
Recovery Plan
Check soil, leaves, and one crown
Inspect both leaf surfaces, compare inner and outer leaves, and probe below the mulch before changing care. Record recent rain, drought, fertilizer, and disease patterns, then lift one failing fan only when the center is soft, foul-smelling, or collapsing.
Stop the active stress
Deep-water a truly dry bed, stop irrigation in saturated soil, bag rusted foliage, or remove rotted crowns. Do not combine these actions, since opposite corrections can hide the original pattern and make a recovering fan harder to judge.
Judge the next leaves
Look for firm green growth from the center of the fan, stable moisture below the mulch, and no fresh lesions on new leaves. Existing yellow or scarred tissue may continue to brown after the cause has been corrected, so mark one lesion or photograph one fan instead of judging recovery from old color alone.
Correct repeat conditions
Move clumps out of wet pockets, revise irrigation coverage, use clean planting material, and remove diseased debris before growth resumes. If the same pattern returns despite those corrections, send a fresh sample that includes the crown and symptom boundary to a local plant diagnostic service.
Keep daylily crowns at or just below soil level in a well-drained bed, water the root zone instead of wetting foliage, and keep mulch from packing against the fans. Remove dead leaves at the end of the season, inspect new plants for spots and orange pustules, and use a soil test before adding fertilizer to an established bed.