
Is Your Sedum Overwatered? Check the Crown and Roots First
A wet pot does not always mean an overwatered Sedum has rotted. Read the leaf texture, the crown firmness, the roots, and the way water leaves the container or bed.
Those four together tell you whether the plant needs time to dry, a new potting mix, root trimming, or salvage from the healthy tips.
Quick diagnosis
Water is remaining around the roots longer than the plant can use it
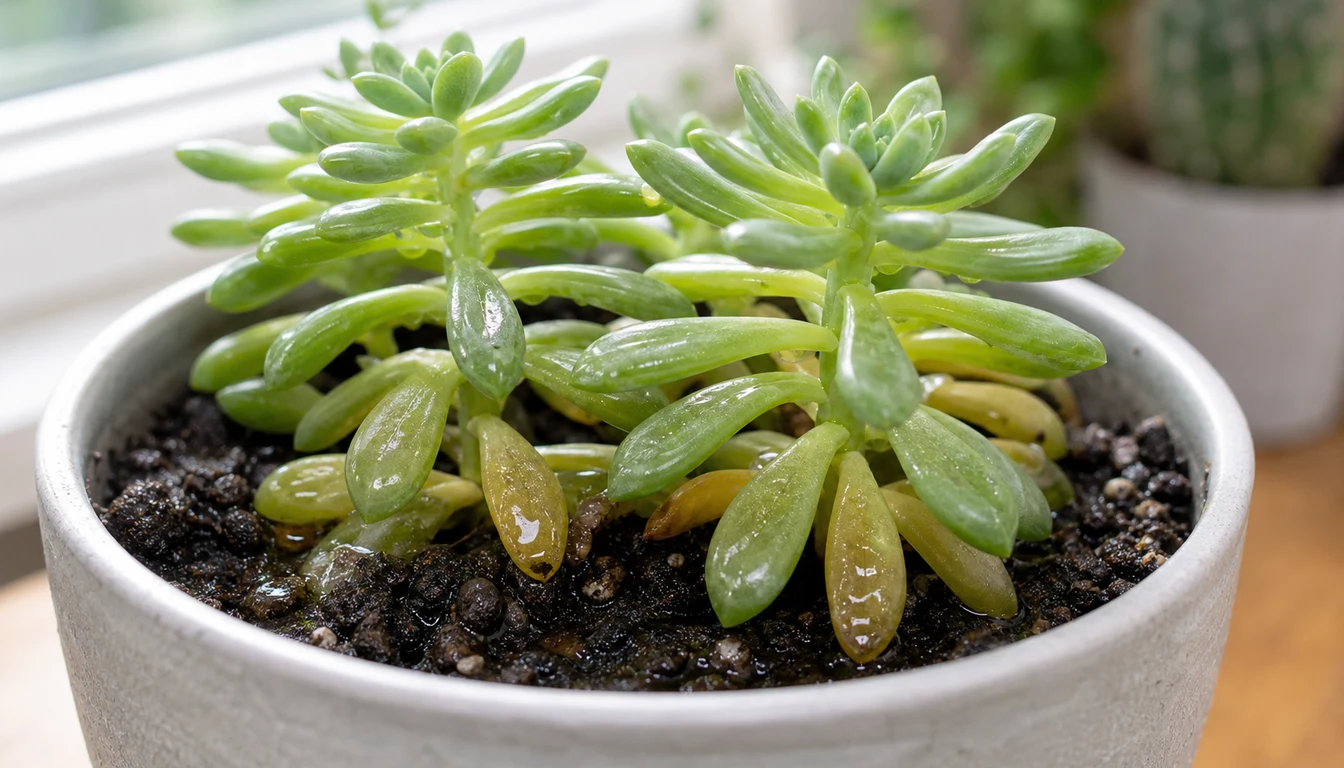
Overwatering is likely when several live leaves turn yellow or translucent and feel soft while the mix remains damp. A firm crown and firm pale roots point to reversible wet stress.
Brown soft roots, a sour smell, a pinched dark stem base, or softness moving upward through the crown indicate established rot and require immediate salvage.
Open the full diagnosisWhat You Are Seeing
Sedum plants store water in fleshy leaves and stems, so their roots need air between thorough waterings. When water fills the pore spaces in the mix for too long, roots lose oxygen and begin to die, and the top can wrinkle or droop because damaged roots no longer move water into the plant.
Judge the whole pattern before cutting anything. One wet afternoon after an accidental extra watering is a different thing from a plant that has stood in a filled cachepot for a week.
Touch the leaves and crown, check how deep the moisture goes, and smell the root zone. Then review the last change in light, temperature, rain, pot or watering routine.
The urgent boundary is firm tissue versus spreading softness. Firm green stems over a wet but odorless root ball often recover once runoff is removed and the mix dries, while a soft crown cannot be restored by sunshine or a longer wait and leaves only firm tips as possible cuttings.
Common Causes
01 High likelihood
Watering again before the root ball dries
A fixed weekly routine can keep adding water faster than Sedum uses it. The same pot dries much more slowly when days shorten, a plant moves away from a bright window, temperatures fall, or active growth pauses.
How to identify it
- The pot receives water on a calendar even when the lower mix is still cool and damp.
- Several lower leaves soften soon after repeated watering rather than drying crisp from the tips.
- The problem began after a seasonal light change, a move indoors, or a spell of cool cloudy weather.
- The crown and roots may remain firm if the excess has been brief.
What to do
- Stop watering and empty all runoff, then keep the plant in its normal bright conditions with gentle air movement.
- Check moisture near the lower half of the root ball with a wooden skewer or through a drainage hole instead of relying on the dry-looking surface.
- Water again only after the root ball has dried and the pot feels distinctly lighter.
- Relearn the drying time after every major change in season, light, temperature, pot size, or location.
02 High likelihood
Fine or compacted potting mix
Peat-heavy or broken-down mix can look dry on top while remaining saturated around the roots. Small particles collapse the air spaces that a succulent root system needs after watering.
How to identify it
- Water drains slowly, pools on the surface, or runs down a gap at the pot edge without wetting the root ball evenly.
- The upper crust is pale while mix taken from below the roots is dark, cool, and wet.
- The root ball is dense and stays in the shape of the old pot when lifted.
- Fine roots are sparse in the wettest lower layer.
What to do
- If the crown and roots are firm, let the current mix dry before disturbing the plant.
- If the mix remains wet or smells sour, unpot the plant and remove loose saturated material without tearing sound roots unnecessarily.
- Repot into a clean container with an open drainage hole and a fresh mineral-rich succulent mix that drains promptly.
- Do not add a gravel layer under wet mix because it does not replace a drainage hole or correct the water held around the roots.
03 High likelihood
Runoff trapped below an apparently drained pot
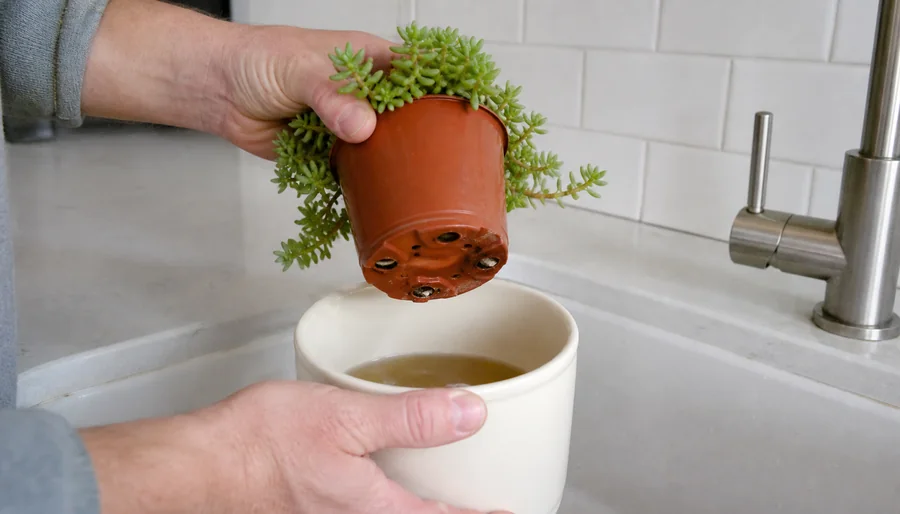
A nursery pot can have good drainage holes and still sit in water inside a decorative cachepot, foil sleeve, or deep saucer. The mix then pulls runoff back upward while the visible surface begins to lighten.
How to identify it
- Water appears in the outer container when the inner pot is lifted.
- The bottom of the nursery pot remains wet long after the rim and surface feel dry.
- Roots cluster near the side but turn brown where they reach the saturated base.
- The decline began after the plant was placed inside a decorative cover pot.
What to do
- Lift the inner pot out and pour away every trace of standing water.
- Allow the pot to drain freely over a sink after future watering before returning it to the cover pot.
- Keep the base raised above any residual runoff or use the nursery pot without the cover until recovery is clear.
- Replace a container that has no open drainage route instead of trying to compensate with smaller sips.
04 Medium likelihood
A pot larger or deeper than the roots need
A small shallow root system cannot use the water held in a large volume of mix. The top and sides may dry while an unused lower core remains wet enough to damage roots.
How to identify it
- The root ball occupies only a small fraction of the container.
- A skewer pushed below the roots emerges wet after the upper zone has dried.
- The pot stays heavy for many days despite bright light and an open drainage hole.
- Roots are healthy near the crown but sparse or brown in the deep wet layer.
What to do
- Choose a snug pot only slightly wider than the cleaned healthy root system.
- Prefer a shallow form for a shallow-rooted specimen when it remains stable and has a drainage hole.
- Fill the whole pot with one consistent free-draining mix rather than hiding a reservoir of fine mix below a coarse top layer.
- Reduce the volume of each new container only after removing dead roots, because the living root mass sets the appropriate size.
05 Medium likelihood
Rain pooling around an outdoor crown
Garden Sedum can be overwatered without irrigation when compacted clay, a low planting pocket, roof runoff, or repeated rain keeps the crown and root zone saturated.
How to identify it
- Water stands beside the crown or flows toward it after rain.
- Basal stems soften first where they meet wet soil while upper shoots remain firm.
- Nearby soil forms a slick dense ribbon when pressed rather than crumbling.
- The damage follows a prolonged wet spell and is strongest in the lowest part of the bed.
What to do
- Stop supplemental irrigation and divert roof or path runoff away from the plant.
- Expose the crown at its original level without cutting sound roots merely to inspect them.
- Remove soft basal stems and move surviving firm divisions or tips to a raised, sharply drained position when the site stays waterlogged.
- Correct the grade across the planting area rather than creating a small amended pocket that can hold water like a basin.
06 Urgent when tissue is soft
Root or crown rot has already become established
Once roots or the stem base become brown and soft, removing standing water alone may not stop the loss. The rescue boundary must move upward until every retained surface is firm and clean.
How to identify it
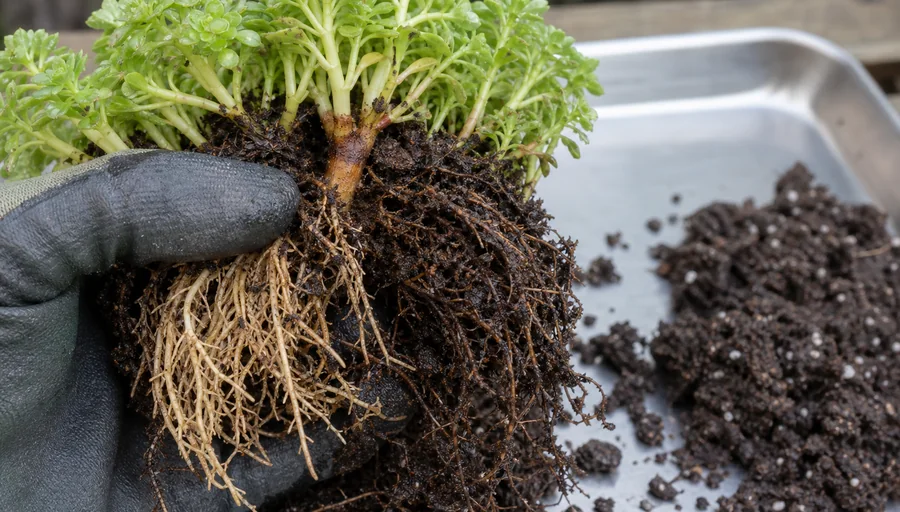
- Roots are brown, slimy, hollow, or detach with a gentle pull instead of bending while firm.
- The stem base is pinched, dark, translucent, or foul-smelling.
- Softness continues into new leaf layers even after the pot is allowed to drain.
- A cut through the stem shows brown or water-soaked tissue instead of an evenly clean interior.
What to do
- Isolate the plant and remove it from the wet mix so the crown and roots can be examined in full.
- Use a clean blade to remove soft roots and stems, cleaning the tool before each new cut through questionable tissue.
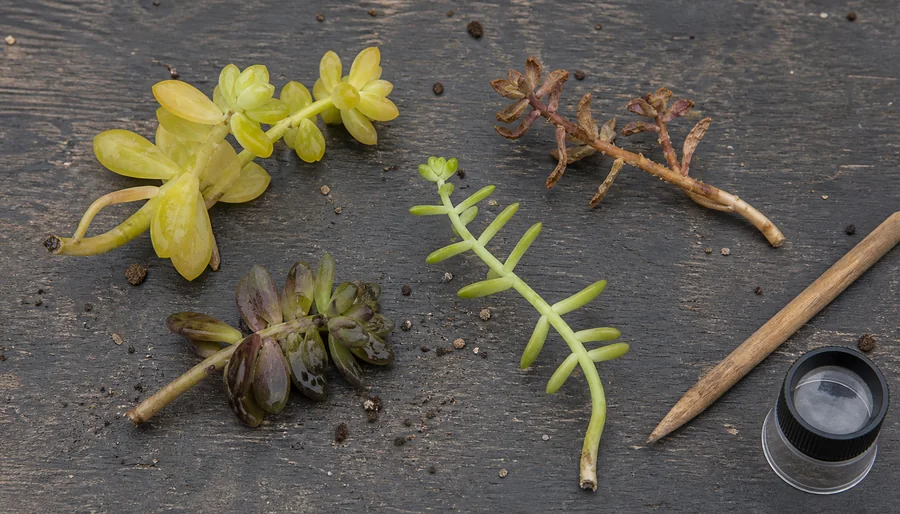
- When the crown is lost, take firm healthy tips above the discoloration and discard the rotten base and contaminated mix.
- Let clean cutting surfaces dry before placing salvage pieces into fresh gritty medium.
Wet soil is a warning, but tissue texture sets the urgency
Moisture history tells you where to look, while firmness tells you how quickly to act.
If the plant had one extra watering, the leaves and crown remain firm, and the root zone has no sour odor, remove trapped runoff and let the mix dry in bright suitable light. Cutting healthy roots at this stage adds wounds to a plant that may recover without surgery.
Unpot the plant when the container cannot drain, the mix remains saturated well beyond its normal drying period, or softness is spreading. Healthy roots are usually firm and pale to tan, although their exact color varies with the mix.
The same root-first check for an overwatered plant applies here.
Rotten roots feel soft or slimy, break apart easily, and may lead to a dark constricted stem base.
A wet plant can also look thirsty.
Roots deprived of oxygen stop supplying the leaves, so the top may droop or wrinkle while water still surrounds the root ball. Adding another drink worsens that cycle.
Use root condition and deep moisture as the tie-breaker whenever the foliage sends a mixed signal.
Choose the Least-Destructive Next Step
Leave a firm Sedum in its pot after one brief wet episode when runoff has been removed, the crown has no sour odor, and deep moisture is already receding. Cutting or stripping sound roots at this stage creates wounds without removing a rotten boundary.
Leaf color cannot choose the rescue because wet roots, dry roots, cold exposure, and ordinary lower-leaf loss can all produce yellow or brown tissue. Feel the leaf and crown, then use a skewer or drainage-hole check and the difference between overwatering and underwatering to learn what is happening below the dry-looking surface.
Leave It Potted
- The crown and stems remain firm.
- The root zone smells normal and has begun to lose moisture.
- Empty trapped runoff, provide suitable bright light, and wait for the root ball to dry.
Unpot It Now
- The lower mix stays saturated or smells sour.
- Leaves continue softening after standing water is removed.
- Expose the roots and crown so firm tissue can be separated from rot.
Salvage Above the Crown
- The crown is dark, pinched, translucent, or soft.
- A test cut remains brown or water-soaked inside.
- Move upward to clean firm stem and retain only healthy tips.
Use the least destructive column supported by all the evidence, then escalate only if softness spreads or the root-zone check contradicts the leaves. A wrinkled top above saturated mix can result from oxygen-damaged roots, so another drink is not a safe tie-breaker.
What the Root Inspection Changes
Support the plant as you ease the root ball free, then remove only loose saturated mix until the roots and underside of the crown can be examined. Firm roots may be pale, tan, or stained by the mix; texture and attachment matter more than color alone.
Retain roots that bend without collapsing and trace every soft root toward the stem base. Brown slimy roots, tissue that sheds with a light pull, or a dark pinched crown show where drying alone stops being enough.
- Set firm rooted sections aside, then remove brown soft roots with a clean blade without shortening sound roots to make them look even.
- Inspect the crown after each removal. If it remains firm and clean, repot the surviving root system in a snug draining container with fresh gritty mix.
- When the crown is soft, cut a stem above the discoloration and inspect the interior. Clean the blade and move higher whenever the cut remains brown, glassy, or wet.
- Let clean cuts dry in an airy shaded place before using a stem-cutting propagation method. Keep fleshy leaves above the medium rather than pressing them into damp mix.
- Discard the plant when no firm root, crown, division, or upper stem remains; fertilizer and extra drying cannot rebuild tissue that has already collapsed.
After Heavy Rain, Fix the Water Path Around Garden Sedum
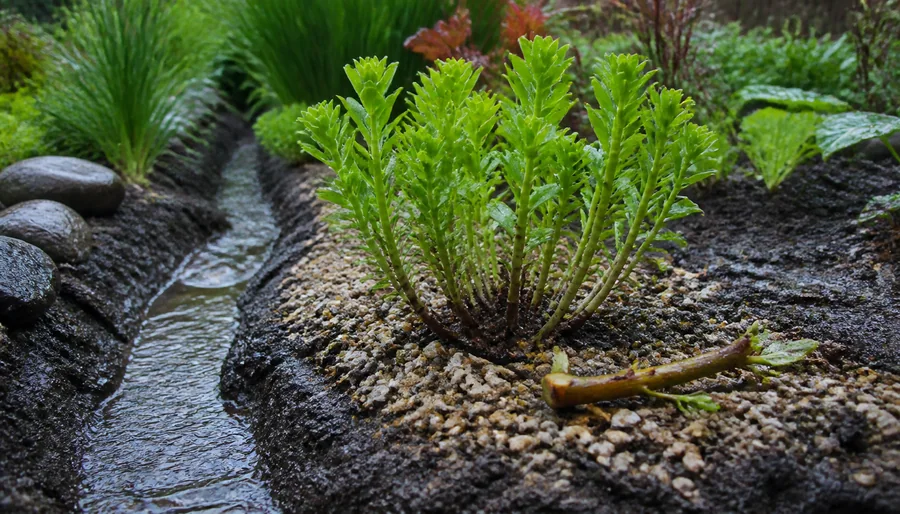
After heavy rain, uncover the crown to its original soil line and press the basal stems gently before moving the plant. Firm tissue after temporary saturation can remain in place while surface water is redirected, but softness that advances upward from the soil line requires removal back to a clean boundary.
Watch where roof runoff, path water, and puddles travel rather than improving only the small hole around the plant. A pocket of loose amendment inside dense clay can refill like a basin, while a raised shoulder and continuous downhill outlet give water somewhere to leave.
Move firm divisions or healthy tips only when the site cannot be corrected without leaving the crown wet. At the next storm, the proof is visible flow away from the plant and a firm crown after the surface drains, not a prescribed number of dry days.
Recovery Plan
The spread of softness should stop
A plant kept intact should become no softer after standing water is removed and the root ball begins to dry.
Salvaged tips should keep a firm clean cut surface. Any discoloration moving above a cut means decay remains and the stem must be cut again into clean tissue.
Firm attachment comes before obvious top growth
Retained roots may stabilize before the leaves change visibly.
A cutting begins to resist a very gentle nudge as new roots form, but repeated pulling tears those roots. Old translucent leaves will not turn sound again, so judge progress by a firm crown and firm new growth.
Return to normal care gradually
Resume a thorough watering only when the root ball has dried and the plant shows stable firm tissue. Delay fertilizer until active new growth is clear.
If the pot remains heavy for too long, correct the mix, pot volume, light, or runoff path before adding water again.
Replace the calendar with a wet-and-dry watering cycle for succulents. Let all runoff escape, empty the saucer or cachepot, and wait until the root ball dries before watering again.
Recheck the routine whenever light, temperature, humidity, season, pot size or growth rate changes. Inspect outdoor crowns after prolonged rain, because rainfall creates the same oxygen-poor root zone as frequent hand watering.