
Why Sedum Gets Leggy or Flops and How to Reset It
Leggy Sedum needs a closer look before it needs pruning. Pale stems with widening gaps between leaves point to low-light stretch, while firm flowering stems that open from the center usually belong to an upright stonecrop with a support, soil, or clump-age problem.
Start diagnosis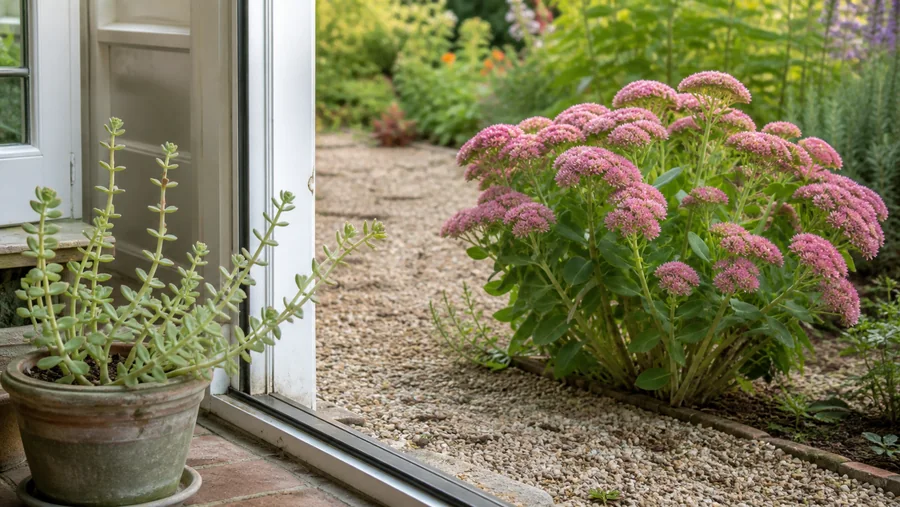
What You Are Seeing
The name Sedum covers plants with very different silhouettes. Some creep across rock and root where a stem touches soil, some form low compact mounds, and taller plants now often classified as Hylotelephium carry broad flower heads on upright stems.
That variation is why a long stem is not enough to diagnose leggy growth. Leaf spacing, stem firmness, color, direction, flowering stage, and the condition of the crown show whether the plant is reaching for light, following its normal habit, or losing structural support.
Existing stretched sections will not become short again after the light improves. The immediate goal is to stop further elongation, then decide whether to keep, shorten, reroot, divide, or support the growth already present.
Common Causes
Insufficient light is stretching the newest growth
A Sedum in weak light extends its stem between leaf nodes as it grows toward a brighter area. New leaves may be smaller or less colorful, and a previously tight plant develops a loose top while older growth near the base still records the compact shape it had in stronger light.
The direction matters. A stem that arcs toward one window or a shelf edge gives stronger evidence than an old bare stem by itself, because leaves can also disappear after handling, drought, or normal aging.
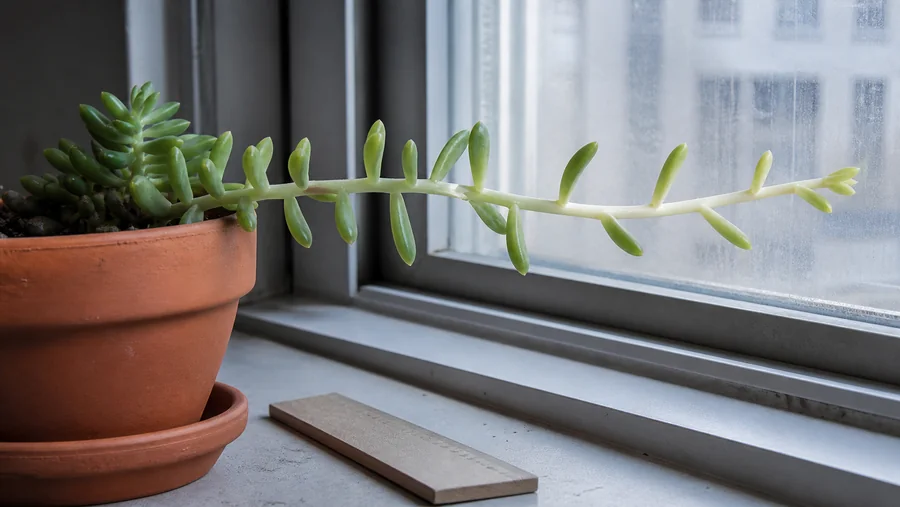
- Internodes become progressively longer toward the newest tip rather than staying even along the whole stem.
- New leaves lose some of the color or compact arrangement typical of that plant in brighter conditions.
- Several tips lean toward the same window, lamp, or opening instead of falling randomly in every direction.
- The stem remains firm. Soft tissue or a dark crown requires a root and rot check before light correction.
- Move the plant to the brightest sustainable indoor position or add a suitable grow light, then use the spacing of the next leaves to judge whether the change is enough.
- Increase direct sun gradually when moving an indoor plant outside so low-light leaves are not exposed to intense midday sun in one step.
- Wait for compact new growth before reshaping a badly stretched plant. This proves the new site can support the replacement growth.
- Cut and reroot healthy compact tips when the old gaps spoil the plant's shape, following the propagation sequence below.
The plant is creeping or trailing as that Sedum normally grows
Many stonecrops do not hold every stem upright. A healthy creeping Sedum can run over gravel, spill beyond a pot, or bend down and form roots where a node meets soil without showing the pale sparse growth of etiolation.
Use the whole plant as the reference. Firm stems, even species-typical leaf spacing, good color, and compact side shoots along a long runner support normal spread, especially when the same stem is rooting at several contact points.
- Leaf size and spacing remain similar from the base to the tip.
- Stems spread in several directions or follow the pot edge instead of reaching toward one light source.
- Nodes touching gritty soil may produce roots and new anchored shoots.
- The plant matches a creeping, groundcover, or hanging form rather than an upright border stonecrop.
- Leave healthy spreading stems in place when they are performing the groundcover or trailing job you chose the plant for.
- Redirect a runner onto bare gritty soil if you want coverage, or trim it at a branching point when it has crossed a path or crowded another plant.
- Confirm the species or cultivar before trying to force a naturally trailing form into a tight upright rosette.
- Use the habit comparison below when the label is missing and the newest growth is hard to interpret.
A flowering upright stonecrop is opening under its own weight
Tall upright stonecrops can look sturdy through spring and then splay outward as their broad flower clusters gain weight. The center may open while each stem remains green, firm, leafy, and capable of flowering, which separates this structural flop from both pale etiolation and soft crown rot.
An older crowded crown makes the pattern stronger. Dense shoots compete for space near the center and lean outward, so staking this year's stems can improve the display but does not renew the clump that will return next season.
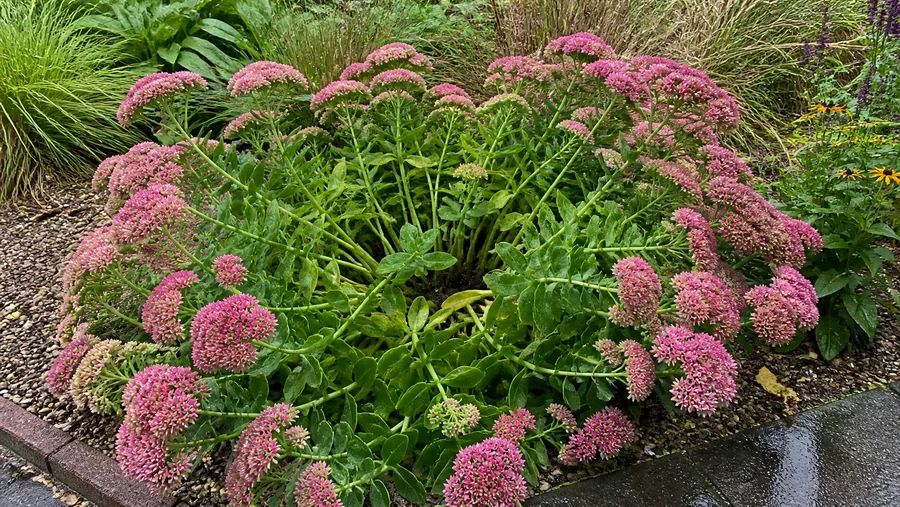
- The plant stood upright earlier and began opening as flower clusters enlarged or after rain added weight.
- Leaves keep normal spacing and color along firm green stems.
- Stems radiate away from a hollow or congested center instead of bending toward one light source.
- The same mature clump repeats the pattern in successive flowering seasons.
- Support the current display with a low ring or discreet stakes placed before stems are already on the ground.
- Divide a repeatedly hollow or congested clump in spring or fall and replant vigorous outer pieces at their original depth.
- For suitable tall Hylotelephium forms, cut some or all stems back by about one third to one half in late spring before flower buds develop. This makes shorter branched stems but can delay flowering and produce smaller, more numerous heads.
- Leave low, compact, or early-flowering sedums out of a Chelsea chop unless reliable guidance for that plant supports it.
Rich soil, fertilizer, or constant moisture is making stems too soft
Stonecrops are adapted to lean, well-drained ground. A plant receiving lawn fertilizer, frequent liquid feed, compost-rich soil, or steady irrigation may grow tall dark foliage quickly without building stems able to hold the canopy and flowers.
This growth usually looks lush rather than pale. It may occur across the entire clump with no strong lean toward light, and the soil history often reveals the cause before the roots show obvious decay.
- Leaves are large, dark, and full while stems are unusually tall and flexible.
- The plant receives runoff from a fertilized lawn or regular feeding intended for neighboring perennials.
- Soil stays moist for long periods even though the crown and roots are still firm.
- A plant in the same light but leaner, drier soil keeps shorter, sturdier growth.
- Stop routine fertilizer and keep compost-heavy mulch away from the crown.
- Redirect frequent irrigation meant for thirstier plants so the sedum root zone can drain and dry between waterings.
- Do not dig rich amendments into an established crown during active growth. Correct the site gradually or move the plant during an appropriate division season.
- Support soft stems for the rest of the current season, then judge the change by next season's growth.
Nearby growth has changed the light and support around the plant
A sedum can begin stretching even though nobody moved it. A young tree develops a wider canopy, a shrub fills in, or taller perennials surround the clump and remove direct light from the lower stems.
Crowding can hide the evidence because neighboring plants prop the sedum up until wind or rain separates them. Look for shorter compact growth on the bright side and longer leaning growth inside the shaded side of the same clump.
- The bed now receives fewer hours of direct light than when the sedum was planted.
- Stems on the open edge remain shorter than stems reaching through nearby foliage.
- Lower leaves thin where neighboring plants block light and air.
- The plant flops when surrounding stems are moved aside, even before flowers become heavy.
- Observe the actual sun path across the bed instead of relying on the site's old full-sun label.
- Thin or relocate competing growth only when that change also suits the neighboring plant.
- Move the sedum to an open, well-drained site during a suitable transplant season when the shade source cannot be corrected.
- Give the moved clump enough spacing to develop its natural width without depending on nearby plants as supports.
Wet roots or crown rot are causing collapse rather than stretch
Rot can make a Sedum fall over, but it does not create the orderly pale internodes of etiolation. Affected leaves may become translucent, the stem pinches easily at soil level, and roots turn brown or black instead of remaining firm.
Treat this as a separate rescue decision. Adding light or staking the top will not restore a decaying crown, and watering because a fallen plant looks wilted can accelerate the loss.
- The stem is soft or discolored where it meets the soil rather than firm along its full length.
- Leaves feel mushy or release with a light touch while the potting mix remains wet.
- Dark slimy roots or a sour smell appear when the root ball is inspected.
- Collapse follows persistent rain, a pot without drainage, or repeated watering before the mix dried.
- Separate firm healthy tips from every soft or discolored section before rot advances farther up the stem.
- Remove wet contaminated mix and inspect the roots, then use the Sedum overwatering diagnosis for the full root-triage sequence.
- Let clean succulent cut surfaces dry before rooting them in a sterile gritty medium.
- Correct drainage and watering before returning saved cuttings to the same container or bed.
Low-light stretch when the newest internodes are long, pale, and aimed toward the brightest side
Trace one stem from its older base to its newest tip. True etiolation produces a sequence of increasingly wide gaps between leaves, weaker color, and a bend toward a window or other light source, while the tissue stays firm.
If the leaf spacing looks normal but a mature flowering clump has opened like a ring, check flower weight and clump age instead. Stop and inspect the crown and roots before making any cut when stems are soft, translucent, foul-smelling, or dark at soil level, because that pattern points to rot rather than a light problem.
Open full diagnosisJudge the repair by new growth because old internodes do not close
Etiolation is built into the stem while that stem is growing. More light can make the next nodes closer together, strengthen new leaves, and improve color, but it cannot pull an existing long internode back into a compact one.
This gives you a useful test before pruning. Leave the plant in its corrected light long enough to see a run of compact new leaves, then keep that tip, shorten the bare base, or use the top as a cutting according to the plant's habit.
An upright flowering stonecrop follows a different clock. Support can rescue this year's display, late-spring pinching changes the stems that will flower later that season, and division is judged by the strength and shape of the next full clump.
Reset the diagnosis if the newest growth remains long in the brighter site. The light may still be inadequate, a neighboring plant may be shading only part of the canopy, or rich moist conditions may be producing soft growth that resembles stretch.
Is the Long Stem Actually Abnormal?
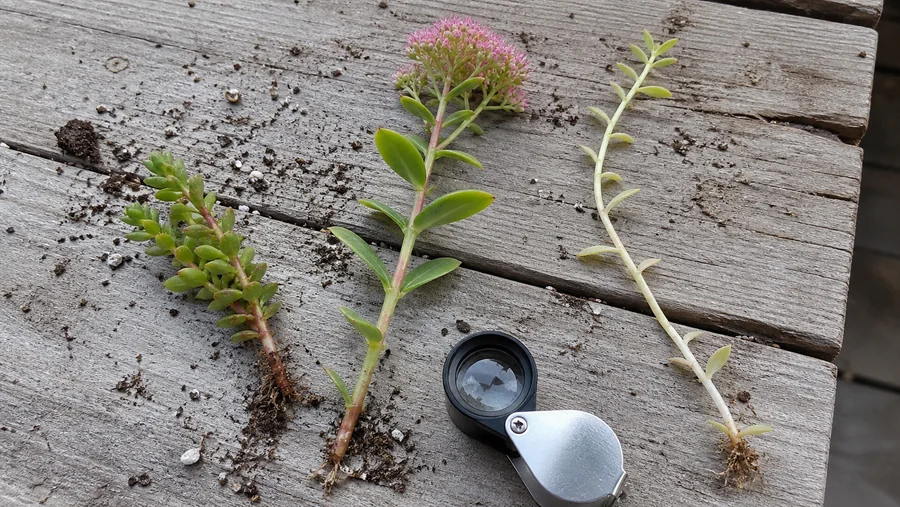
Identify the plant's intended habit before deciding what shape to restore. Groundcover sedums spread horizontally, low clumping forms mound, and upright stonecrops carry seasonal flower stems, so only the change from that normal pattern reveals a problem.
- Healthy creeping or trailing stem
- Firm leaves keep normal color and spacing while the stem runs across soil or over a pot. Nodes may root where they touch the surface.
- Healthy upright flowering stem
- Leaf spacing stays consistent and the firm stem ends in a developing flower cluster. Outward lean begins as the head becomes heavier.
- Low-light etiolation
- New internodes lengthen in sequence, color weakens, and several tips reach toward the same bright side. Old compact growth remains visible below.
- Lush structurally weak growth
- Large dark leaves sit on fast flexible stems across the clump. Rich soil, fertilizer, or constant moisture is present without a one-sided reach.
- Root or crown collapse
- Leaves or the stem base turn soft, translucent, dark, or foul. This needs rot triage before any light, staking, or pruning plan.
A missing label does not require a perfect species identification before you act. Firmness, leaf spacing, direction, and flowering stage are enough to separate normal spread from etiolation and to stop a dangerous watering response when the crown is already soft.
Reset a Stretched Container Sedum Without Rushing the Cuttings
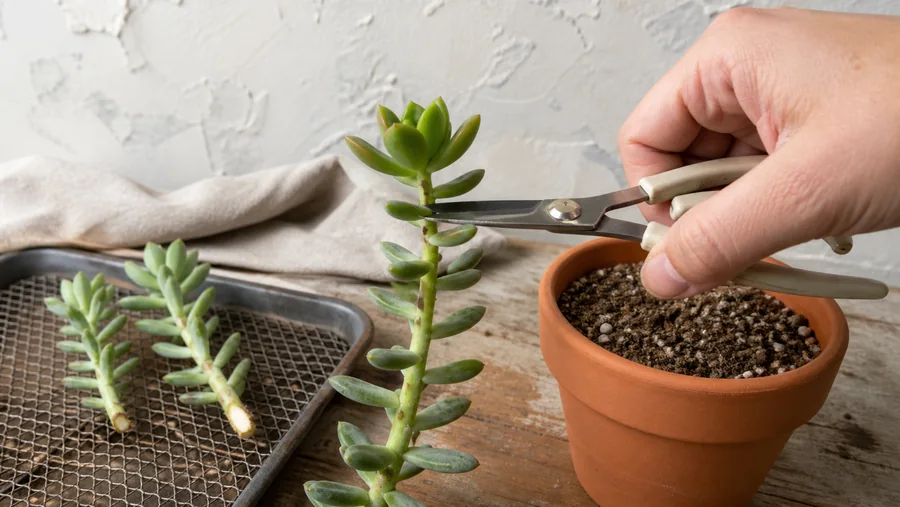
Correct the light before making a major cut. If the replacement tip stretches in the same dim position, pruning only creates another long stem and propagation creates another plant with the same problem.
- Move the pot to a brighter sustainable position and wait for several compact, well-colored new leaves that confirm the site works.
- Select firm healthy tips with multiple intact leaves, then make a clean cut below useful stem tissue and remove only the lowest leaves that would sit in the medium.
- Lay the cuttings in a dry airy place until the cut surface is dry rather than wet and freshly exposed.
- Insert the stem shallowly into a sterile gritty rooting medium so no fleshy leaves are buried, then hold the cutting steady without compacting the mix.
- Water sparingly and test for rooting with gentle resistance instead of pulling the cutting out repeatedly. Increase normal care only after roots and compact new growth are evident.
Keep the original base when it is firm and healthy because dormant buds may make side shoots after the tip is removed. Discard only tissue that is soft, discolored, or clearly dead, and clean the cutting tool before moving between a rotting plant and healthy material.
Delay cosmetic pruning when the whole plant is dormant, badly dehydrated, or actively rotting. Stabilize the root and stem problem first, because a stressed base cannot support branching and a soft cutting will not become sound by callusing its end.
Recovery Plan
Watch the newest nodes and the crown
Keep the corrected light stable instead of moving the pot daily. Firm tissue and closer spacing on the newest leaves support the etiolation diagnosis, while softening at the crown, spreading translucence, or a sour smell redirects the plant to rot triage.
Hold moisture low while roots begin
A cutting should remain firm in a gritty medium, not sit in saturated soil. Gentle resistance eventually shows that roots have formed, while a dark soft stem at the medium line means the cutting needs to be lifted and recut above the damage.
Build the compact shape from new shoots
Retain the best compact tips and branches, then remove remaining bare stretched sections only when the plant has enough healthy replacement growth. If every new shoot lengthens again, reassess light intensity and duration before feeding or watering more.
Judge an upright clump after prevention has had time to work
A divided clump needs a full active season to show its renewed outline. A suitable upright stonecrop pinched in late spring should flower later on shorter branched stems, while repeated soft collapse points back to site fertility, moisture, shade, or an unsuitable cultivar for that position.
Keep indoor and container Sedum where the newest growth can maintain its normal color and leaf spacing. Artificial light can replace missing window light, but fixture output varies, so follow the lamp maker's safe placement and duration guidance and judge the result from new nodes rather than copying one universal distance.
When an indoor plant returns outside, increase direct exposure gradually. Pair the brighter site with a pot that drains freely and a gritty medium, then water thoroughly only after the mix has dried instead of giving repeated shallow sips.
Keep garden stonecrops in open sun and lean, well-drained soil. Avoid routine fertilizer, lawn-feed runoff, and irrigation intended for thirstier neighbors, because lush fast growth is more likely to fall under flowers.
Divide an old hollow upright clump in spring or fall. Where a suitable tall Hylotelephium repeatedly flops, use a late-spring pinch before buds form and accept the tradeoff of later, often smaller and more numerous flower heads.