
Mint Leaves Turning Yellow? Check Soil, Leaf Age, and Spots
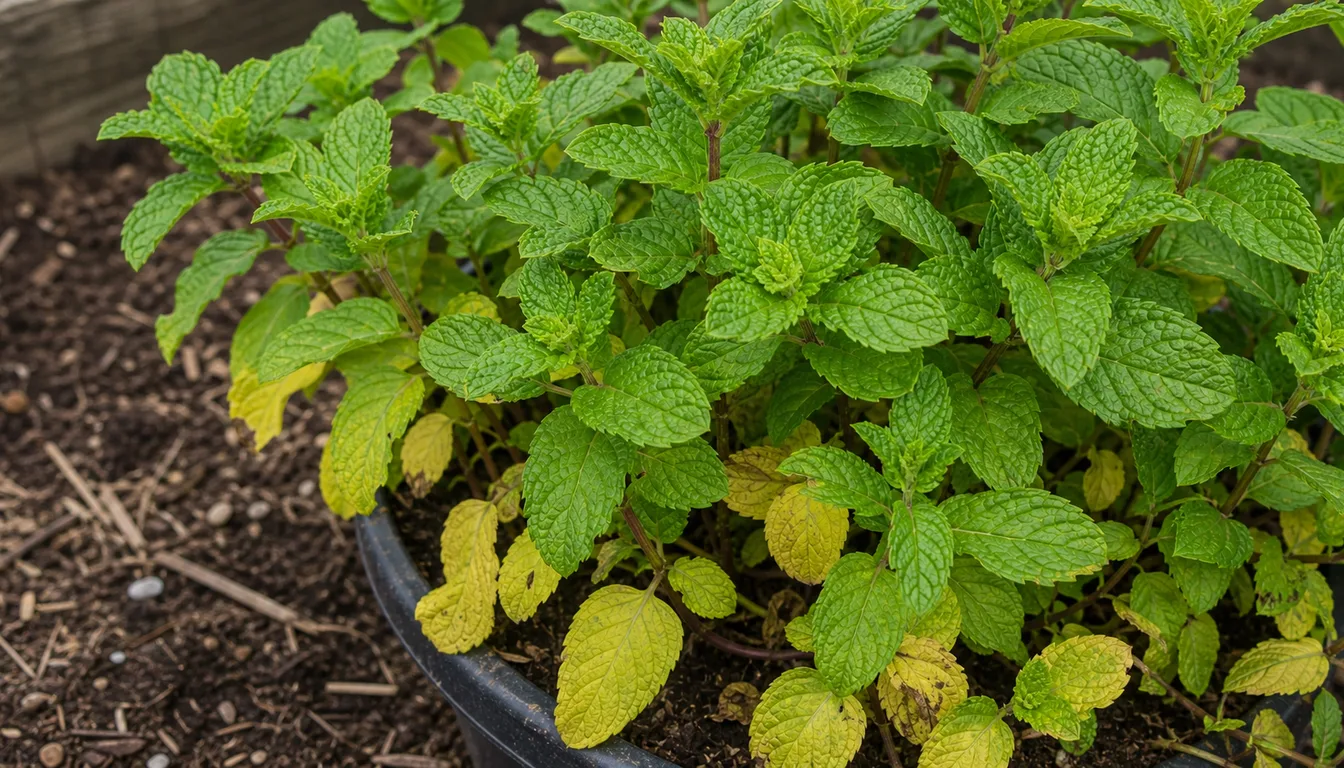
Yellow Mint leaves need three checks before any treatment.
Compare old and new leaves, feel whether damaged tissue is soft or crisp, then turn a leaf over for rust pustules, pest stippling, or webbing.
Quick diagnosis
Leaf texture and soil condition separate the common causes
Soft yellow lower leaves above a heavy wet root ball point toward poor root aeration, while crisp margins and a light pot support drought stress.
If moisture looks normal, use leaf age next, then inspect the undersides for dusty rust pustules, fine stippling, webbing, or insects.
Open the full diagnosisWhat You Are Seeing
Start by marking where the yellowing began. A few old leaves hidden under vigorous green tips can be normal turnover, while yellow new shoots, several collapsing stems, or a widening patch means the plant is losing more foliage than routine aging explains.
Mint in a container supplies evidence that a leaf cannot. Lift the pot, probe moisture through the middle of the root ball, watch where water exits, and check whether rhizomes and roots have displaced most of the mix.
In a bed, map the affected area instead. Uniform stress across a dry edge, one low wet pocket, scattered leaves with surface marks, and a persistent stunted patch each point toward a different mechanism.
Healthy runners appearing outside the intended area are a separate containment problem. This diagnosis concerns foliage that changed from green to yellow, not a vigorous plant that simply spread farther than wanted.
Common Causes
01 Common when new tips stay green
Old shaded leaves or seasonal stems are finishing
Dense Mint keeps pushing fresh tips while its oldest lower and interior leaves receive less light and eventually finish. The pattern stays low in the canopy, develops gradually, and leaves the crown and exposed shoots firm.
Outdoor mint also dies back to ground level after autumn cooling because it is a herbaceous perennial. A whole patch fading late in the season can therefore be normal when the stems are otherwise clean and the rhizomes produce healthy growth again in spring.
How to identify it
- Only the oldest leaves below a vigorous green canopy are yellow.
- The affected leaves stay free of stippling, webbing, sticky residue, and dusty pustules.
- Soil moisture and drainage match the healthy parts of the planting.
- The crown is firm and new tips are normal in size, color, and shape.
- Whole-stem fading follows autumn cooling rather than a summer watering or feeding event.
What to do
- Remove fully yellow lower leaves that lift away easily, but leave useful green tissue in place.
- Thin or harvest a dense summer canopy so air and light reach the lower stems without stripping the plant bare.
- Cut flowered stems back to about 2 inches when harvest quality declines and fresh regrowth is wanted.
- Let outdoor stems die back naturally in autumn, then clear old faded growth before spring shoots emerge.
- Restart the diagnosis when yellowing reaches exposed new tips, appears out of season, or comes with wilt, spots, or root odor.
02 High likelihood
The root zone stays saturated and short of air
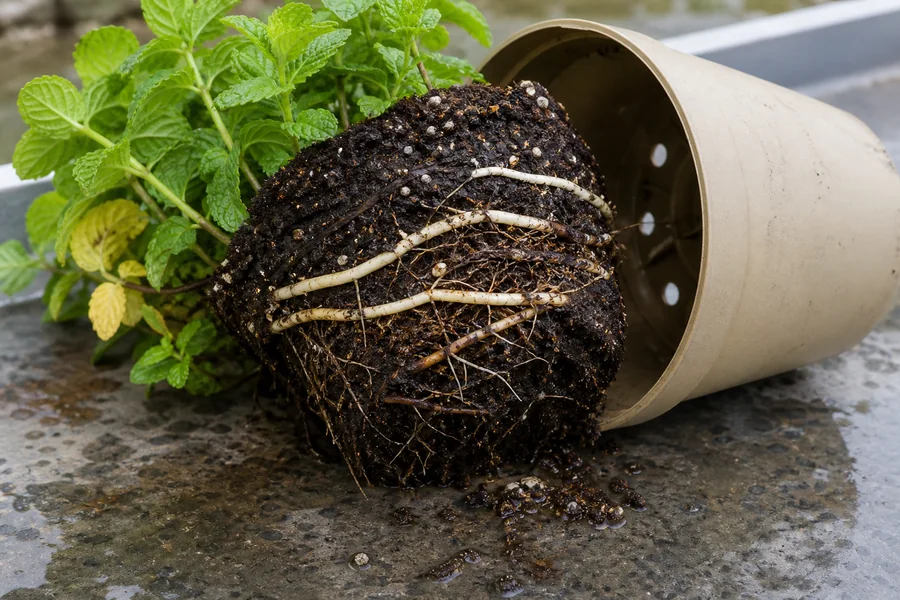
Mint prefers steady moisture, but roots still need oxygen. Mix that stays saturated can leave several lower leaves soft, limp, and yellow while the pot remains heavy and the newest shoots begin to slow.
Wet soil alone does not prove decay. Standing water, blocked holes, sour-smelling mix, dark soft roots, or stems that loosen at the crown provide the evidence that separates a root-zone failure from a plant that was watered recently.
Compare several stems at the soil line.
Firm green-white crowns attached to pale rhizomes can recover after drainage improves, while blackened crowns that pull apart are already lost. In a bed, check whether the affected patch follows a low spot, downspout, or dense compacted area before changing irrigation across the entire planting.
How to identify it
- Yellow lower leaves feel soft or limp rather than dry and papery.
- The container stays heavy and the middle of the root ball remains wet for days.
- Water sits in a saucer or outer pot, or usable drainage holes are blocked.
- Potting mix smells sour and some roots are dark and soft instead of firm and pale.
- Several stems wilt in wet soil and the crown may begin to lose firmness.
What to do
- Stop watering until the upper mix begins to dry and the container loses some weight.
- Empty standing water and clear every drainage opening before the next irrigation.
- Use an overwatered-plant root inspection when wetness persists or odor and soft roots appear.
- Remove only clearly decayed roots, keep firm rhizomes, and replace collapsed mix with a fresh airy container mix.
- Take healthy tip cuttings before a badly softened crown declines further, then discard decayed material away from edible beds.
03 High likelihood in hot weather
The root ball dried out or water bypassed its center
Mint in a container can use water quickly during warm active growth. Leaves lose firmness, then yellow from the margins or tips when the root ball becomes very light and dry.
Old potting mix may also shrink from the wall so a quick watering runs down one side and out the bottom. A wet surface and immediate runoff can hide a dry center, which is why pot weight and a probe through the middle matter more than the top inch alone.
Test again after watering.
A center that remains dry while the edge is wet confirms bypass, so rewet the root ball slowly in stages and let it drain. If the entire root ball is moist and heavy, recurring wilt points away from thirst and toward damaged roots, heat, or vascular disease.
How to identify it
- Leaf margins turn pale yellow, then tan or crisp, and whole leaves may fold or droop.
- The pot feels unusually light and mix is dry through the center.
- A gap has opened between the mix and the container wall.
- Water exits immediately along one side instead of soaking the root ball evenly.
- The change followed hot weather, a missed watering, or a pot placed in reflected heat.
What to do
- Apply water slowly across the entire surface until the center is evenly moist and excess drains below.
- Briefly soak a shrunken nursery pot in shallow water when dry mix refuses to absorb from above, then drain it completely.
- Move a small container out of harsh reflected afternoon heat while preserving enough light for compact growth.
- Check pot weight during the next few hot days and water before the whole root ball becomes extremely light.
- Investigate rhizome crowding when the pot dries much faster than it did earlier in the season.
04 Common in an older container
Rhizomes and roots have displaced most of the potting mix
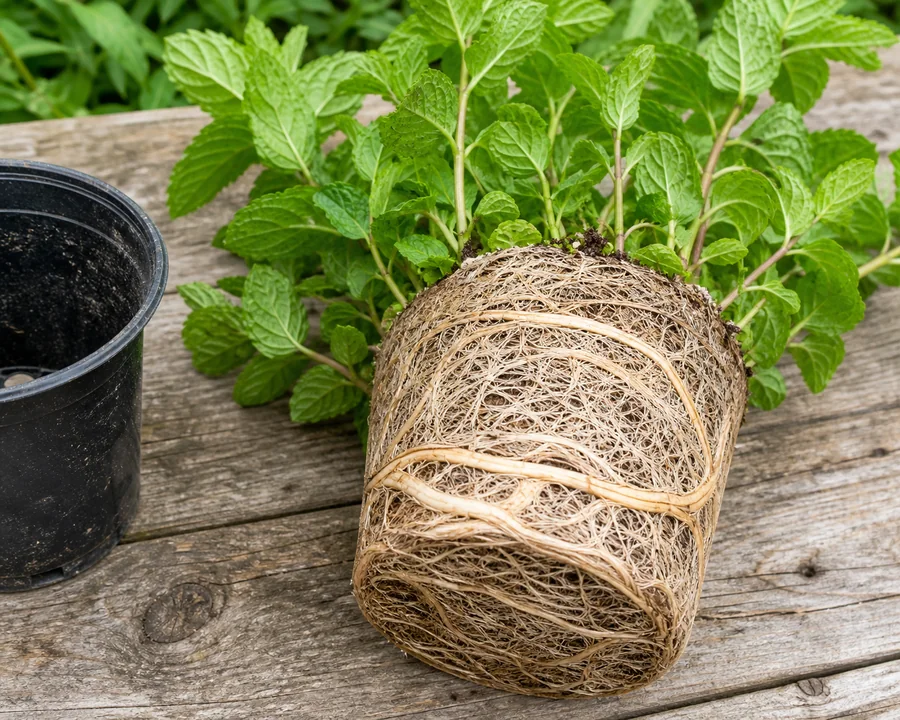
Mint spreads through underground stems called rhizomes, so an established container can become a solid network with little mix left to hold water or nutrients. The plant may wilt soon after watering, produce smaller shoots, and yellow repeatedly even though drainage is open.
Crowding is confirmed by the root ball, not by the plant's age alone. Water that races through, roots pressing from the holes, a distorted pot, and dense rhizomes around a dead center all support division or repotting.
How to identify it
- Water moves through the pot almost immediately and the plant wilts again soon afterward.
- Firm roots or rhizomes fill the container and leave little visible potting mix.
- Roots emerge from drainage holes or pressure has distorted the container.
- New stems are thinner and shorter even after the root ball is watered evenly.
- The center of an old clump is woody or dead while growth crowds the rim.
What to do
- Lift the root ball and confirm that firm crowded rhizomes, rather than dark soft decay, fill the pot.
- Divide the clump into several healthy sections and discard the old dead center.
- Replant one vigorous section in fresh mix at its previous depth and give the other sections separate containers if wanted.
- Use a container with working drainage and enough room for a growing season rather than an oversized reservoir of wet mix.
- Water the newly divided plant evenly while its roots reestablish, then resume harvesting after firm new shoots appear.
05 Medium likelihood after moisture checks
Nutrients are depleted or unavailable to the roots
Fast harvest and repeated watering can remove nutrients from container mix. A nitrogen shortage usually makes older lower leaves uniformly pale green to yellow while the newest shoots stay greener but become smaller and weaker.
Yellowing between green veins on the youngest leaves points away from simple nitrogen shortage and toward nutrient availability, root damage, or unsuitable pH. Fertilizer cannot correct uptake while roots are saturated, decayed, extremely dry, or salt-injured.
Review harvest and feeding history before adding nutrients.
A vigorously harvested container in old mix with healthy roots has a different case from an unharvested plant that yellowed immediately after feeding. Correct moisture and salt problems first, then use a modest label-directed feeding only during active growth and judge the next shoots rather than the old leaves.
How to identify it
- Older leaves fade evenly while moisture, roots, and drainage look healthy.
- New shoots remain greener but are smaller, thinner, or slower than earlier growth.
- The mint has been harvested repeatedly or watered heavily in the same container mix for months.
- Young leaves show yellow tissue between greener veins when availability rather than nitrogen alone may be involved.
- There is no salt crust, recent fertilizer spill, rust powder, stippling, or persistent wilt patch.
What to do
- Correct root moisture and drainage before adding nutrients.
- Use a complete fertilizer labeled for edible container herbs at the label rate during active growth when old-leaf pallor and weak shoots fit a shortage.
- Refresh depleted container mix or divide a crowded clump when water and nutrients no longer move evenly through the root ball.
- Use a soil or potting-mix test before trying separate micronutrient products for young interveinal yellowing.
- Judge the response from stronger green new shoots because old yellow tissue may not recover its color.
06 Event-linked
A strong feeding or soluble salts injured the roots
Fertilizer salts and mineral-heavy irrigation water accumulate as water leaves a container. A high concentration can injure fine roots, causing yellow margins, brown tips, wilt, or sudden decline even though the pot contains plenty of nutrients.
Timing and residue separate this cause from deficiency. Damage that begins after a concentrated dose, fertilizer applied to a dry root ball, or repeated small waterings with no runoff carries more weight than leaf color by itself.
How to identify it
- Yellow-to-brown margins appeared soon after a strong fertilizer application.
- A white or tan crust coats the soil surface, pot rim, saucer, or drainage holes.
- Several stems changed together after feeding while new rust or pest evidence is absent.
- The container drains, but normal watering rarely sends any water through the bottom.
- Roots near concentrated granules or the pot edge are brown while other roots remain firm.
What to do
- Stop feeding and remove any visible fertilizer granules from the surface.
- Flush a freely draining pot with lower-mineral water, then let all excess water escape.
- Do not flush saturated or poorly drained mix because extra water would worsen root oxygen loss.
- Replace heavily crusted mix when flushing cannot move water through the root ball evenly.
- Resume light label-rate feeding only after healthy new growth returns.
07 Medium likelihood when pustules are present
Mint rust is producing dusty pustules and distorted shoots
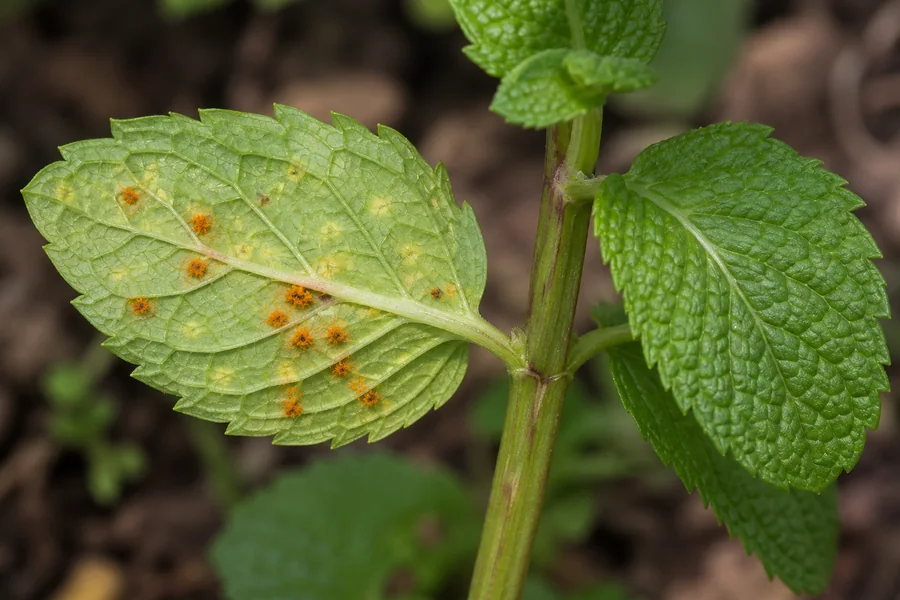
Mint rust is caused by Puccinia menthae and changes the leaf surface before it causes broad yellowing and leaf loss. Pale or distorted shoots may appear first, followed by dusty orange pustules that can progress through yellow, brown, and black spore stages.
Turn over several marked leaves because the raised powder often sits beneath discolored spots seen from above. A wipe that picks up orange-brown dust supports rust, while fixed pale speckles with fine silk point toward mites.
Bag visibly infected stems before carrying them through the garden so spores are not brushed onto clean mint.
Do not compost heavily rusted material unless the compost process reliably reaches disease-killing temperatures. Clean tools and hands before handling an unaffected container, and replace severely infected stock with clean material when repeated removal cannot stop new pustules.
How to identify it
- Dusty raised orange, yellow, brown, or black pustules appear on leaf undersides or stems.
- Discolored spots on the upper surface correspond to pustules below.
- Young shoots may be pale, thickened, twisted, or otherwise distorted.
- Leaves yellow in patches, die, and drop as the disease advances.
- The marking is powdery and raised rather than fine flat stippling.
What to do
- Stop harvesting affected foliage for food and separate potted mint from other mints.
- Remove an infected container plant promptly when pustules occur on many stems because contaminated rhizomes can carry the problem.
- Bag diseased leaves, stems, and rhizomes instead of composting or moving them to another bed.
- Clean tools and hands before handling healthy mint.
- Start again with clean planting material and fresh mix rather than relying on a home fungicide cure for culinary mint.
08 Low likelihood to medium in favorable weather
Spider mites or aphids are removing sap from the foliage
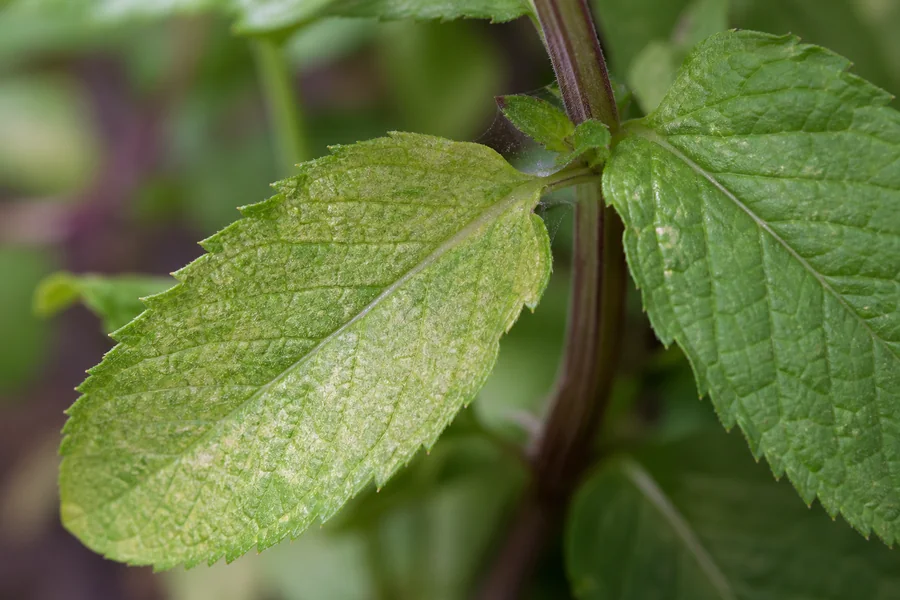
Spider mites empty individual leaf cells, leaving many tiny pale marks that merge into a yellow or bronze cast. Fine webbing, eggs, shed skins, and moving specks on white paper confirm mites, especially during hot dry weather.
Aphids create a different pattern on tender mint tips. Visible colonies, curled or puckered new leaves, sticky honeydew, and ants support aphids rather than mites or a root-zone problem.
Because mint is harvested for food, use only a treatment whose label includes the pest, the crop or edible herbs, and the intended site.
Follow its preharvest interval. Removing badly infested tips and rinsing accessible pests may reduce a small population, but inspect the next growth because eggs and hidden colonies can survive one pass.
How to identify it
- Fine yellow or white stippling covers the leaf instead of one even fade.
- Delicate webbing, mites, eggs, or shed skins appear along the underside or between leaves.
- A tap over white paper dislodges tiny moving specks when mites are present.
- Aphids cluster on young stems and curled tips and leave sticky honeydew.
- Hot dry conditions coincide with mite damage, while root moisture alone does not explain the surface pattern.
What to do
- Rinse confirmed mites or aphids from both sides of sturdy foliage and prune only badly damaged tips.
- Repeat inspections because one rinse may miss eggs or sheltered insects.
- Use insecticidal soap, horticultural oil, or another product only when its label permits the pest, the plant, and edible herbs.
- Follow the label's harvest interval and avoid applying oils during high heat or to drought-stressed leaves.
- Reduce water stress and check nearby host plants without spraying foliage that lacks pest evidence.
09 Rare in home plantings
Verticillium wilt is weakening a persistent patch
Verticillium wilt is a soilborne disease of susceptible mints, especially some peppermint and spearmint types. Upper leaves can twist, curl, and bunch while plants become stunted and yellow-to-bronze, then lower leaves and entire stems die.
One yellow leaf cannot diagnose this disease. Concern rises when the same bed patch declines over time despite correct moisture, several stems share the distinctive upper-growth pattern, and ordinary root or leaf-surface checks find no better explanation.
Outline the patch and compare it after new growth begins.
A persistent sector that enlarges independently of wet and dry zones is more concerning than scattered old leaves. Submit whole symptomatic stems with roots and nearby soil for diagnosis before moving rhizomes, because apparently green runners can carry the problem into a clean bed.
How to identify it
- Upper leaves twist, curl, or bunch while the whole plant becomes stunted.
- Foliage develops a yellow, red, or bronze cast and lower leaves die first.
- Several stems in one persistent patch wilt and die despite suitable soil moisture.
- A neighboring mint planted from the same rhizome stock begins showing a similar pattern.
- A diagnostic service finds vascular discoloration or confirms the soilborne pathogen.
What to do
- Do not move rhizomes, soil, or divisions from the affected patch to a clean bed.
- Remove severely declining plants with the surrounding root material and dispose of them away from compost.
- Clean soil from tools and footwear before working around healthy mint.
- Ask a local plant diagnostic service to confirm persistent patch decline before making a long-term rotation decision.
- Replant only with clean material in an unaffected container or site because the pathogen can persist in soil for years.
Old yellow tissue is evidence, not the recovery test
A leaf that has lost most of its chlorophyll usually will not return to useful green. Keep partly green, clean leaves while they still support the plant, then remove them after the cause is corrected or when disease makes disposal necessary.
Leaf age explains why nutrient patterns matter. A mobile nutrient such as nitrogen is moved toward new growth, so an actual shortage tends to appear first as uniform pallor on older leaves rather than rusty powder, mite stippling, or a suddenly soft crown.
Mint can replace damaged foliage quickly because living crowns and rhizomes make new shoots. That vigor also hides root trouble for a time, so fresh green growth and a normal wet-to-moist cycle are stronger recovery signs than one remaining healthy stem.
Use the pattern to choose the next observation.
Uniform lower yellowing after repeated harvest points toward nutrition only after roots prove healthy. Soft stems over wet soil call for drainage.
Dry folding foliage above a light pot calls for a moisture check. Dusty pustules, stippling, honeydew, or a persistent stunted patch each require their own evidence before treatment.
Disease recovery uses a different test.
No new pustules, no spreading pest marks, and no additional stems collapsing in a wilt patch matter more than the color of leaves that were already damaged. Keep diseased or pesticide-treated foliage out of the kitchen, and follow all label harvest restrictions before using new growth.
Match the Yellow Pattern to Its Location
Start at the scale of the change. Yellowing across one container, a weak patch that persists in a bed, and marks that resolve into pustules or stippling on individual leaves require different first inspections.
Use location before treatment. Open the root-zone diagnosis for a whole pot, map the soil patch over time for repeated bed decline, and inspect both leaf surfaces under bright light when the pattern sits on the blade.
- Most of One Container
- Check center moisture, drainage, root texture, crowding, residue, and how quickly water moves through the pot.
- A Persistent Bed Patch
- Map the affected stems, avoid moving soil, and inspect roots and cut stems before considering a soilborne wilt.
- Marks on the Leaf Surface
- Use raised rust pustules, fine stippling, webbing, clustered aphids, or shed skins to identify a leaf-level problem.
Recovery Plan
Record the pattern before changing care
Mark which leaves changed first, compare texture, probe the root ball or affected bed, and inspect both leaf surfaces. Make the one correction supported by the strongest evidence instead of combining water, fertilizer, and pesticide.
Check whether the root zone behaves normally
A corrected container should drain evenly, lose weight gradually, and remain moist without staying saturated. Reopen the root diagnosis when water still bypasses the center, the pot stays heavy, or stems wilt while the mix is wet.
Judge the next shoots
Look for firm green tips of normal size and no new stippling, honeydew, or rust pustules. Old yellow leaves may continue to decline even when the chosen correction is working.
Replace conditions that keep causing decline
Divide a crowded pot, refresh depleted mix, revise drainage, or restart diseased mint with clean material in a clean site. Persistent twisted and stunted bed patches need diagnostic help before more mint is planted there.
For container Mint, use a pot with open drainage, wet the whole root ball, and water again from moisture at depth and pot weight.
Divide rhizome-packed plants every few years so the container retains enough mix to hold water and nutrients evenly.
Feed active container growth with a complete product labeled for edible herbs, using its rate rather than leaf color as the dose.
Let some water drain through when appropriate, keep runoff out of the outer pot, and stop feeding when the root zone is stressed.
In beds, water the soil rather than the foliage and thin or harvest dense stems so leaves dry promptly.
Inspect leaf undersides during the season, dispose of rusted material away from the garden, and never move divisions from a persistent wilt patch into clean soil.
Sources
- How to Grow Mint, Royal Horticultural Society
- Fertilizing and Watering Container Plants, University of Minnesota Extension
- Mint Rust, Royal Horticultural Society
- Peppermint and Spearmint Rust, Pacific Northwest Pest Management Handbooks
- Peppermint Verticillium Wilt, Pacific Northwest Pest Management Handbooks
- Spider Mites, Virginia Cooperative Extension
- Identifying Nitrogen Deficiency, Iowa State University Extension