
Garlic Rotting in the Ground or in Storage? Tell Them Apart
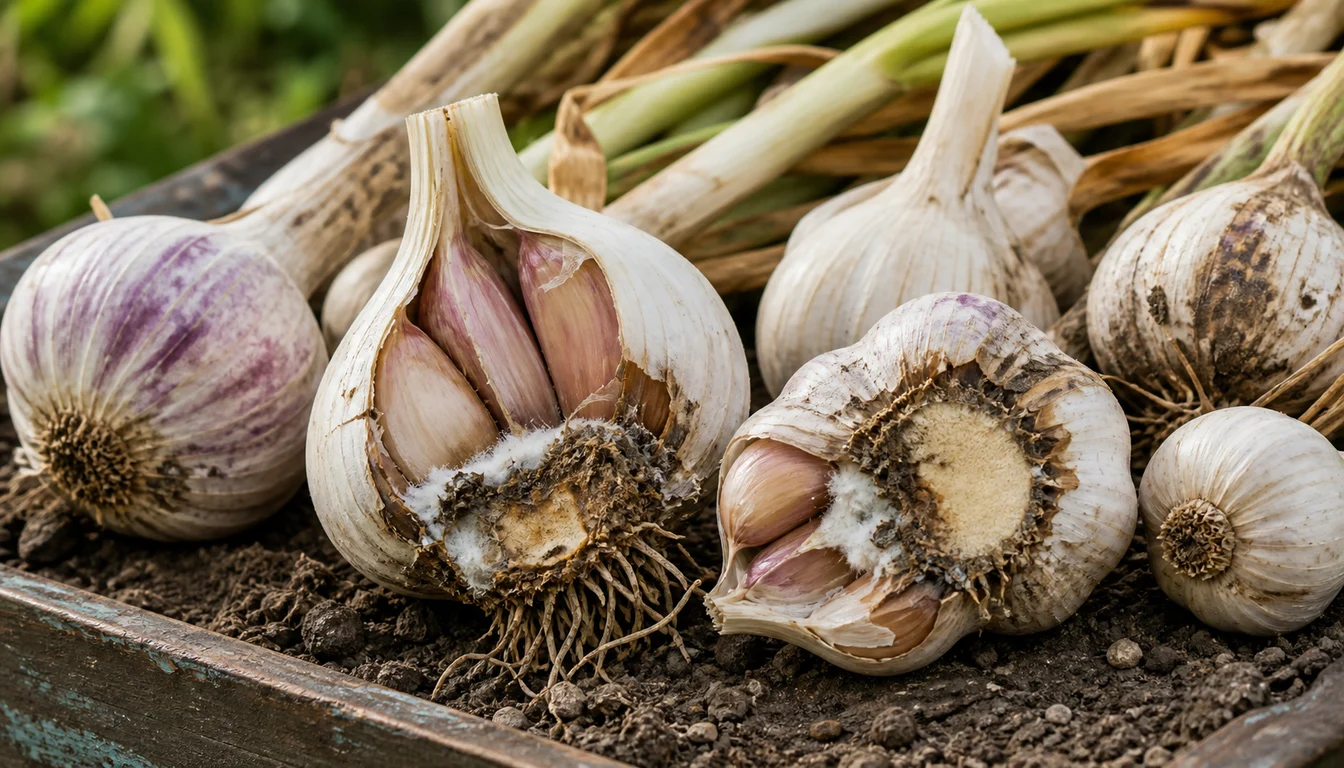
Garlic rot is easiest to identify by finding where the damage began. Dry brown decay moving up from the basal plate suggests Fusarium, soft damage moving down from the neck suggests Botrytis or bacteria, powder at a wound points to storage mold, and an amber translucent clove inside clean wrappers can be waxy breakdown rather than an infection.
Quick diagnosis
Cut one bulb from neck to basal plate before changing the bed
Pull a whole plant with soil attached when the crop is still growing, or open one newly affected bulb when the loss began in storage.
Rot that starts at the base narrows the cause to white rot, Fusarium, southern blight, or pest injury. Top-down damage belongs to neck rot or bacteria, while blue-green or black powder at a bruise belongs to storage mold.
A clean-skinned clove that is amber, translucent, and sticky fits heat-related waxy breakdown instead.
Open the full diagnosisWhat You Are Seeing
Yellow leaves do not diagnose Garlic rot because normal maturity, drought, root injury, and several diseases all yellow the tops. The bulb supplies better evidence when the basal plate, neck, roots, outer scales, and one cut clove remain together for inspection.
Begin with direction. Base-up decay points toward soilborne or seedborne problems, neck-down decay points toward late-season or storage infection, and a powdery patch centered on torn skin points toward a wound after harvest.
Texture and fungal structures make the next split. Dry pitted brown tissue differs from wet mush, white cottony growth with black poppy-seed bodies differs from gray felt at the neck, and an amber waxy clove without mold differs from every contagious rot on this page.
Keep one early-stage sample cool and separate if the bed may be contaminated. A county extension office or plant diagnostic laboratory can distinguish overlapping fungi, bacteria, and nematodes before a home gardener retires a bed or moves suspect soil.
Common Causes
01 High likelihood after harvest
Blue or black storage mold
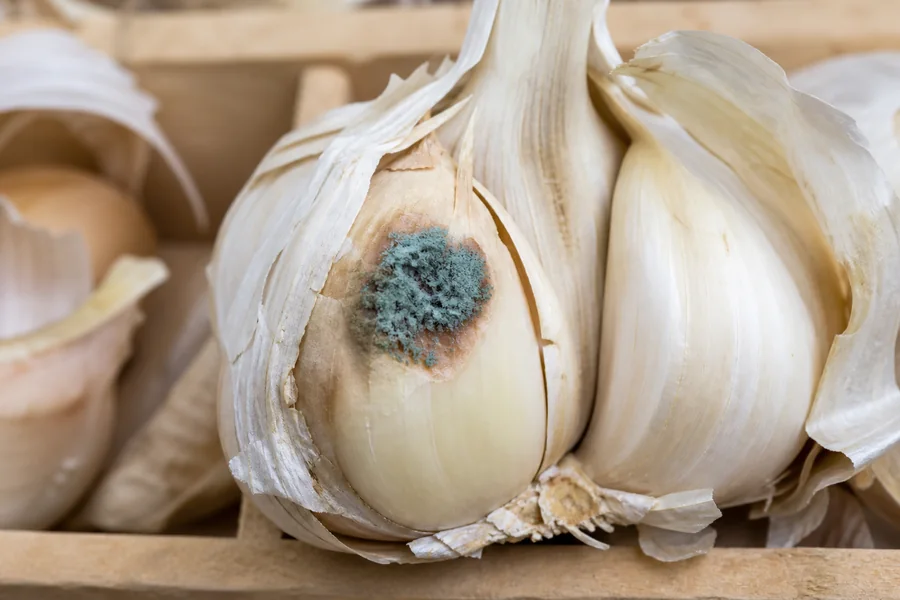
Penicillium blue mold and Aspergillus black mold enter through bruises, cuts, insect damage, or neck tissue that never dried fully. The powder color appears after a water-soaked or discolored spot has already formed, so a closed bulb can look sound while decay develops between its scales.
This pattern usually indicts handling and storage before it indicts the garden bed. Moderate warmth, high humidity, deep piles, and condensation give injured cloves time to mold.
Open several bulbs from different parts of the stored lot.
Mold repeatedly centered on scraped wrappers or bruised cloves, while basal plates and roots remain sound, supports a postharvest route. Mold that appears across many uninjured cloves or follows field yellowing deserves a seed-lot and field diagnosis rather than a storage adjustment alone.
How to identify it
- Blue-green, green-gray, or black powder sits on a wound, beneath a torn wrapper, or between cloves.
- A cut clove beneath blue mold is tan or gray and may feel soft or spongy.
- The basal plate can remain firm while one bruised side or an uncured neck fails.
- Losses begin during curing or storage, especially in a damp container or a pile with little airflow.
What to do
- Remove the affected bulb and inspect every bulb that touched it because powder can hide between scales.
- Discard moldy or softened cloves rather than trimming the visible patch or saving them for seed.
- Move sound dry bulbs into shallow trays, mesh bags, or loose bundles where air reaches every neck.
- Lower storage humidity and avoid temperature swings that put condensation on the wrappers.
- Handle the remaining crop gently because every fresh bruise creates another entry point.
02 High likelihood
Fusarium basal rot
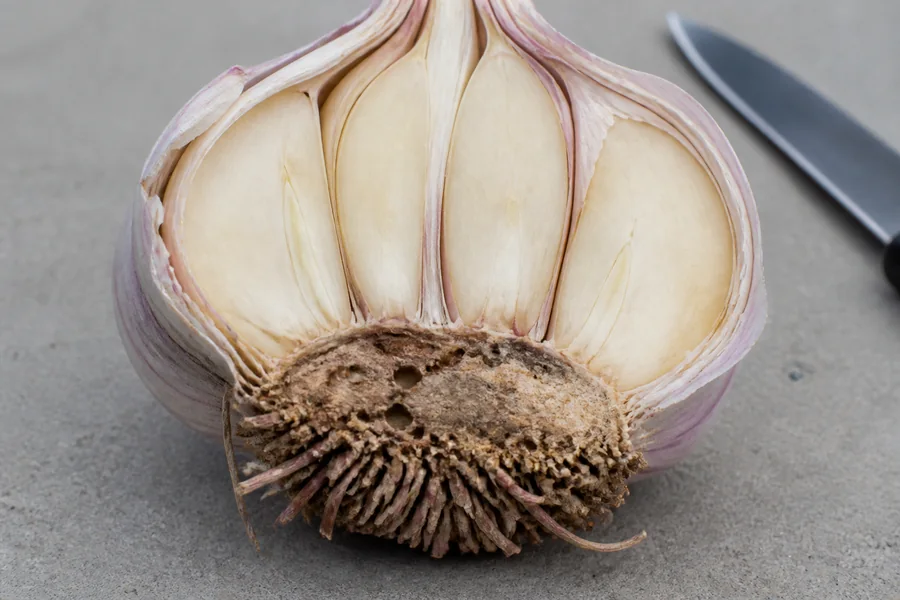
Fusarium usually begins in the stem plate at the bottom of a Garlic bulb and moves upward. An early vertical cut shows brown basal tissue that becomes dry, pitted, and cracked, while roots may turn dark brown or dark pink.
Warm soil speeds disease, but symptoms can stay hidden until curing or storage. Seed cloves can carry Fusarium without obvious damage, which makes a firm-looking clove an imperfect guarantee of clean planting stock.
Compare the basal plate with the neck before advanced organisms blur the picture.
A firm neck above a dry, discolored plate and sparse dark roots supports Fusarium more than storage mold. Once the whole bulb is soft and colonized, a photograph cannot reliably reveal which organism entered first.
How to identify it
- Brown discoloration begins in the basal plate rather than in the neck.
- The damaged plate becomes dry, pitted, or corky instead of remaining uniformly wet.
- Roots are sparse and dark brown to pink, while foliage yellows from the tips and dies back.
- White growth may appear at the base, but black spherical sclerotia are absent.
- A bulb that seemed acceptable at harvest develops dry rot during storage.
What to do
- Cull every bulb with basal discoloration before it enters the curing or seed pile.
- Do not plant cloves from a lot with widespread basal rot, even when selected cloves look firm.
- Ask a diagnostic laboratory to examine an early lesion when bacteria or white rot could be involved.
- Plant future Garlic in soil that drains freely and use clean stock from a program that tests seed garlic.
- Keep stored bulbs cool and dry because Fusarium can continue through susceptible tissue after harvest.
03 Medium likelihood
Botrytis neck and bulb rot
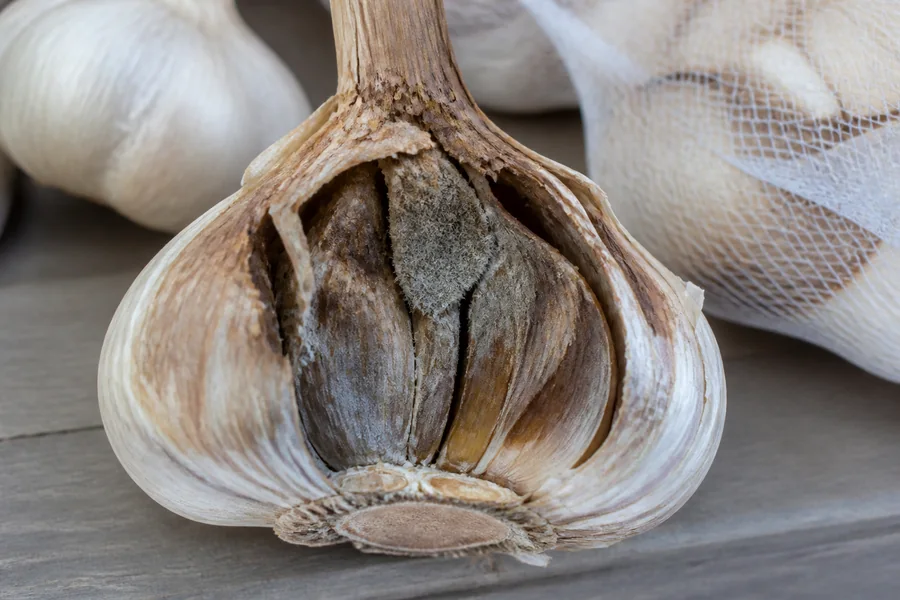
Botrytis enters mature or wounded tissue near the neck and may remain unnoticed until late in the season or after the bulb enters storage. The upper scales first become sunken, soft, water-soaked, and brown, then the tissue dries and turns necrotic.
Gray feltlike growth between scales supports a Botrytis diagnosis. Dark sclerotia may also form at the neck or cling to rotten outer scales, which separates this top-down disease from Fusarium at the basal plate.
How to identify it
- Damage begins at the neck and extends toward the basal plate.
- Upper scales soften and turn water-soaked before becoming dry and brown.
- Gray feltlike mold develops between scales when storage air stays humid.
- Dark sclerotia occur in the neck or on outer scales rather than inside a white mat at the bulb base.
- The crop had dead outer leaves, wet harvest weather, late nitrogen, or necks that entered storage before curing.
What to do
- Remove affected bulbs because treatment cannot reverse invaded scales.
- Keep only mature bulbs whose necks and wrappers have dried fully before storage.
- Stop late irrigation early enough for foliage and neck tissue to dry as harvest approaches.
- Avoid late nitrogen that keeps neck tissue lush when it should be maturing.
- Store cured bulbs cool and dry with steady airflow and little temperature fluctuation.
04 Medium likelihood
Bacterial bulb rot
Several bacteria can rot Garlic, and a home inspection cannot reliably name which one. The useful pattern is soft water-soaked yellow-to-brown tissue that often moves from the neck downward or follows a wound, with no gray mold, powdery spores, or sclerotia to explain it.
A sour or foul odor supports advanced bacterial breakdown but is not required. Warm wet conditions, overhead irrigation late in the season, excessive nitrogen, injury, and slow neck curing all increase risk.
Separate an early wet lesion from bulbs that have already collapsed.
Bacteria commonly invade tissue opened by bruising, insects, nematodes, or fungal rot, so a foul late-stage bulb may show the final decomposer rather than the first cause. Field notes, intact roots, and the clean-to-diseased boundary give a laboratory a better chance of finding the initiating problem.
How to identify it
- The neck yields when pressed and one or more internal scales are wet, soft, or mushy.
- Yellow-to-brown decay progresses from the neck toward the base or follows a visible wound.
- Some scales can remain firm while a neighboring ring or clove has broken down.
- No fungal mat, gray felt, or colored powder is present at the early edge of damage.
- The first losses follow heat, saturated soil, splashing water, bruising, or poor curing.
What to do
- Bag and discard soft bulbs as soon as they are found, then clean the surface used for sorting.
- Do not taste, cook, store, or plant cloves from a bulb with wet decay or an abnormal odor.
- Dry sound bulbs in a single loose layer with moving air rather than sealing them in a container.
- Water the soil instead of the foliage and reduce irrigation as mature bulbs approach harvest.
- Submit an early sample when the result will change how the bed is managed because late secondary bacteria can hide Fusarium.
05 Medium likelihood but high impact
White rot
White rot begins around the roots and basal plate in cool moist soil. Affected plants yellow, wilt, lose roots, and pull from the ground easily as semi-watery decay moves into the scales.
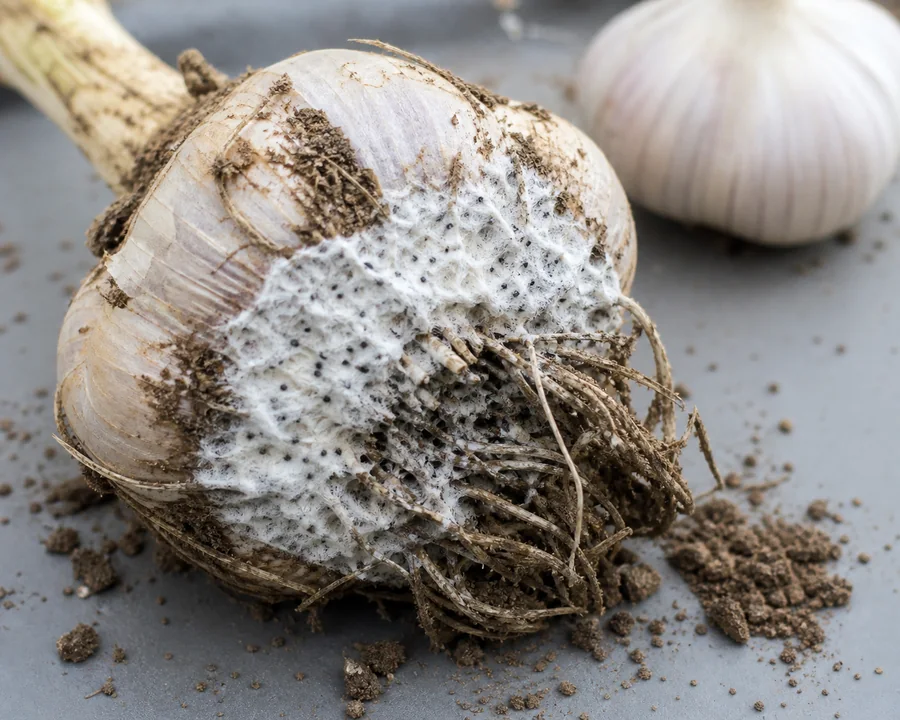
The decisive evidence is a white cottony mat containing many small round black sclerotia about the size of poppy seeds. Those resting bodies can survive in soil for more than 20 years, so an ordinary short crop rotation does not clean an infested bed.
Map every affected plant before removing soil.
A cluster that expands along a row or recurs where alliums previously failed strengthens the field diagnosis. Do not shake suspect soil into another bed, compost the bulbs, or save apparently firm cloves from that patch for planting while confirmation is pending.
How to identify it
- White fluffy growth wraps the basal plate, roots, and nearby lower scales.
- Small hard spherical black bodies sit inside the white growth rather than appearing as loose soil crumbs.
- Roots rot away and affected plants lift with little resistance.
- Older leaves yellow and collapse first during cool moist weather.
- Several alliums in a patch fail as the disease spreads through infested soil.
What to do
- Lift the plant with surrounding soil, bag it, and keep that soil out of compost and clean beds.
- Mark the affected area and stop growing garlic, onions, leeks, shallots, or chives there.
- Remove soil from tools, boots, trays, and gloves before they enter another growing area, then clean them.
- Use clean purchased seed cloves in a separate bed rather than saving anything from the affected lot.
- Confirm the diagnosis through extension or a plant laboratory before committing a bed to long-term allium exclusion.
06 Low likelihood
Southern blight mistaken for white rot
Southern blight also produces white growth around a rotting bulb, but it favors warm conditions and makes a fanlike mat across the bulb and soil surface. Its sclerotia are larger and mature from white to tan or reddish brown instead of remaining black.
The distinction changes crop choice because southern blight attacks many vegetables beyond alliums. Rotating a suspect bed from Garlic straight into tomatoes, peppers, beans, peas, cucurbits, or carrots can preserve the problem under a different crop.
Temperature, mat shape, and sclerotium color should agree before assigning the name.
White growth alone is not enough because several fungi can cover a bulb after it dies. Preserve tissue at the advancing edge, some attached soil, and photos of the field pattern for a diagnostic laboratory.
How to identify it
- White mycelium spreads in a fanlike pattern across warm soil and the bulb surface.
- Numerous round sclerotia measure about one to two millimeters and mature tan to reddish brown.
- Outer leaves yellow and wilt while the leaf bases and bulb develop a soft rot.
- Symptoms are strongest during warm weather rather than the cool soil conditions associated with white rot.
What to do
- Remove affected plants and attached soil without carrying debris into clean beds.
- Ask for laboratory confirmation when sclerotia color or size is unclear.
- Choose a poor-host rotation such as a cereal or grass only after the diagnosis is supported.
- Keep the bed surface drier and avoid moving contaminated soil on tools or transplants.
- Do not assume a standard allium-only rotation controls a disease with many vegetable hosts.
07 Low likelihood
Stem and bulb nematodes or bulb mites
Stem and bulb nematodes feed inside garlic tissue, while bulb mites cluster around the roots and basal plate. Both injuries create openings that fungi and bacteria can colonize, so a soft bulb may show secondary rot after the pest caused the first damage.
Nematodes are microscopic and need laboratory confirmation. Bulb mites are visible with magnification as tiny cream bodies that resemble pearls with legs, but their presence on an already rotten bulb does not prove they started the problem.
Inspect a bulb at the early edge of a field patch and compare it with a fully rotten one.
Distorted or swollen tissue, missing roots, and recurring damage from the same seed source raise the pest question. Finding mites only in decomposed stored cloves is weaker evidence because they can arrive after decay has made the tissue suitable.
How to identify it
- A field patch has stunted thin plants with shortened, distorted, or collapsing leaves.
- The neck looks bloated or softened, and a bulb cut across may show brown internal rings.
- Decay continues in storage even at low temperature when nematodes and secondary microbes remain inside tissue.
- Clusters of tiny shiny cream mites collect beneath the root plate or between damaged scales.
- Roots and basal tissue show feeding injury as well as fungal or bacterial decay.
What to do
- Keep the entire plant and bulb for a diagnostic laboratory instead of trying to see nematodes at home.
- Discard infested bulbs and do not use any clove from the lot as planting stock.
- Remove volunteer alliums and decaying crop debris that can shelter pests between crops.
- Use certified clean seed garlic and avoid moving bulbs, soil, or equipment from the affected patch.
- Treat mites as a clue to inspect the original rot rather than proof that a pesticide is the first answer.
08 Low likelihood
Waxy breakdown that is not contagious rot
Waxy breakdown is a physiological injury associated with high heat near harvest and sometimes with poor ventilation or low oxygen after harvest. It commonly appears in stored garlic even though the dry outer skin remains clean and unchanged.
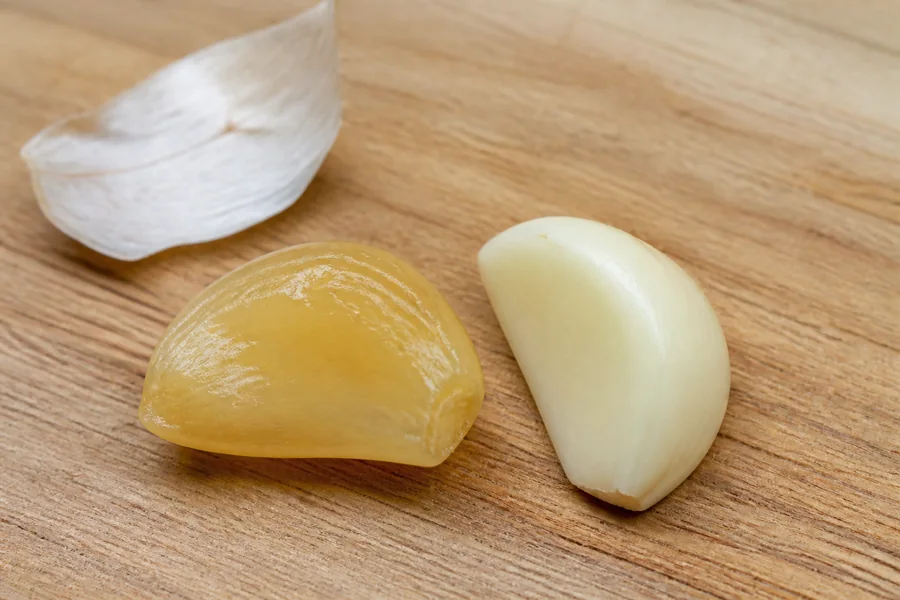
Peeling reveals the distinction. The clove begins with a small light yellow area, then becomes amber, translucent, sticky, and waxy without a fungal mat, colored powder, rotten basal plate, or wet neck moving toward it.
Check several cloves within the same bulb because the injury can be hidden and uneven.
A clean wrapper and firm basal plate do not make the amber clove usable, but they help separate this heat-related disorder from a contagious field rot. Review harvest temperature, time left in direct sun, pile depth, and ventilation before changing the bed plan.
How to identify it
- One or more cloves are deep yellow or amber and partly translucent beneath normal dry wrappers.
- The flesh feels sticky, waxy, or jellylike rather than powdery or foul-smelling.
- No mold, black sclerotia, gray neck growth, or bruised entry point surrounds the affected tissue.
- The crop experienced high heat near harvest, direct sun during curing, or a poorly ventilated storage pile.
- Neighboring bulbs do not develop a spreading surface mold from contact.
What to do
- Discard the affected clove because its quality has broken down and a home inspection can miss a mixed infection.
- Do not save the affected bulb for planting even though the disorder itself is not contagious.
- Cure future bulbs in shade with strong ventilation rather than on a hot dark surface or in direct sun.
- Keep curing layers shallow so heat and moisture can escape from every bulb.
- Inspect stored bulbs periodically because the amber color may become visible only after the disorder advances.
What to discard and what the bed diagnosis changes
Do not taste-test or trim around a soft, moldy, foul-smelling, or unexplained discolored clove. Discard the affected bulb, and keep every suspect bulb out of the seed pile because planting multiplies both hidden infection and soil risk.
Make the first cut lengthwise through the neck, cloves, and basal plate with a clean blade.
Keep the two halves together and photograph them before tissue dries. Record whether decay began at the top, bottom, or a wound, whether it is dry or wet, and whether any powder, mat, or sclerotia sit at the advancing edge.
A storage mold centered on a bruise does not prove the garden soil is infested.
Sort the lot, correct curing and airflow, and inspect sound bulbs while the bed history remains unchanged unless field symptoms or a laboratory result say otherwise. Condensation inside a container, damp necks, and losses scattered through a pile support a curing or storage failure.
Field history changes the stakes.
Plants that yellowed and pulled easily before harvest, a cluster of failures in one bed, or recurring trouble after allium crops points toward soil or planting stock. Mark that location before cultivation so suspect soil is not carried on tools, footwear, or transplants into clean ground.
White rot changes the ground for decades because its black sclerotia persist without an allium crop.
Fusarium also survives in soil and travels in seed, while southern blight has many non-allium hosts, so a confirmed name matters before choosing the next crop. The correct rotation can differ sharply between these diagnoses.
Late wet bacterial tissue can colonize a bulb that first had Fusarium or pest damage.
Preserve an early lesion for diagnosis when the answer will decide whether to quarantine soil, reject a seed lot, or change only storage practice. A laboratory receives more useful evidence from a partly affected bulb with attached roots than from a bag of fully liquefied cloves.
Start With Where the Decay Began
Open one representative bulb and trace the damaged tissue to its starting point. Neck-first, base-first, wound-first, and single-clove problems carry different evidence even when the finished bulb is soft or discolored.
Keep the direction tied to texture and growth. Dry brown tissue at the plate, gray growth between neck scales, colored powder at a torn wrapper, and a clean amber clove should not receive the same bed or storage response.
Decay Starts at the Neck
- Open the upper scales
- Look for sunken tissue or gray growth
- Review curing and storage humidity
Decay Starts at the Basal Plate
- Turn the bulb over and inspect roots
- Compare dry brown tissue with a white fungal mat
- Map affected plants in the bed
Decay Starts at a Wound
- Find a torn wrapper or bruise
- Identify powdery blue-green or black growth
- Review harvest and handling damage
One Clove Changes First
- Open the bulb and compare adjacent cloves
- Check for wet odor mold or an amber waxy texture
- Separate contagious decay from storage breakdown
Recovery Plan
Open, isolate, and sort
Cut one representative bulb from neck to basal plate, photograph both halves with the roots and wrapper still attached, and separate every soft, moldy, waxy, or abnormal bulb.
Clean the blade between samples. Bag soilborne suspects and keep one early-stage sample cool, not frozen, for extension or laboratory diagnosis.
Finish curing only sound bulbs
Keep firm bulbs in a single shallow layer or loose well-ventilated bundles in a shaded dry place until necks, roots, and wrappers are fully dry.
Do not let apparently sound bulbs touch the wet tissue of rejected ones. Check them every few days because hidden Fusarium, Botrytis, or storage mold can become visible after harvest.
Watch the direction of new failures
Remove new losses immediately and note whether each begins at the base, neck, or a wound.
Record the storage location too, because failures concentrated in the center of a deep pile or beside a cool wall suggest trapped humidity or condensation. Repeated damage in one position gives a diagnostic service better evidence than a mixed pile of advanced rot.
Match the site and seed to the diagnosis
Buy clean seed garlic and use a well-drained bed. Keep alliums out of confirmed white-rot soil, choose rotation crops carefully after southern blight, and do not return suspect stored cloves to any garden.
Harvest Garlic while several lower leaves have browned but protective upper leaves still remain, then lift bulbs without cutting or bruising them. Move them out of sun and rain, leave space around each bulb, and cure until roots, necks, and wrappers are dry rather than trusting a fixed number of days.
Store only firm unwashed bulbs in mesh bags, shallow trays, or loose bundles under cool dry conditions with steady airflow. Avoid late nitrogen and late overhead irrigation, remove culls from storage promptly, clean soil from tools before moving between beds, and begin every planting with clean seed cloves.
Sources
- White Rot, UC Statewide IPM Program
- Fusarium Basal Rot of Onion and Garlic, UC Statewide IPM Program
- Botrytis Neck and Bulb Rot, UC Statewide IPM Program
- Blue Mold Rot on Garlic and Onions, UC Statewide IPM Program
- Nematodes in Onion and Garlic, UC Statewide IPM Program
- Southern Blight of Onion and Garlic, UC Statewide IPM Program
- Garlic Postharvest Fact Sheet, UC Davis Postharvest Research and Extension Center
- How to Grow Garlic in Your Garden, Utah State University Extension
- Bulb Mites, Utah State University Extension